 Manual de la plataforma
Manual de la
plataforma Tecspal
Guía paso a paso para el Admin del cliente: pedir equipos, gestionarlos y pedir soporte.
Borrador · versión piloto- 01Primeros pasos
- 02Órdenes
- 03Equipos
- 04Empleados
- 05Movimientos
- 06Soporte técnico
- 07Equipos en storage y oficinas
- 08Buyback
- 09Usuarios
- 10Configuración de la empresa
- 11Glosario de estados
 Manual para el Admin del cliente · tecspal.com
Primeros pasos
Cómo entrar a la plataforma y dónde encontrar cada cosa.
- 1.1Entrar a la plataforma
- 1.2El menú lateral
- 1.3Tu perfil y Preferencias
- 1.4Cambiar el idioma
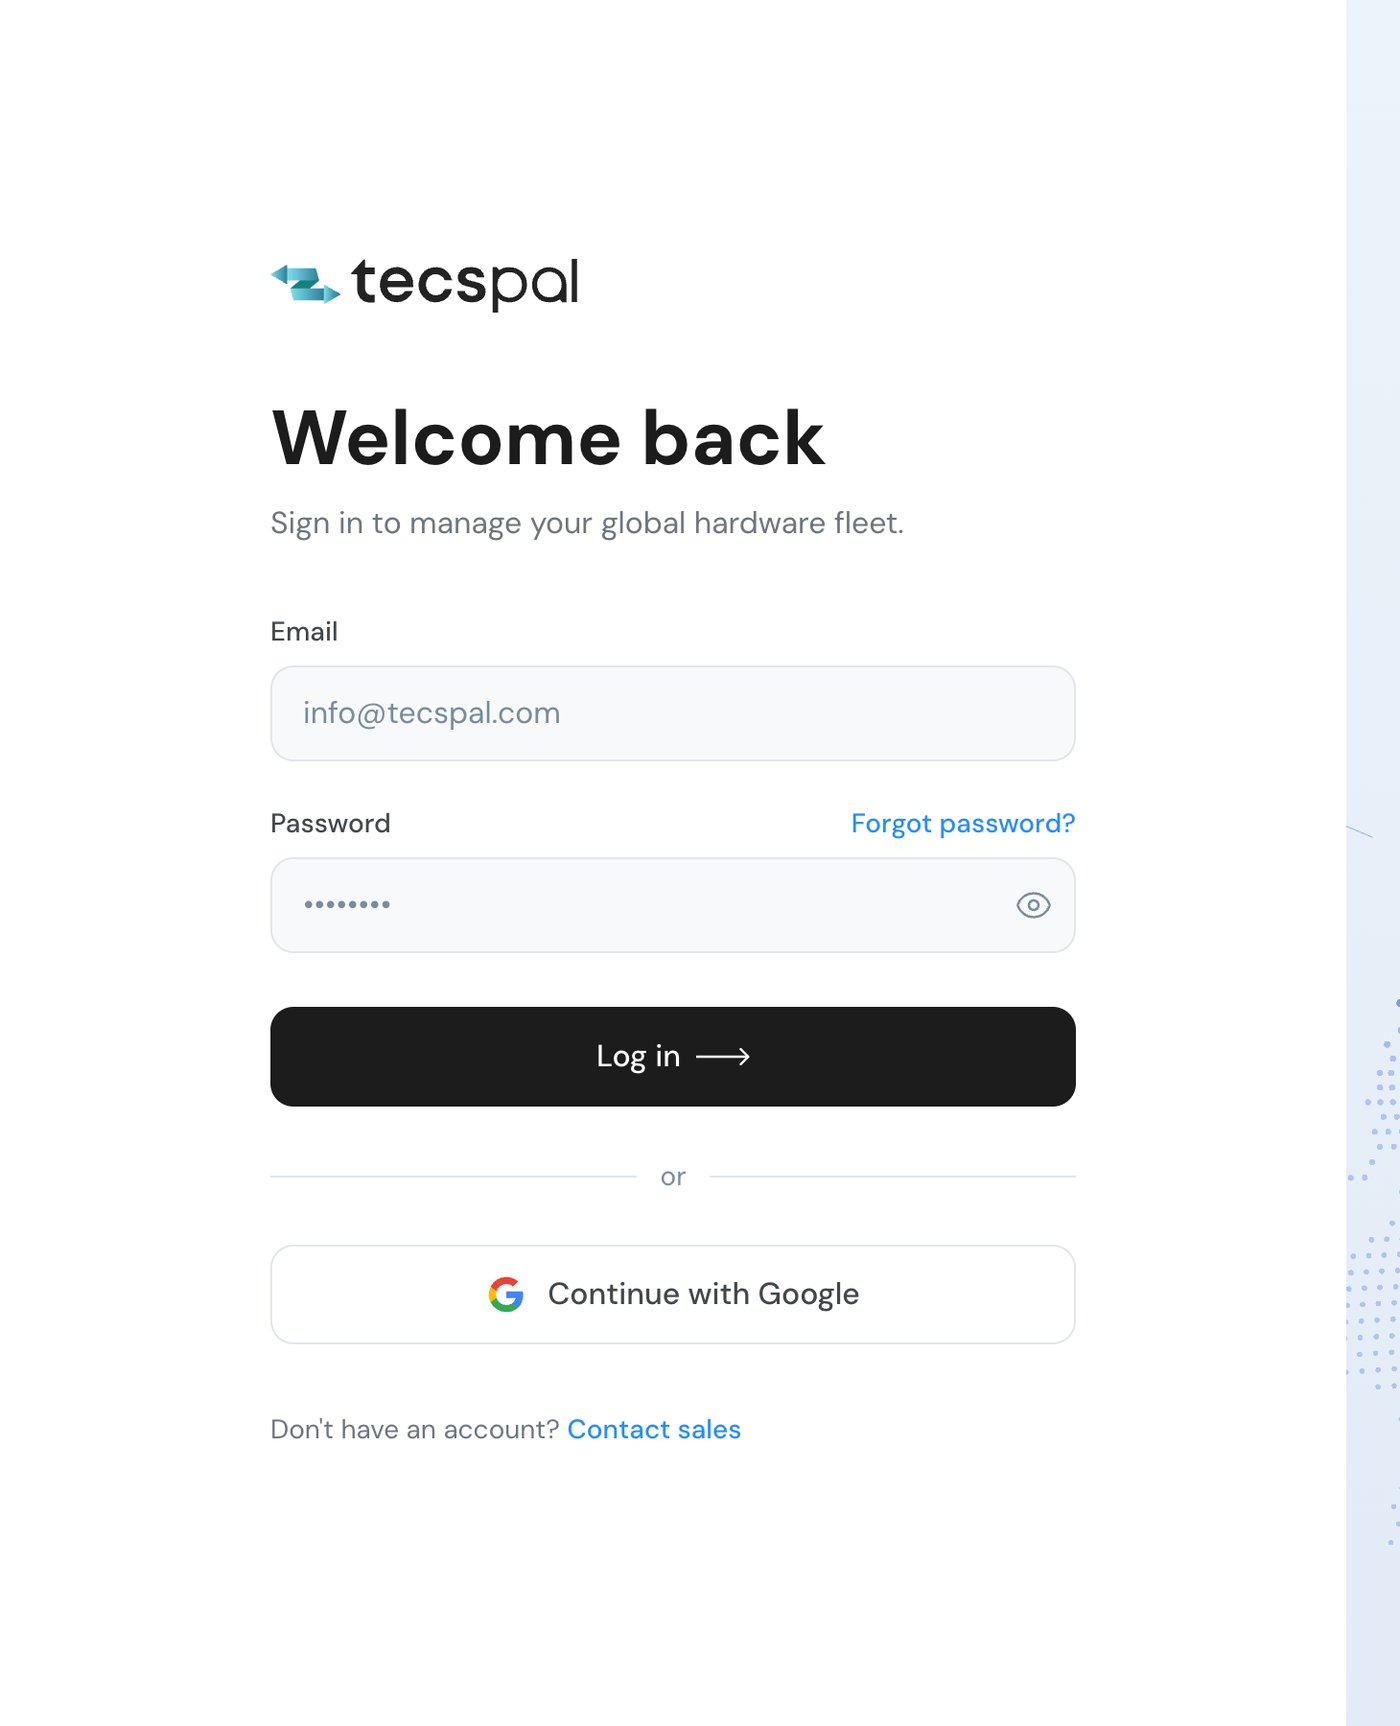
Entrar a la plataforma
Tu cuenta la crea Tecspal o el Admin de tu empresa. Cuando está lista, te llega un email.
Entrá
- 1Buscá el email de bienvenida de Tecspal: trae tu contraseña.
- 2Abrí la plataforma.
- 3Ingresá tu Correo electrónico y tu Contraseña.
- 4Tocá Iniciar Sesión.
- 5Si tu cuenta de Google usa el mismo email, también podés entrar con Continue with Google.
Te recomendamos cambiar la contraseña la primera vez que entrás: Preferencias → Perfil → Cambiar contraseña.
Por seguridad, la sesión dura 12 horas. Después, volvé a entrar.

El menú lateral
Todas las secciones están en el menú lateral, a la izquierda de la pantalla.
Qué hay en cada sección
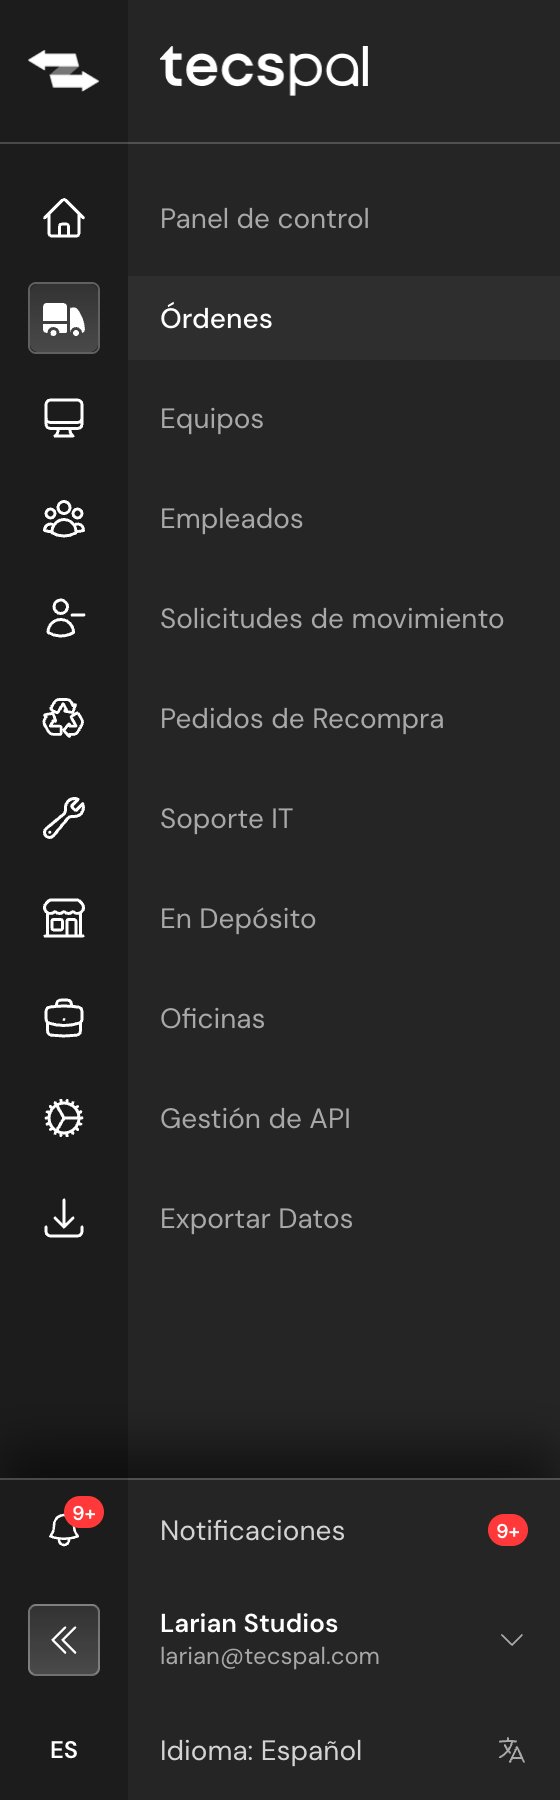
Tu perfil y Preferencias
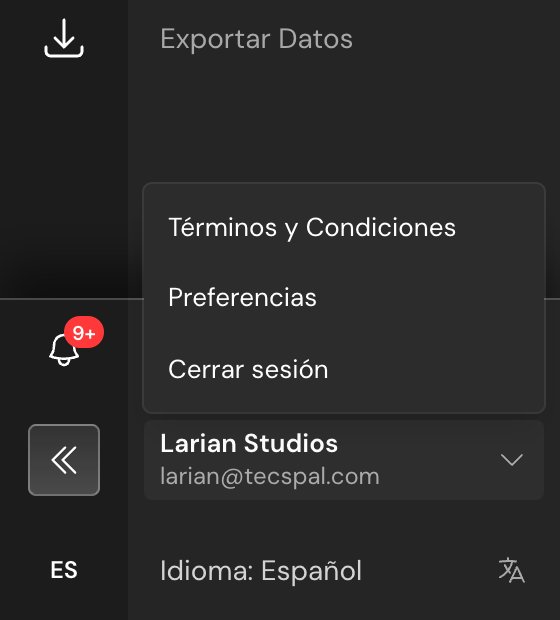
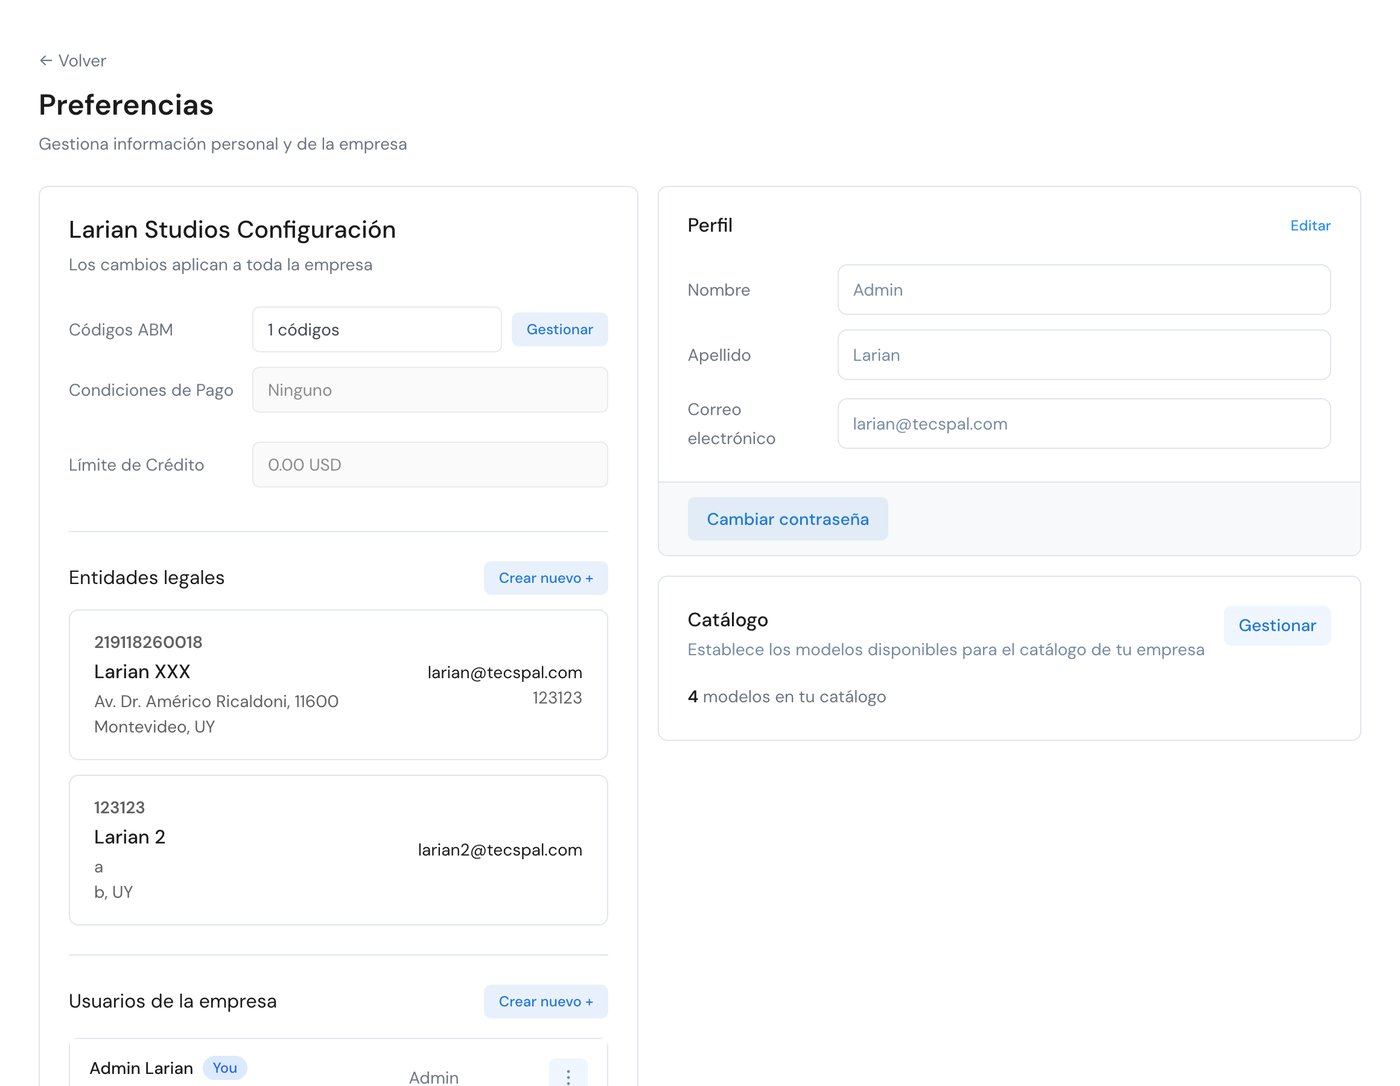
Abajo del menú lateral está tu perfil. Desde ahí entrás a Preferencias, donde se configura tu empresa.
Entrá a Preferencias
- 1Abajo del menú lateral, tocá el nombre de tu empresa.
- 2Tocá Preferencias.
En Preferencias encontrás: la configuración de tu empresa (códigos ABM, condiciones de pago y límite de crédito), las Entidades legales, los Usuarios de la empresa, tu Perfil y el Catálogo. Lo vemos en los capítulos Usuarios y Configuración de la empresa.
En el mismo menú están Términos y Condiciones y Cerrar sesión.
Cambiar el idioma
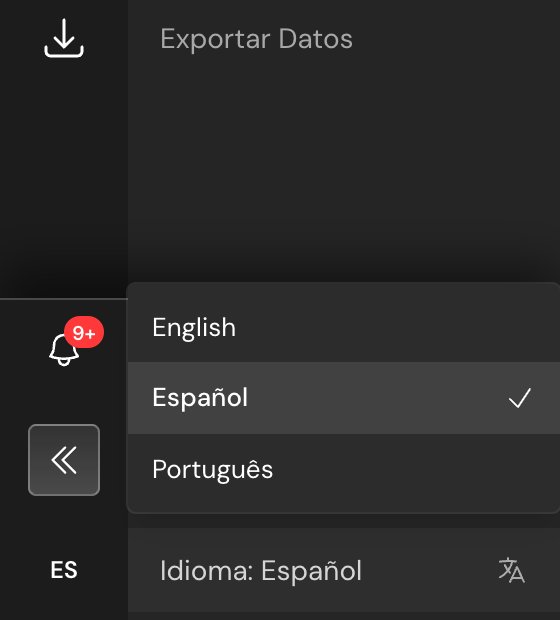
La plataforma está en español, inglés y portugués.
Cambiá el idioma
- 1Abajo del menú lateral, tocá Idioma.
- 2Elegí el idioma.
Los nombres de los estados (Pending, Quoted, Delivered, etc.) se ven en inglés en todos los idiomas.
Órdenes
Cómo pedir equipos nuevos, seguir cada pedido y gestionar la cotización.
- 2.1Crear una orden
- 2.2Seguir una orden
- 2.3Aceptar la cotización
- 2.4Descargar la cotización en PDF
- 2.5Comentar una orden
- 2.6Editar una orden
- 2.7Cancelar una orden
- 2.8Replicar en otros países
Crear una orden
Pedí equipos nuevos para tu empresa. Tecspal prepara una cotización y, cuando la aceptás, se encarga de la compra y la entrega.
Antes de empezar
- El país donde se entregan los equipos.
- A dónde van: un Empleado, una Oficina o el almacén de Tecspal.
- Si van a un Empleado: su DNI, y su CPF si es de Brasil.
Dónde se hace
Menú lateral → Órdenes → Nueva Orden.
Atajo: desde el detalle de un Empleado → Nuevo dispositivo → Ordenar nuevo hardware. El Empleado ya viene cargado como destino.
Armá el carrito
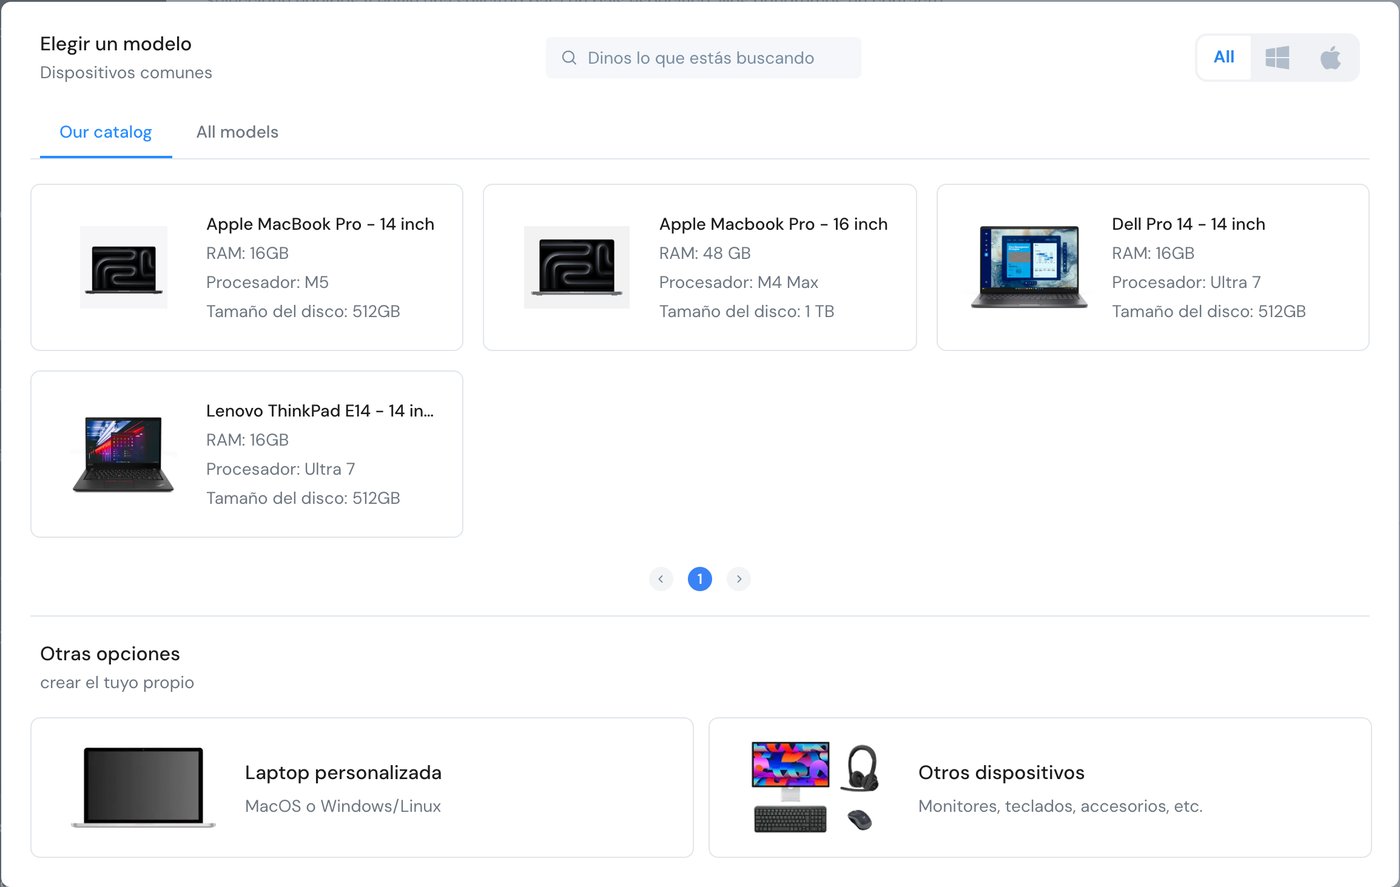
- 1Tocá Agregar equipo. Se abre Elegir un modelo.
- 2Elegí qué equipo agregar:
- Un modelo del catálogo: tocalo. Si tu empresa tiene catálogo propio, se abre en Our catalog. Para ver todos los modelos, andá a All models.
- Laptop personalizada: armá una Mac o una PC a medida (ver la parte 2).
- Otros dispositivos: monitores, teclados y accesorios. Describí lo que necesitás en las notas.
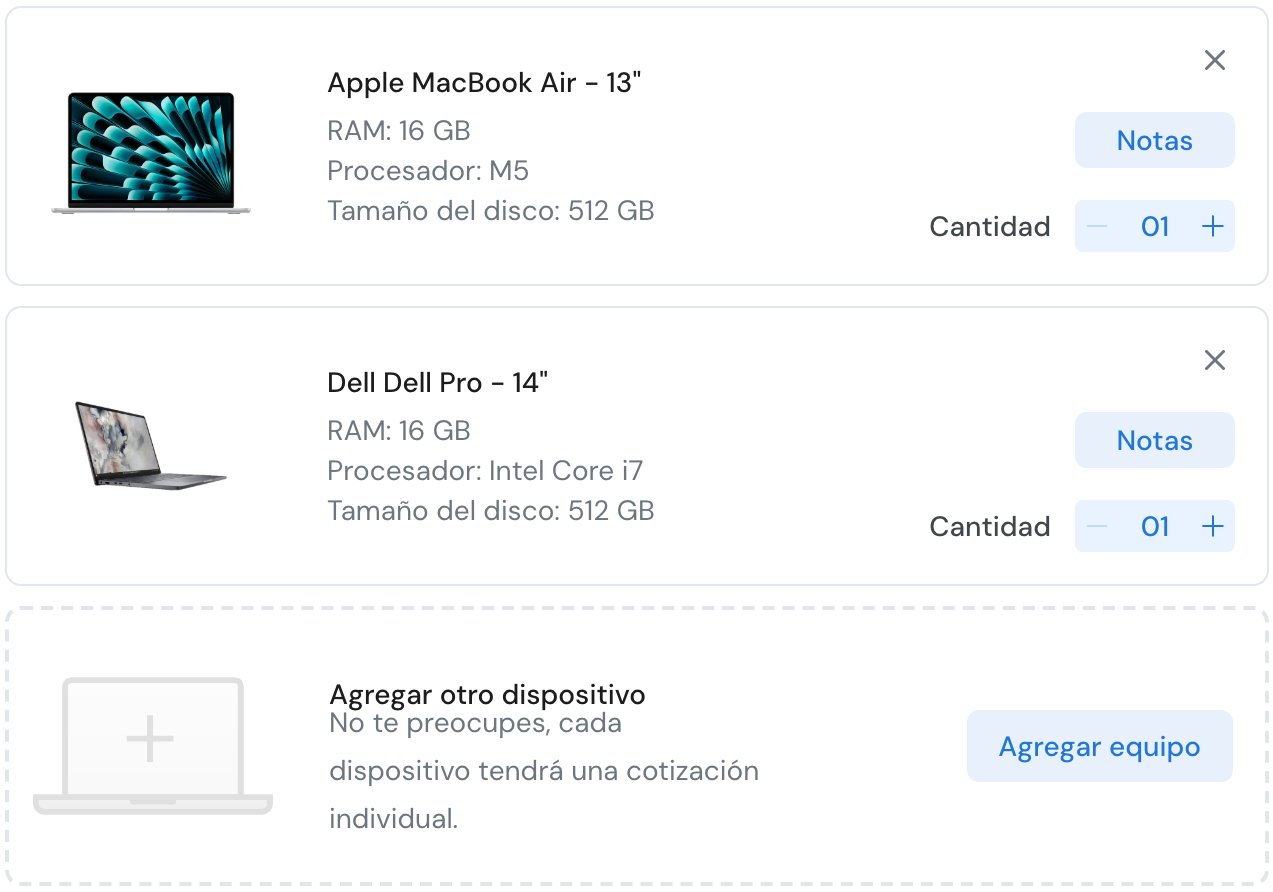
- 3En Cantidad, indicá cuántos necesitás.
- 4Si hace falta, tocá Notas y agregá una nota al equipo.
- 5Para sumar otro equipo, tocá Agregar equipo de nuevo. Para sacar uno, tocá la X.
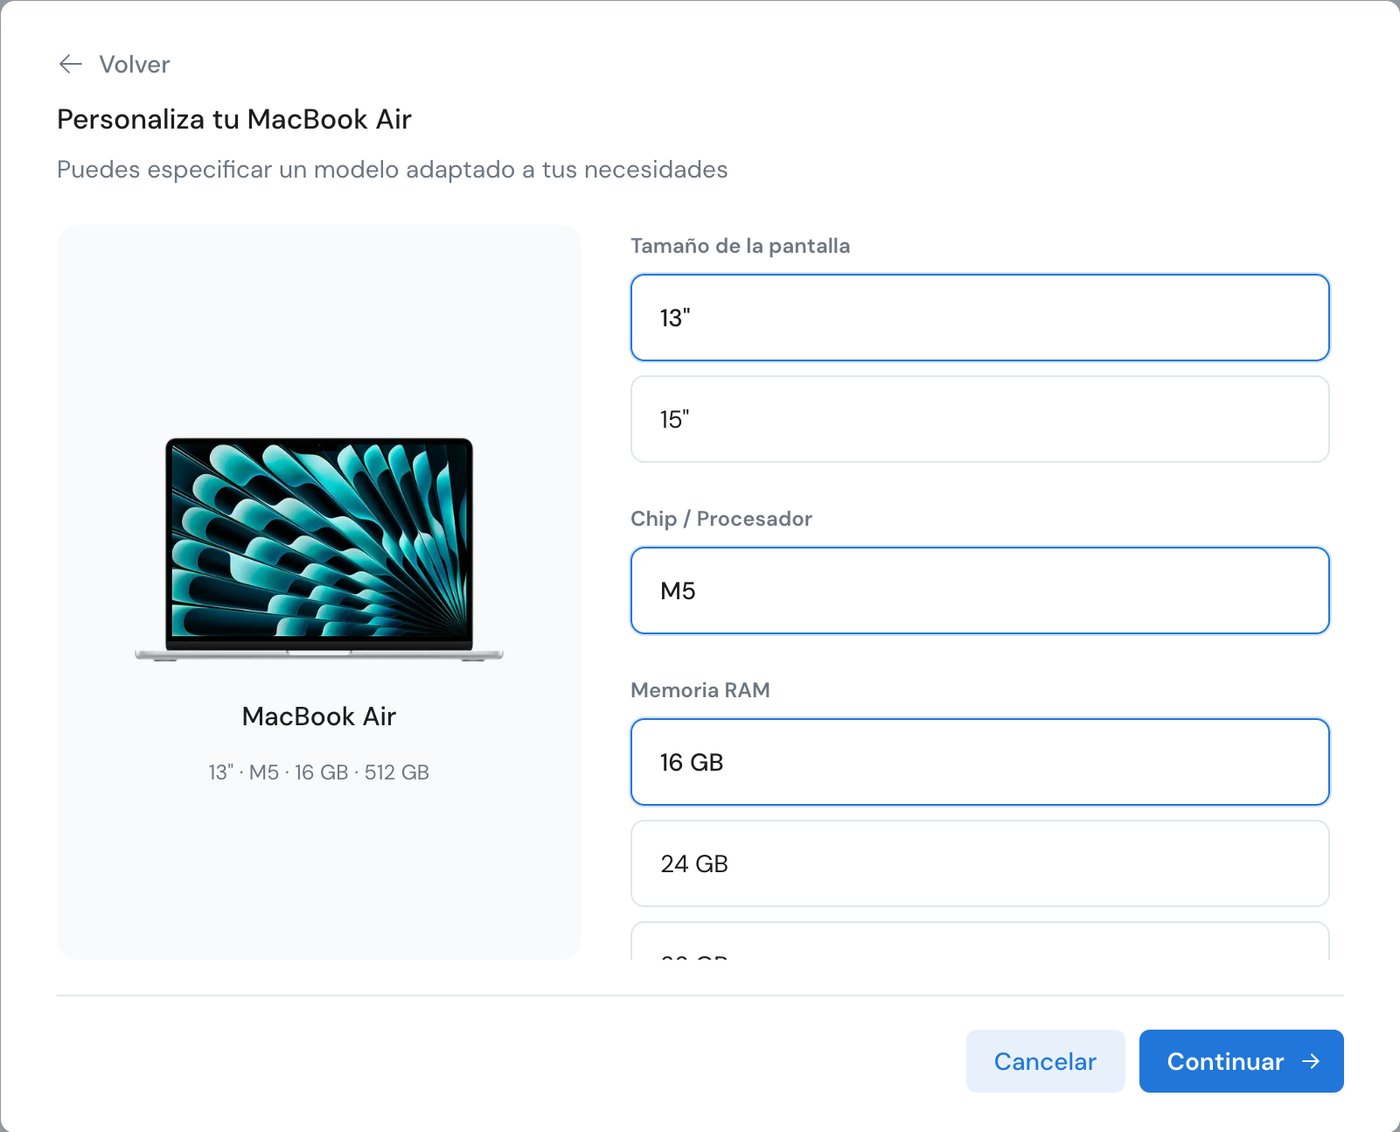
Si elegiste Laptop personalizada
- 6Mac: elegí el tamaño de pantalla, el chip, la memoria RAM y el almacenamiento.
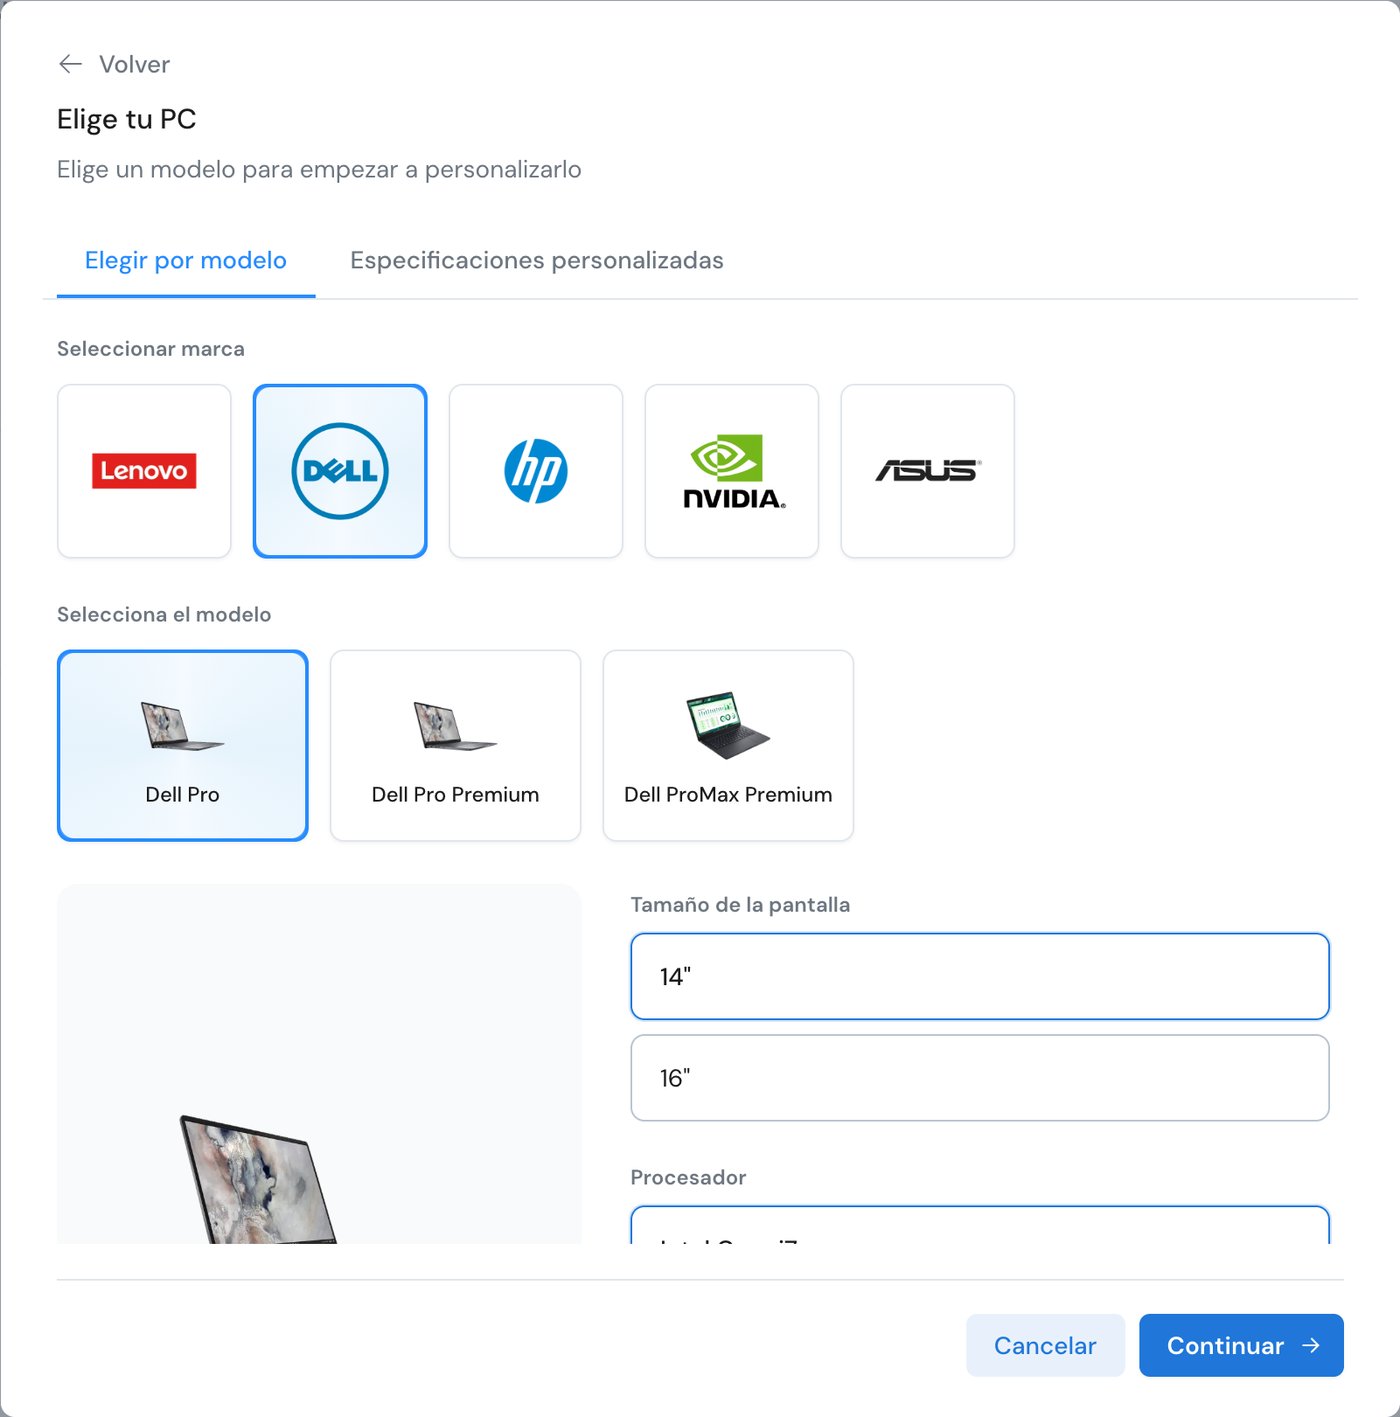
- 7PC: en Elegir por modelo, elegí la marca, el modelo y las especificaciones. Si no encontrás lo que buscás, cargalas en Especificaciones personalizadas.
- 8Tocá Continuar. El equipo se suma al carrito.
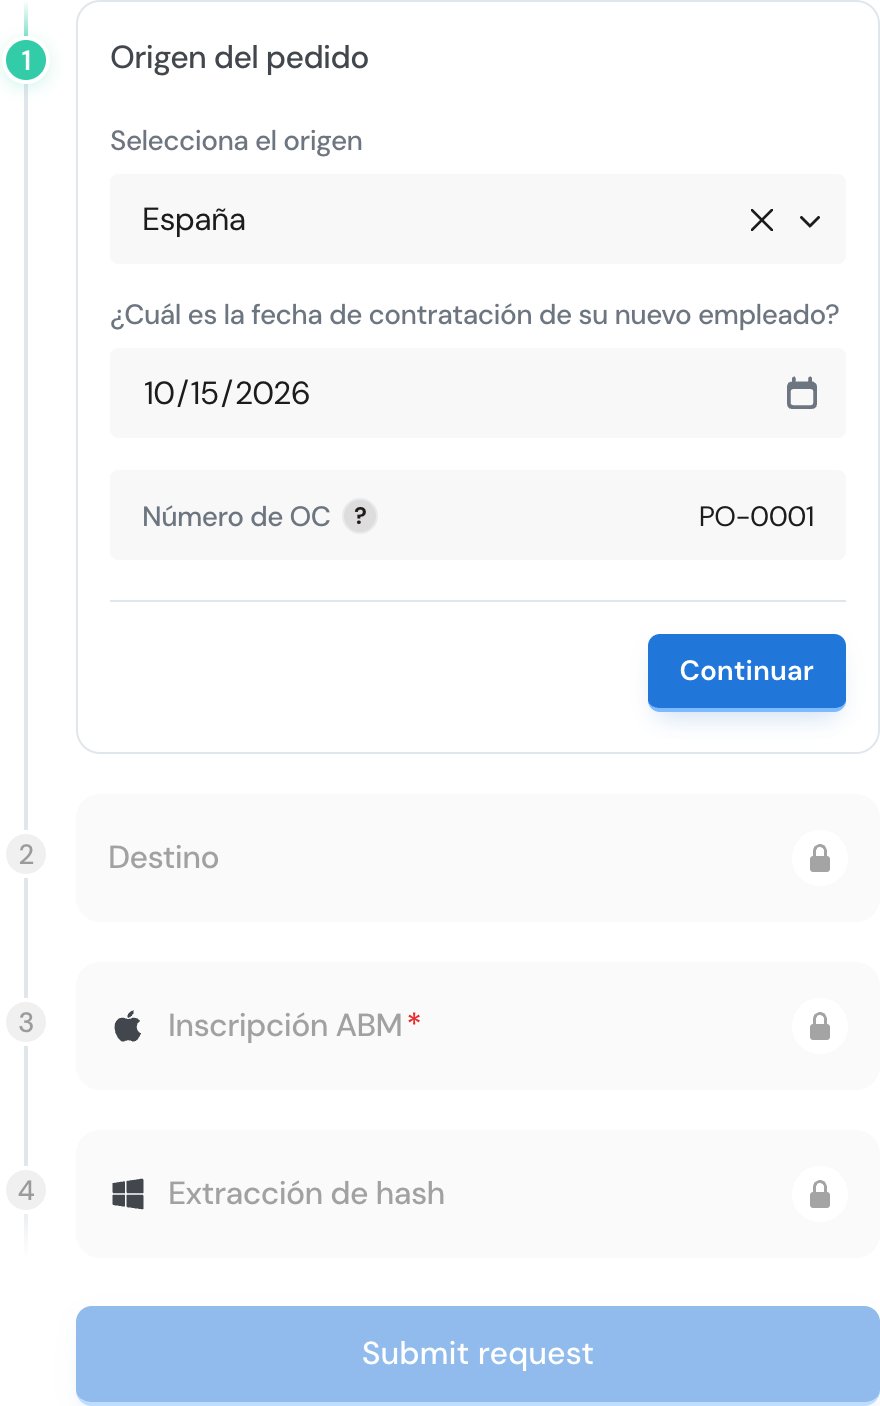
Completá el origen
- 9En Selecciona el origen, elegí el país.
- 10Elegí la fecha en que necesitás los equipos (la pantalla la pide como fecha de contratación de tu nuevo empleado). Tiene que ser al menos 4 días después de hoy.
- 11Si tu empresa trabaja con órdenes de compra, cargá el Número de OC. Es opcional.
- 12Tocá Continuar.
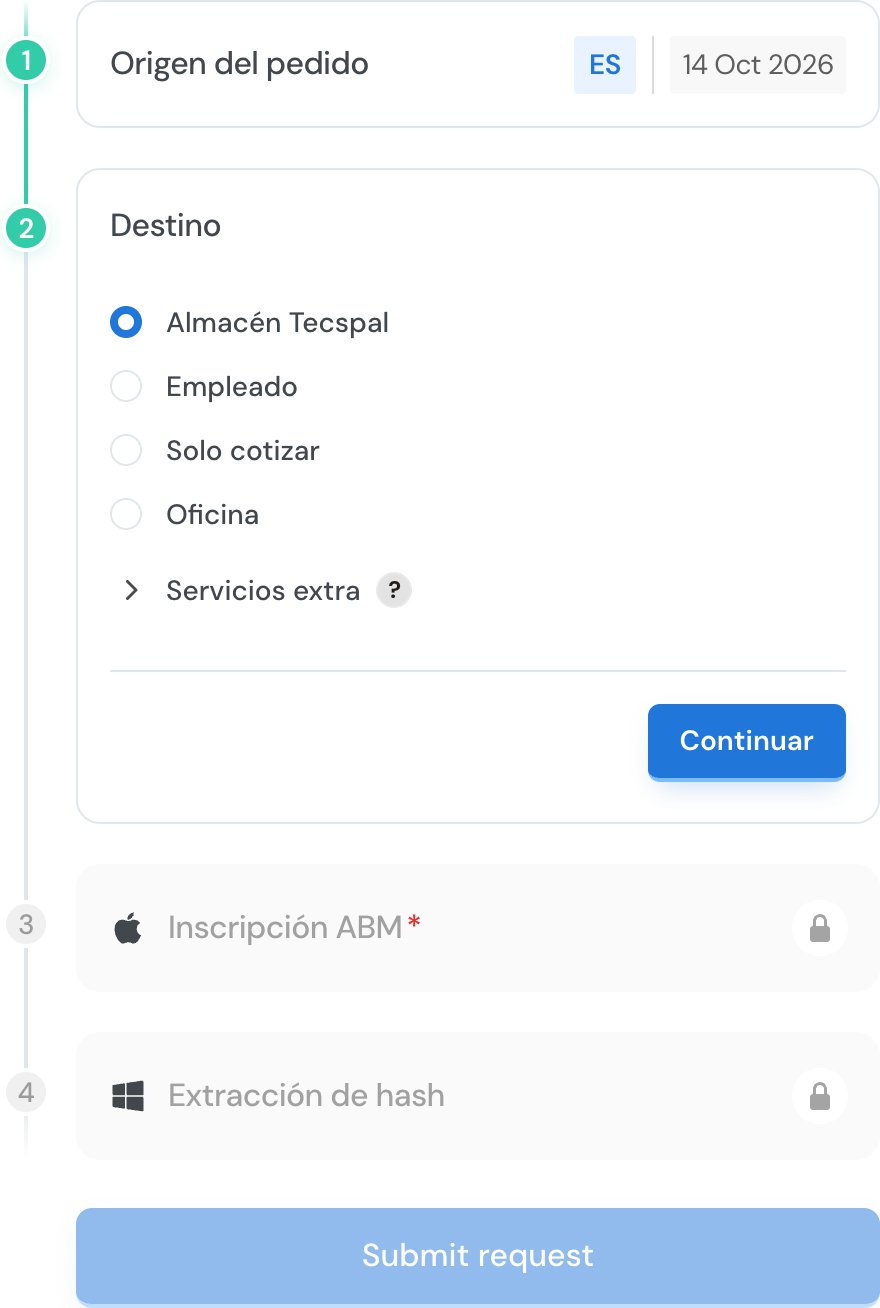
Elegí el destino
- 13Elegí a dónde van los equipos:
- Almacén Tecspal: quedan guardados en el depósito de Tecspal hasta que los envíes. Si no está disponible en tu país, consultá con tu account manager.
- Empleado: elegí un Empleado de la lista o creá uno nuevo.
- Oficina: elegí una Oficina de tu empresa en ese país.
- Solo cotizar: si todavía no sabés a dónde van, elegís el destino al aceptar la cotización.
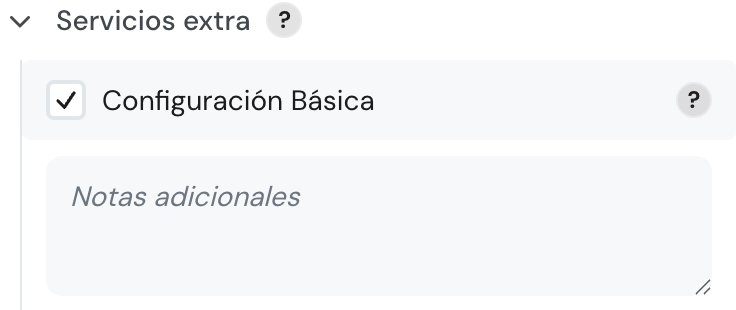
- 14Si querés que los equipos lleguen configurados, abrí Servicios extra y marcá Configuración Básica. Tiene un costo adicional.
- 15Tocá Continuar.
Servicios para Mac y PC
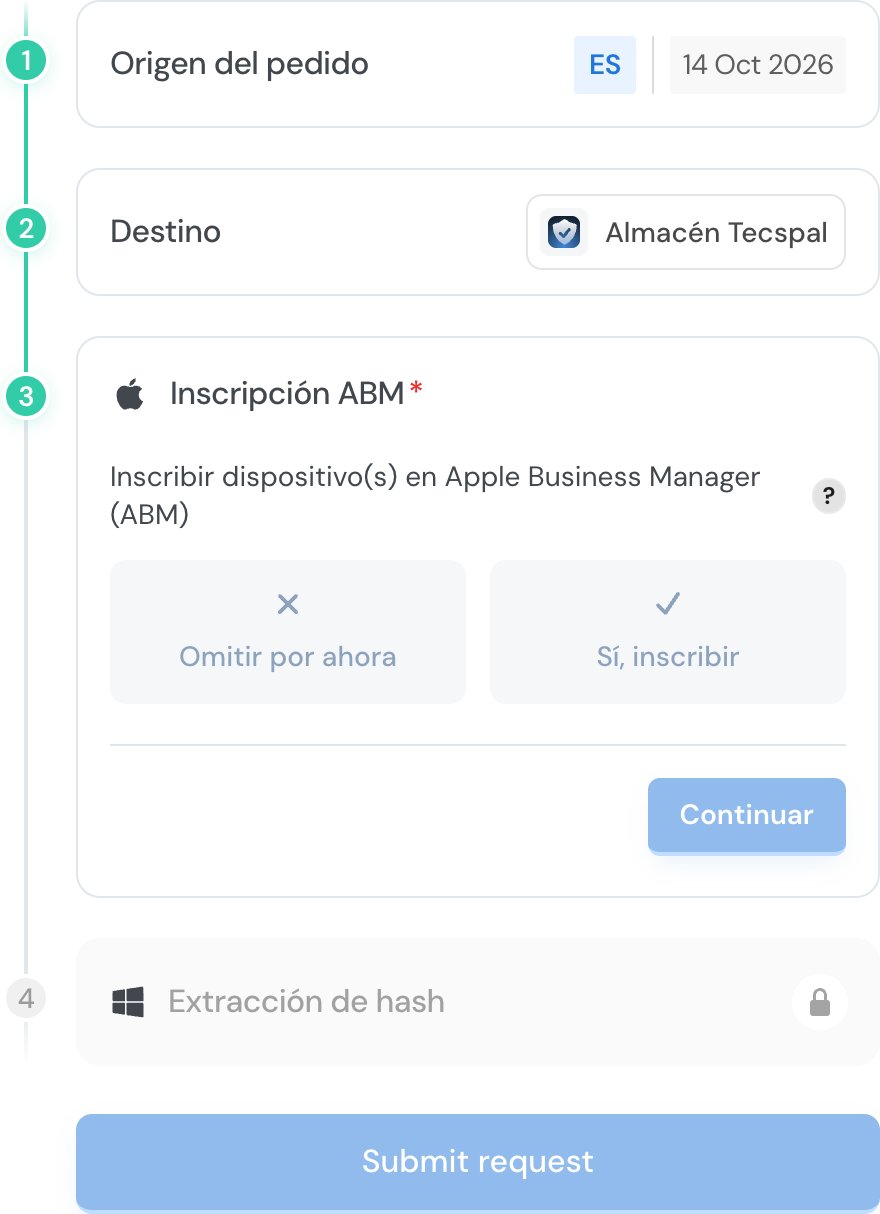
Estos pasos aparecen solo si pediste una Mac o una PC.
- 16Inscripción ABM (si pediste Mac): elegí Sí, inscribir para inscribir las Mac en Apple Business Manager, u Omitir por ahora si no lo necesitás.
- 17Extracción de hash (si pediste PC): elegí si la querés. Tiene un costo adicional por equipo.
- 18Tocá Continuar en cada paso.
Enviá la orden
- 19Tocá Submit request.
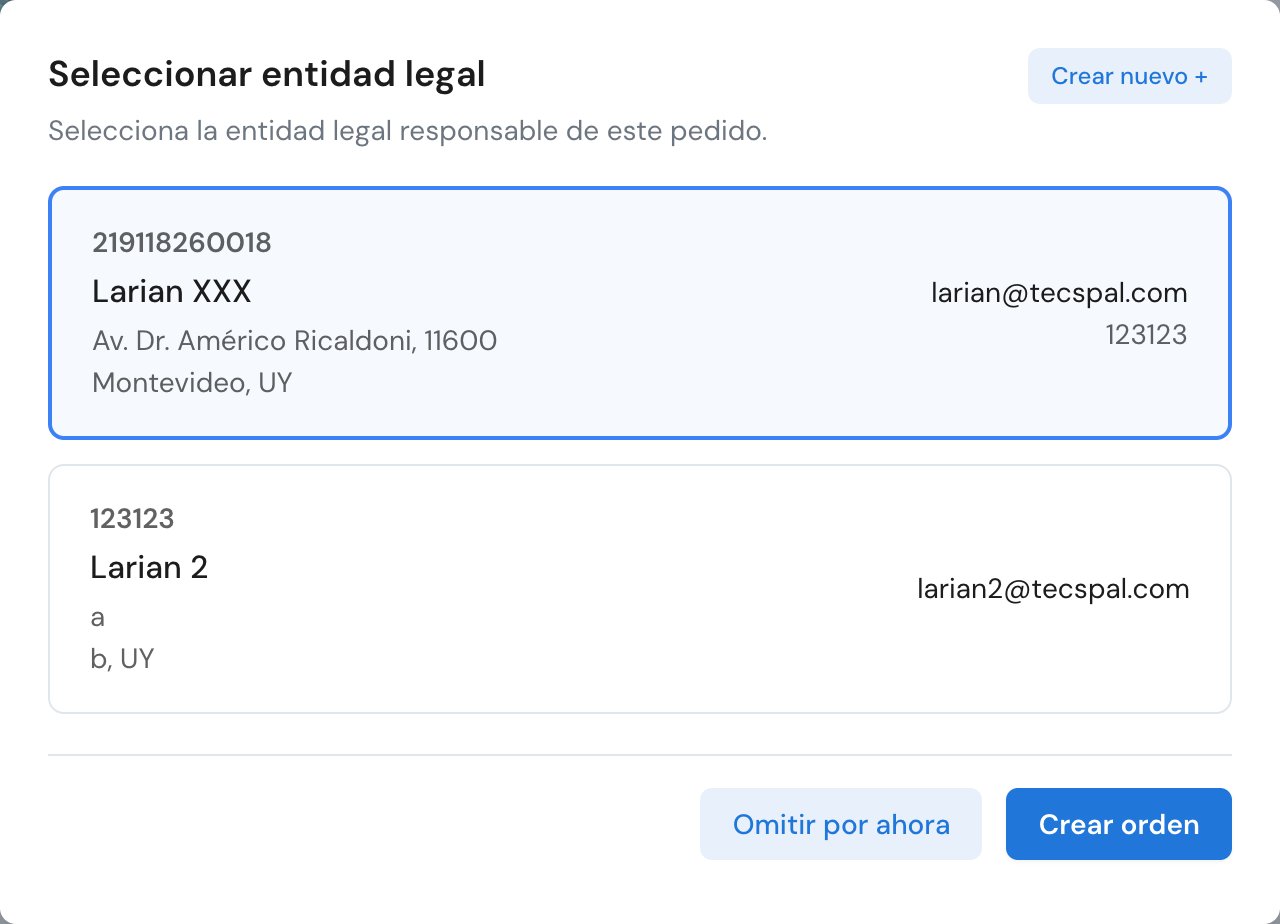
- 20En Seleccionar entidad legal, elegí la entidad de facturación.
- 21Tocá Crear orden.
¿Qué pasa después?
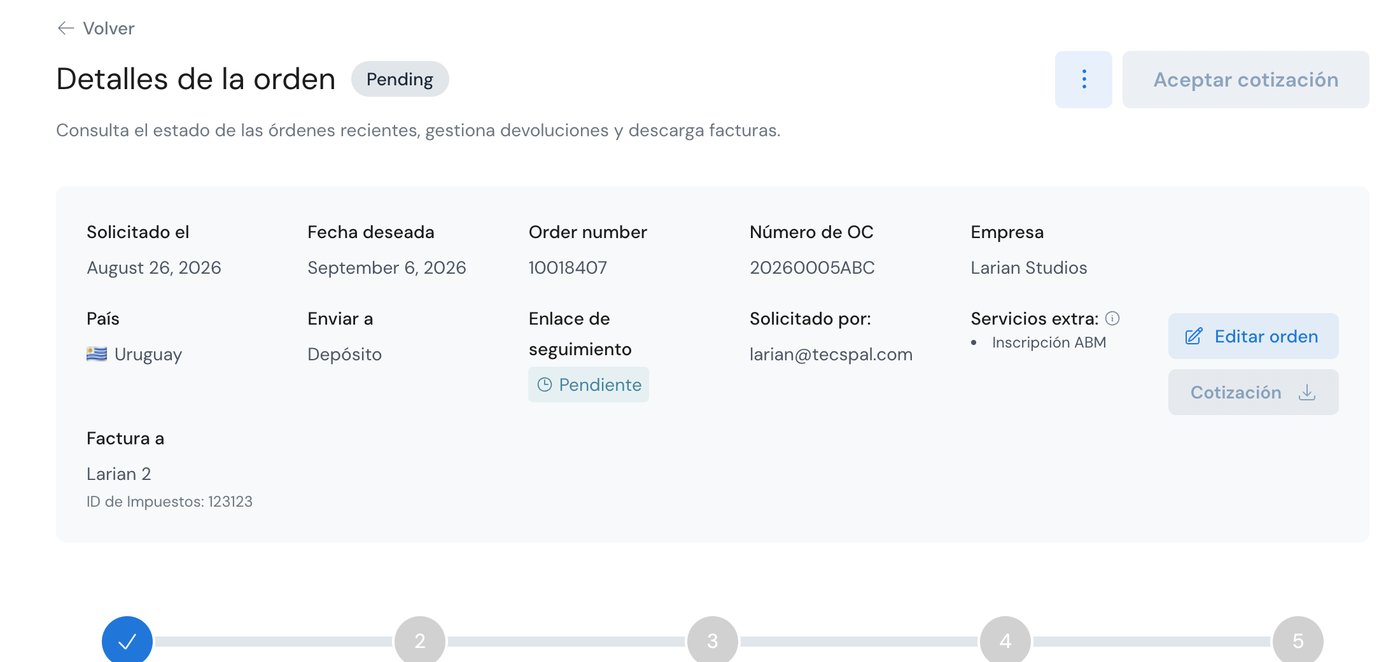
La orden queda en estado Pending y la ves en Órdenes. Tecspal la cotiza y te avisa por email cuando pasa a Quoted.
Seguir una orden
Consultá en qué estado está cada pedido y cuándo llega.
Encontrá la orden
- 1Andá a menú lateral → Órdenes.
- 2Para buscar una orden, escribí el nombre del Empleado, el número de orden o el número de OC.
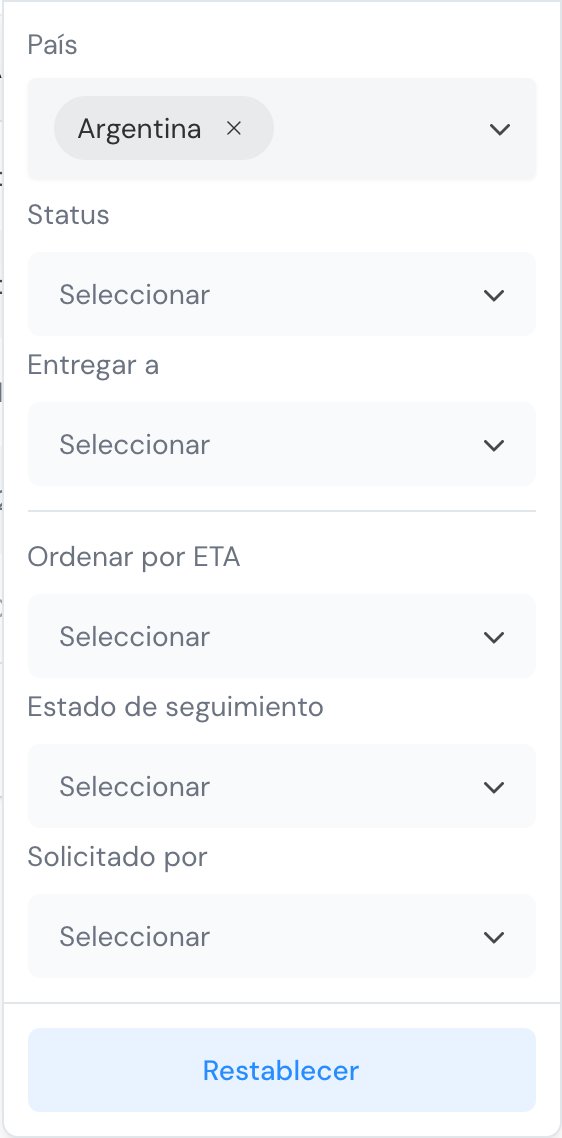
- 3Para acotar la lista, tocá Filtros: país, estado, destino (Entregar a), estado de seguimiento o quién la pidió (Solicitado por).
- 4Para ver primero las que llegan antes, usá Ordenar por ETA.
Qué muestra cada fila: número, fecha, país, destino, estado, ETA, tracking y quién la pidió. Si el envío ya tiene tracking, lo abrís desde la misma fila.
Abrí el detalle
- 5Tocá la orden para abrirla.
- 6Arriba ves la barra de estado con el paso en el que está.
- 7Más abajo están los datos de la orden y la lista de equipos.

Los pasos de una orden
Si la pediste como solo cotización, la barra muestra menos pasos.
Cuándo te avisamos por email
- Cuando la cotización está lista (Quoted).
- Cuando la entrega está coordinada (Coordinated).
- Cuando se carga el tracking.
- Cuando se entrega (Delivered).
Aceptar la cotización
Cuando la orden pasa a Quoted, revisá la cotización y aceptala para que Tecspal avance con la compra.
Aceptá la cotización
- 1Abrí la orden.
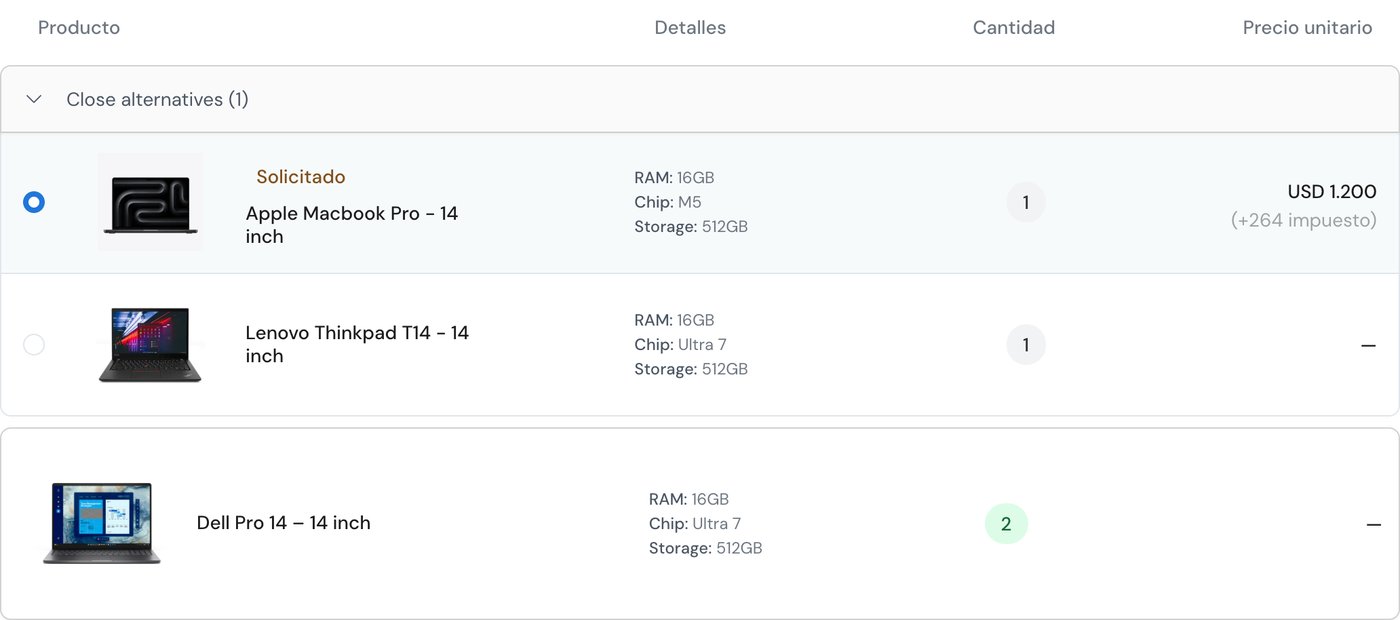
- 2Revisá los equipos y los precios.
- 3Si Tecspal te ofrece alternativas para algún equipo (por ejemplo, porque el modelo pedido no tiene stock), elegí la que prefieras.
- 4Tocá Aceptar cotización.
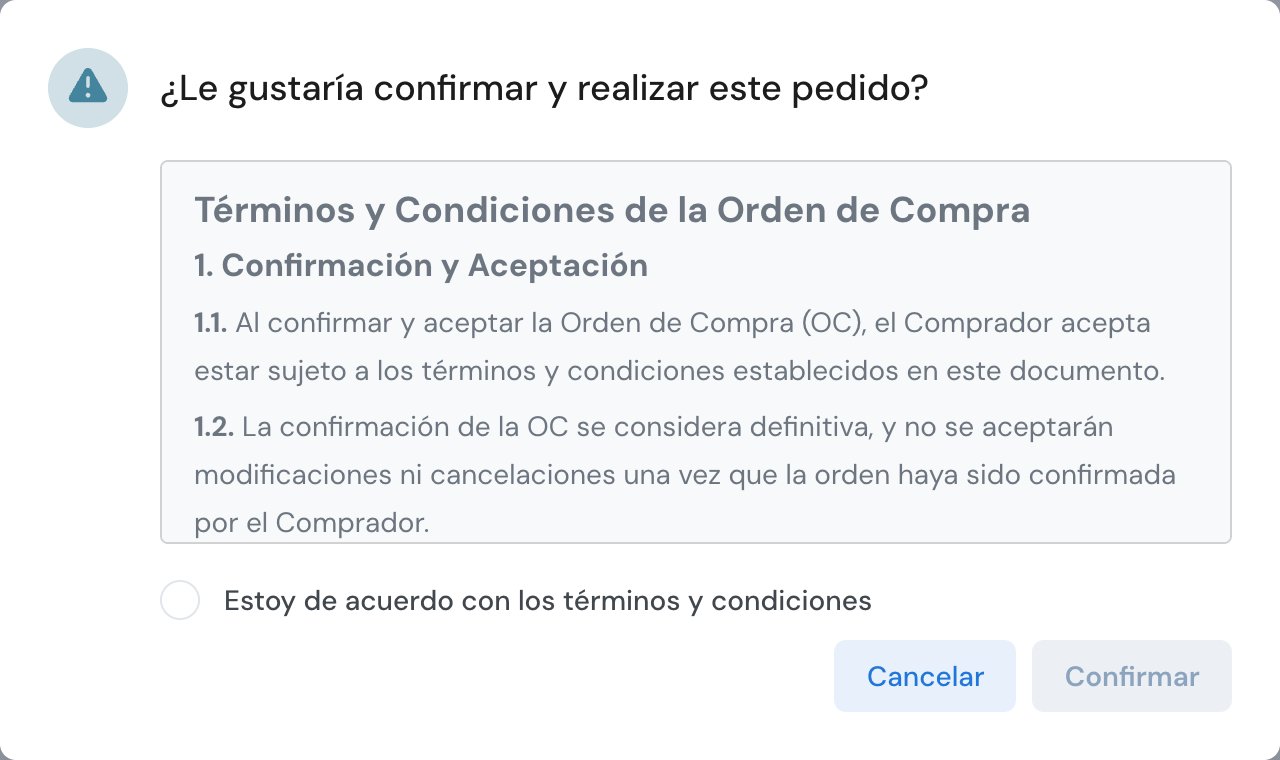
- 5Marcá Estoy de acuerdo con los términos y condiciones.
- 6Si te lo pide, elegí la entidad de facturación y, si hay Mac, el código ABM.
- 7Tocá Confirmar.
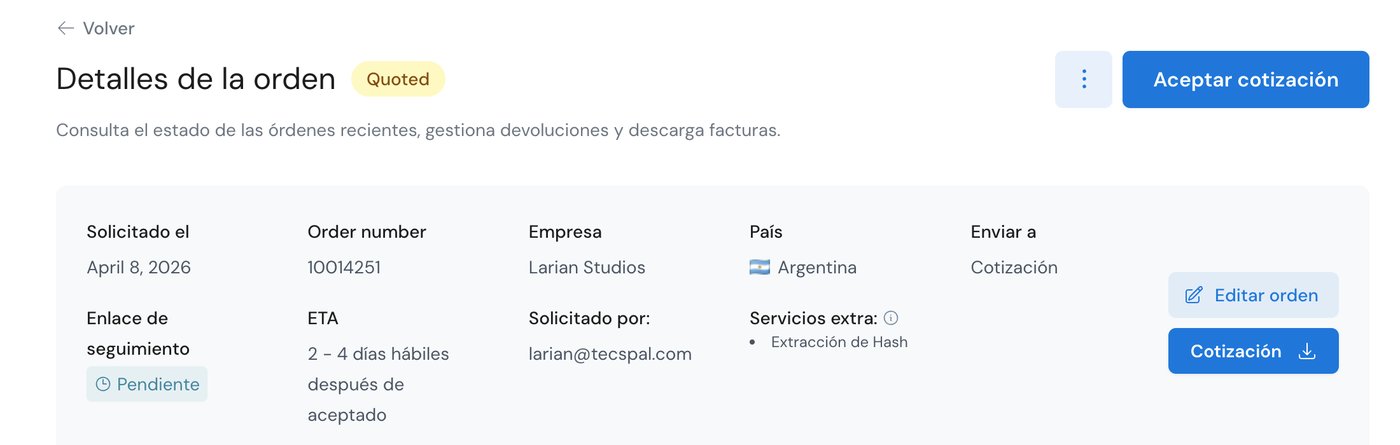
Si era una orden de solo cotización
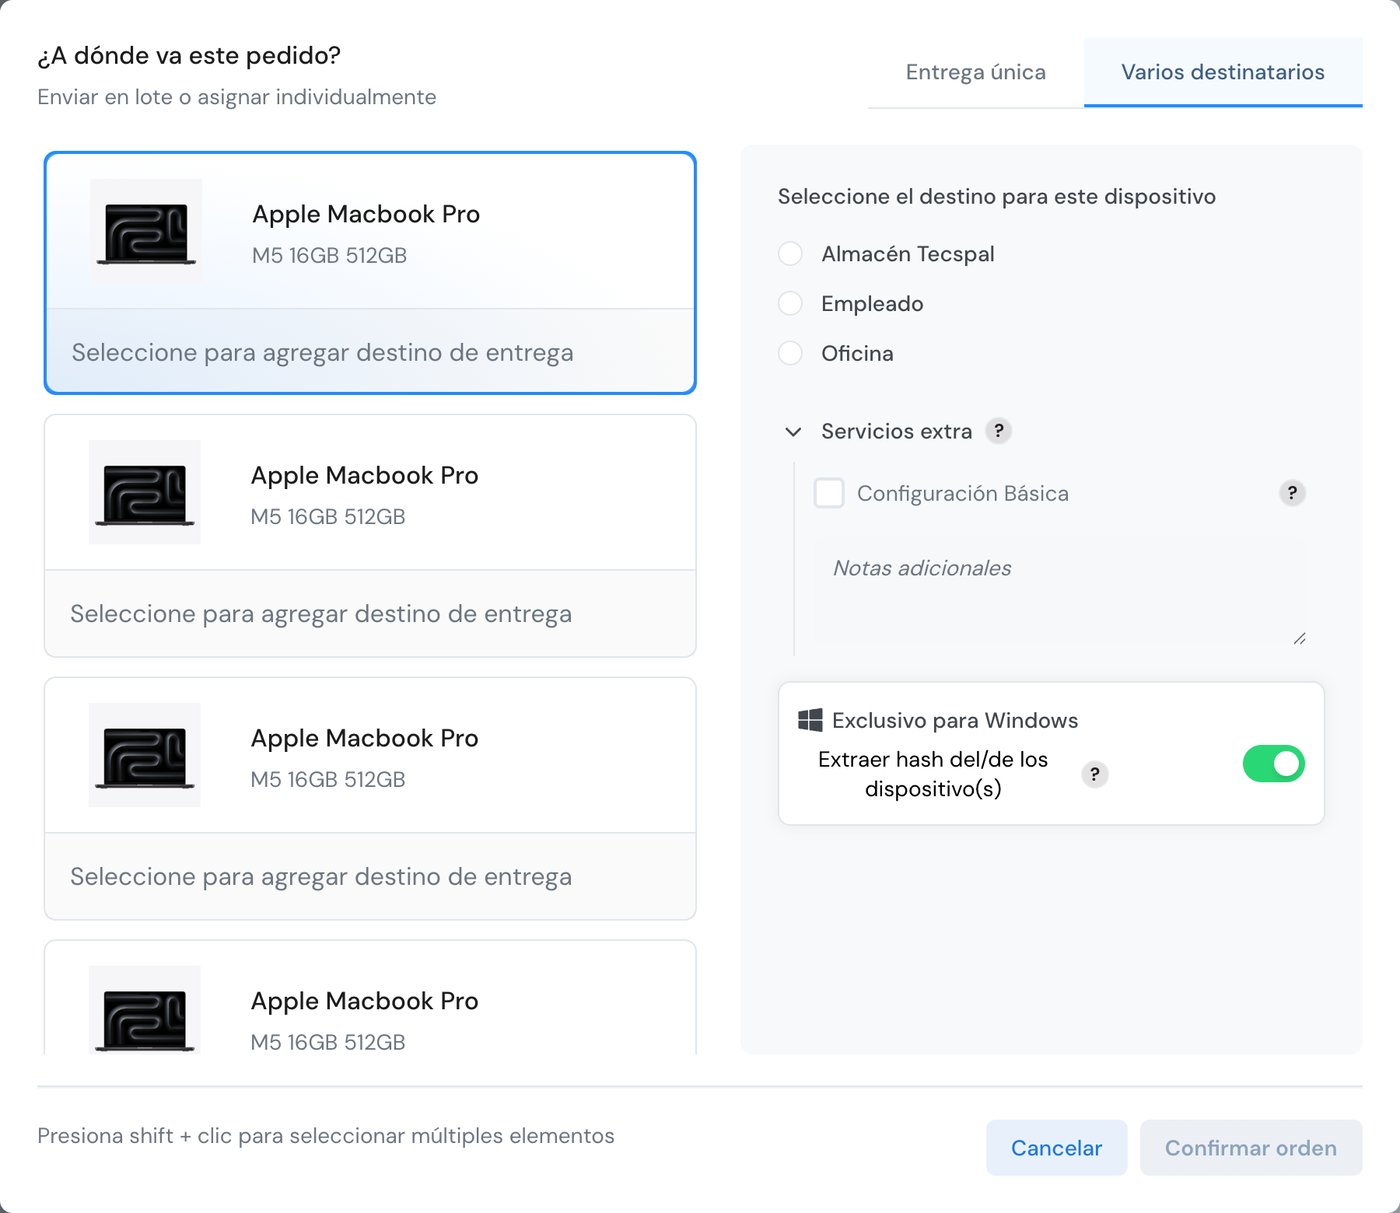
- 8Al aceptar, elegí a dónde van los equipos:
- Entrega única: todos los equipos van al mismo destino.
- Varios destinatarios: elegí un destino para cada equipo. Para seleccionar varios a la vez, usá shift + clic.
- 9Tocá Confirmar orden.
Con varios destinatarios, se crea una orden por cada destino.
Aceptar solo una parte
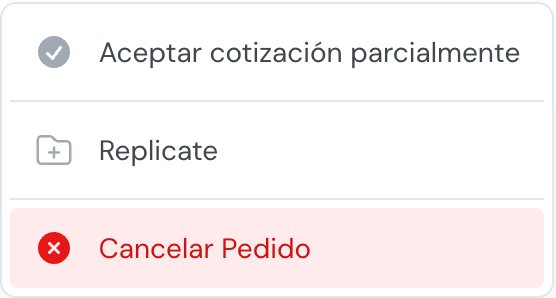
- 10En el menú ⋮, tocá Aceptar cotización parcialmente.
- 11Elegí los equipos que aceptás. El resto se quita del pedido.
- 12Tocá Confirmar orden.
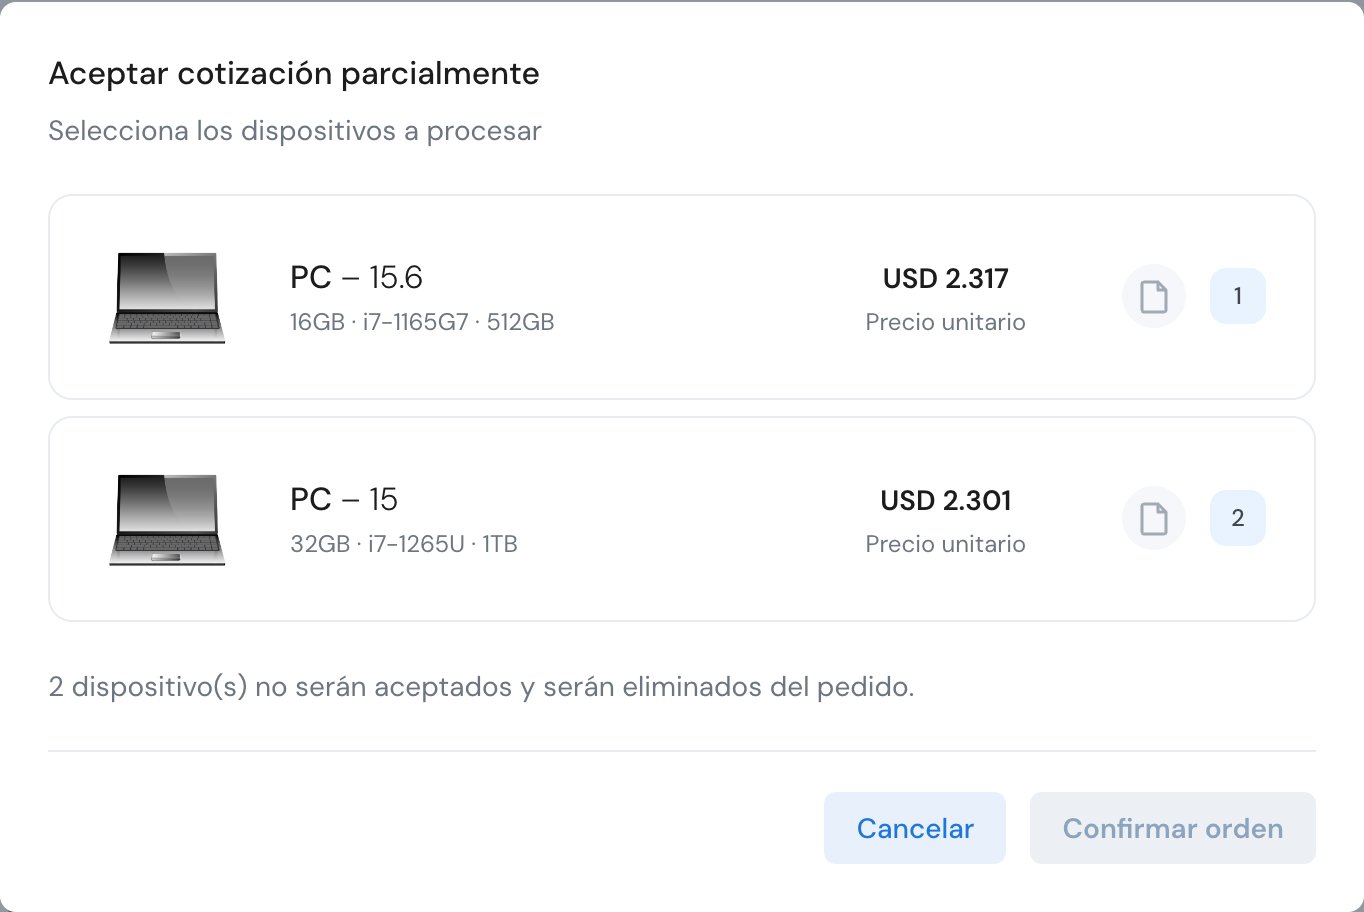
¿Qué pasa después?
La orden pasa a Accepted, Tecspal calcula la fecha estimada de entrega (ETA) y empieza a coordinar.
Descargar la cotización en PDF
Bajá la cotización para compartirla o archivarla.
Descargá el PDF
- 1Abrí la orden.
- 2Tocá Cotización.
- 3Elegí el idioma: español, inglés o portugués.
Disponible desde que la orden está en Quoted.

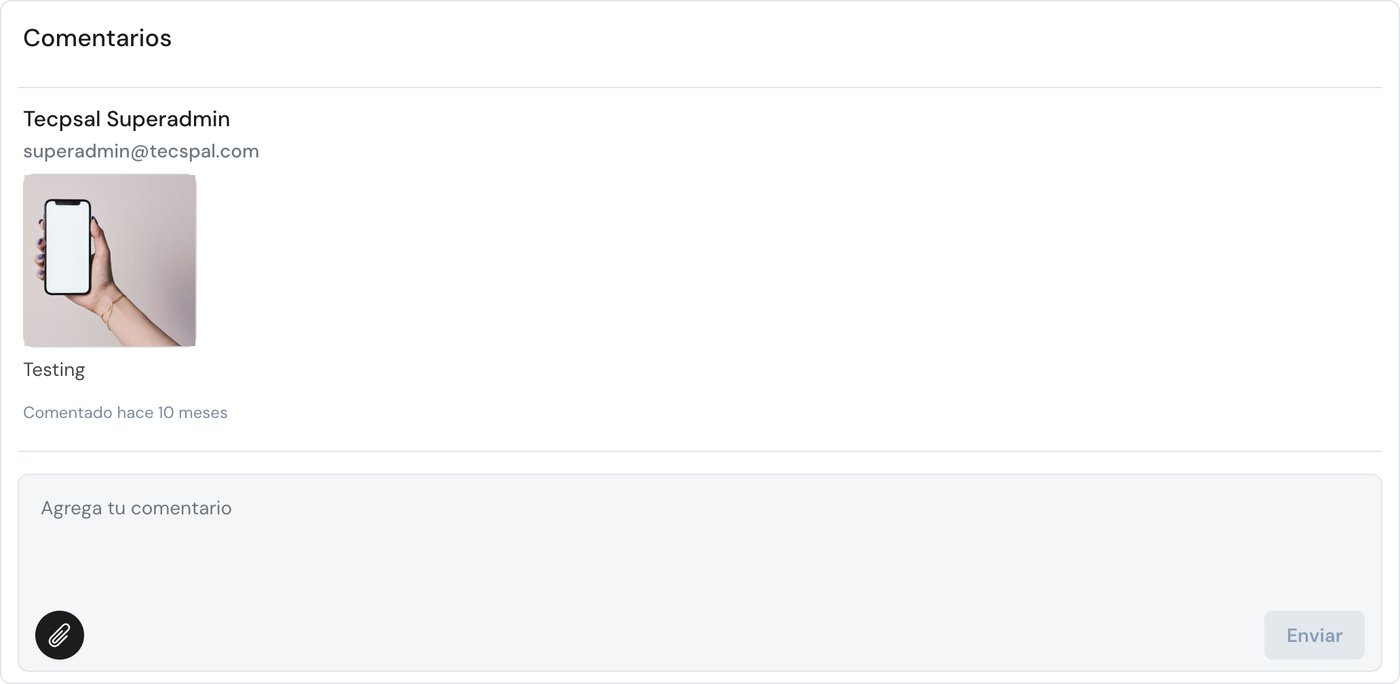
Comentar una orden
Usá los comentarios para hablar con Tecspal sobre un pedido puntual.
Dejá un comentario
- 1Abrí la orden.
- 2Escribí tu mensaje en Agrega tu comentario.
- 3Si hace falta, adjuntá un archivo con el clip.
- 4Tocá Enviar. Tecspal recibe un aviso y te responde en la misma orden.
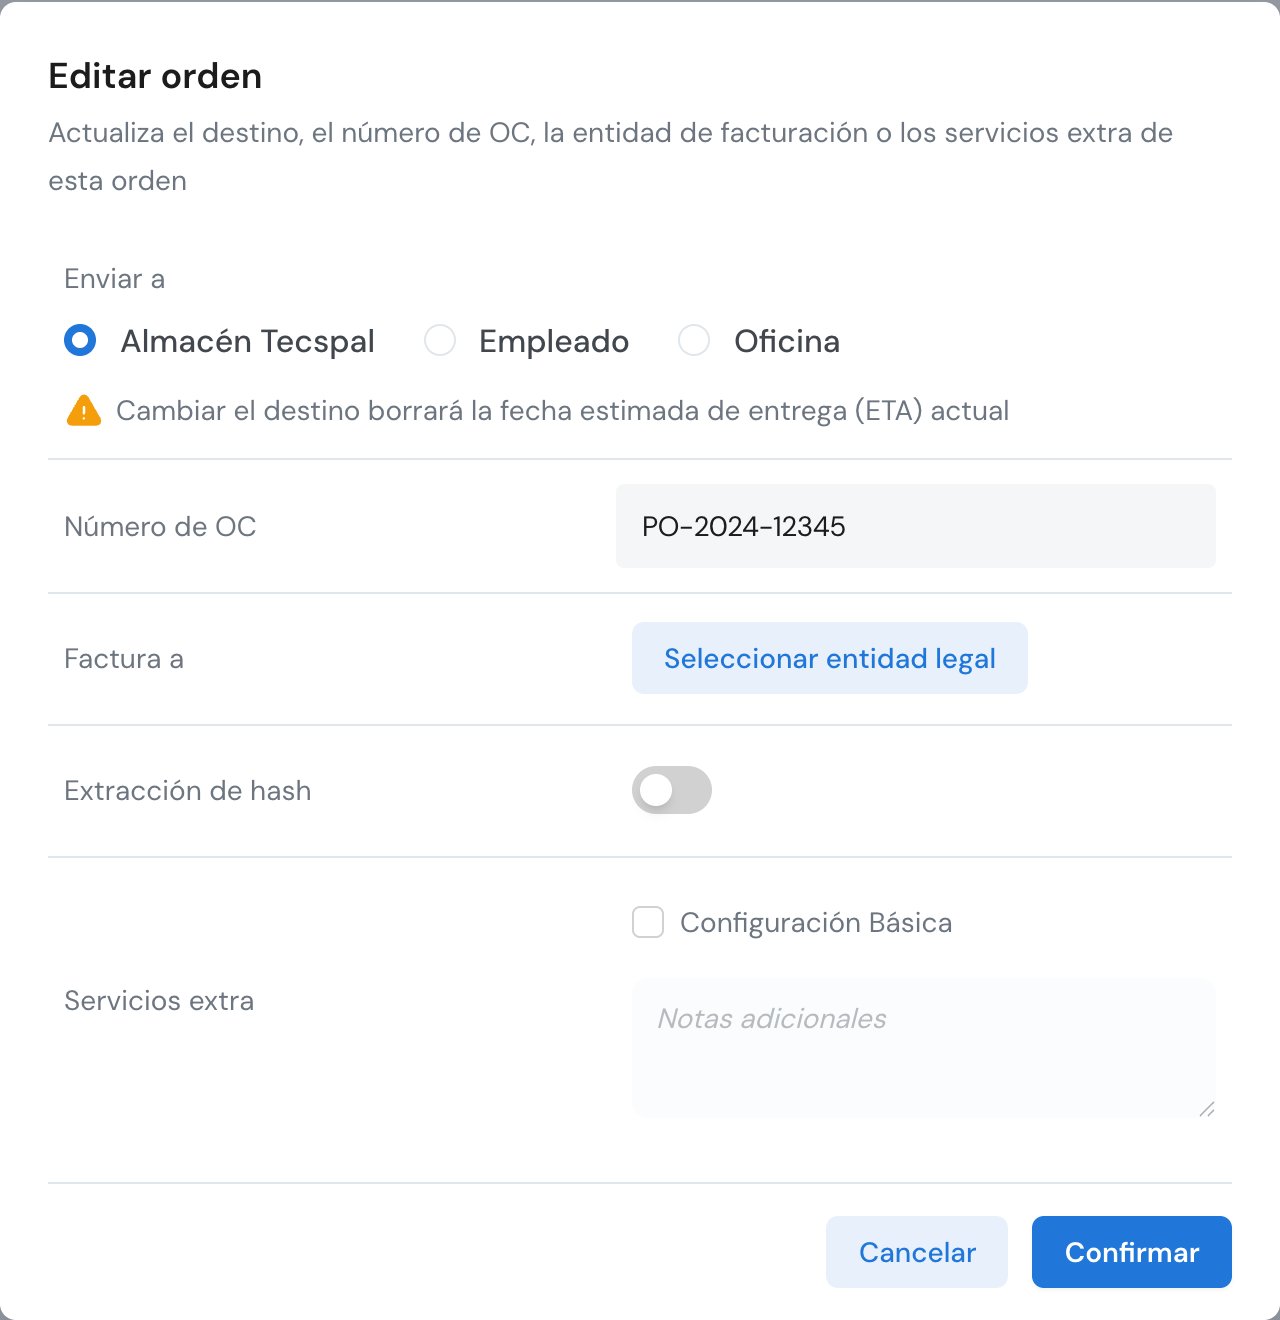
Editar una orden
Podés hacer cambios menores mientras la orden está en Pending o Quoted.
Editá la orden
- 1Abrí la orden.
- 2Tocá Editar orden.
- 3Cambiá lo que necesites: destino, número de OC, entidad de facturación, extracción de hash o servicios extra.
- 4Tocá Confirmar.
Si cambiás el destino, se borra la fecha estimada de entrega (ETA). Si es una orden de solo cotización, elegí el destino al aceptar la cotización.
Después de aceptar la cotización ya no se puede editar. Si necesitás un cambio, dejá un comentario en la orden.
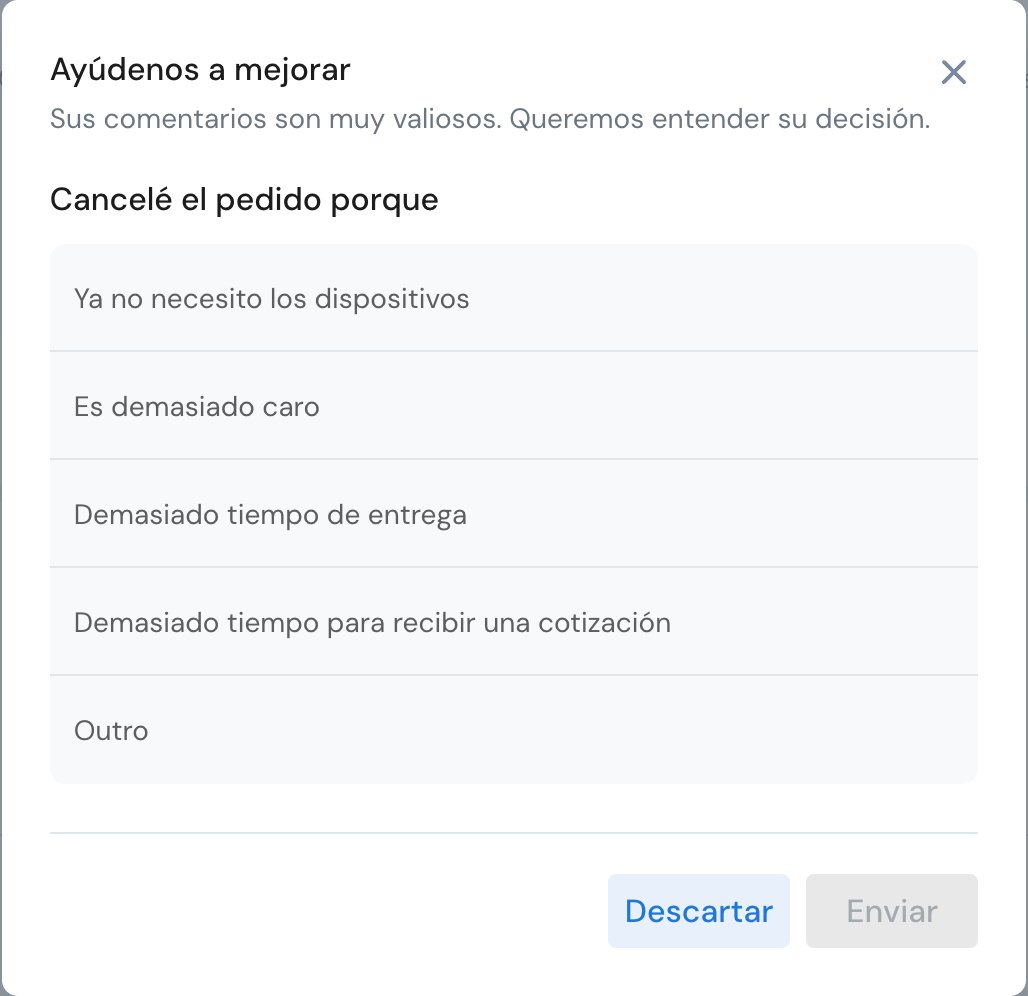
Cancelar una orden
Podés cancelar mientras la orden está en Pending o Quoted. Si no querés aceptar una cotización, cancelala.
Cancelá la orden
- 1Abrí la orden.
- 2En el menú ⋮, tocá Cancelar Pedido.
- 3Elegí el motivo.
- 4Tocá Enviar.
Replicar en otros países
Pedí la misma orden para otros países sin cargarla de nuevo.
Replicá la orden
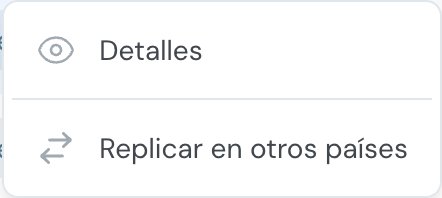
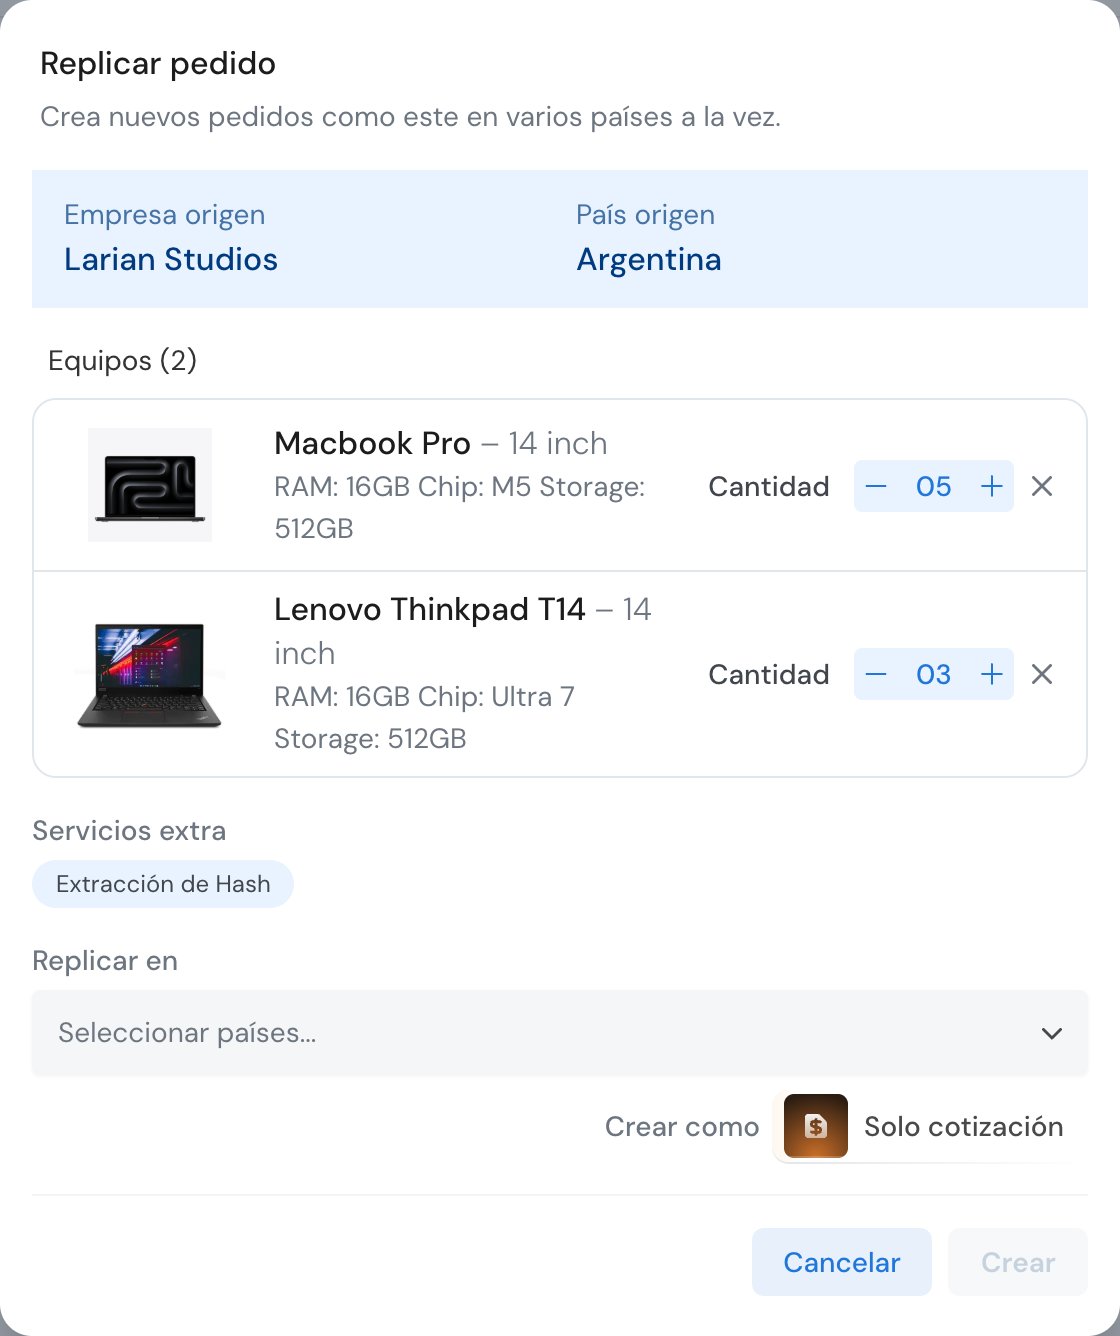
- 1En el listado de Órdenes, abrí el menú de la fila y tocá Replicar en otros países. También podés hacerlo desde el menú ⋮ del detalle.
- 2Si hace falta, ajustá las cantidades o quitá equipos.
- 3En Replicar en, elegí los países.
- 4Tocá Crear.
Las copias se crean como solo cotización: elegís el destino de cada una al aceptar la cotización.
Equipos
Consultá, registrá y gestioná los equipos de tu empresa.
- 3.1Ver tus equipos
- 3.2El detalle de un equipo
- 3.3Agregar un equipo
- 3.4Editar un equipo
- 3.5Agregar una nota
- 3.6Qué más podés hacer desde un equipo
Ver tus equipos
Consultá todos los equipos de tu empresa y dónde está cada uno.
Encontrá un equipo
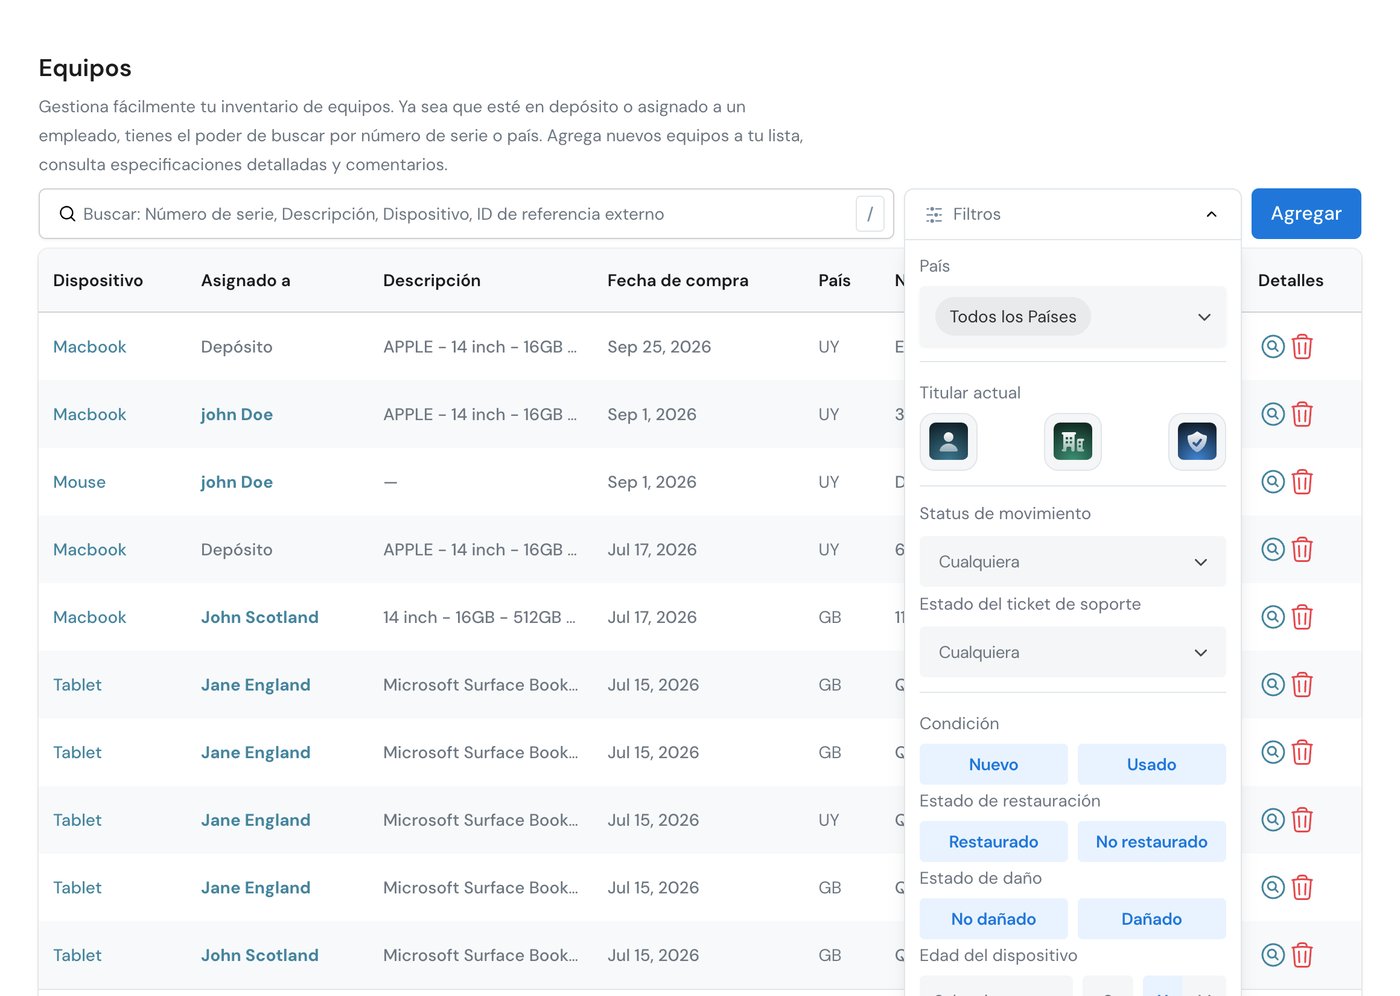
- 1Andá a menú lateral → Equipos.
- 2Para buscar un equipo, escribí el número de serie, la descripción, el dispositivo o tu ID de referencia externo.
- 3Para acotar la lista, tocá Filtros: país, condición (nuevo o usado), estado de restauración, estado de daño o edad del dispositivo.
Qué muestra cada fila: el dispositivo, a quién está asignado, la descripción, la fecha de compra, el país y el número de serie.
El detalle de un equipo
Todo sobre un equipo en un solo lugar: dónde está y su historia.
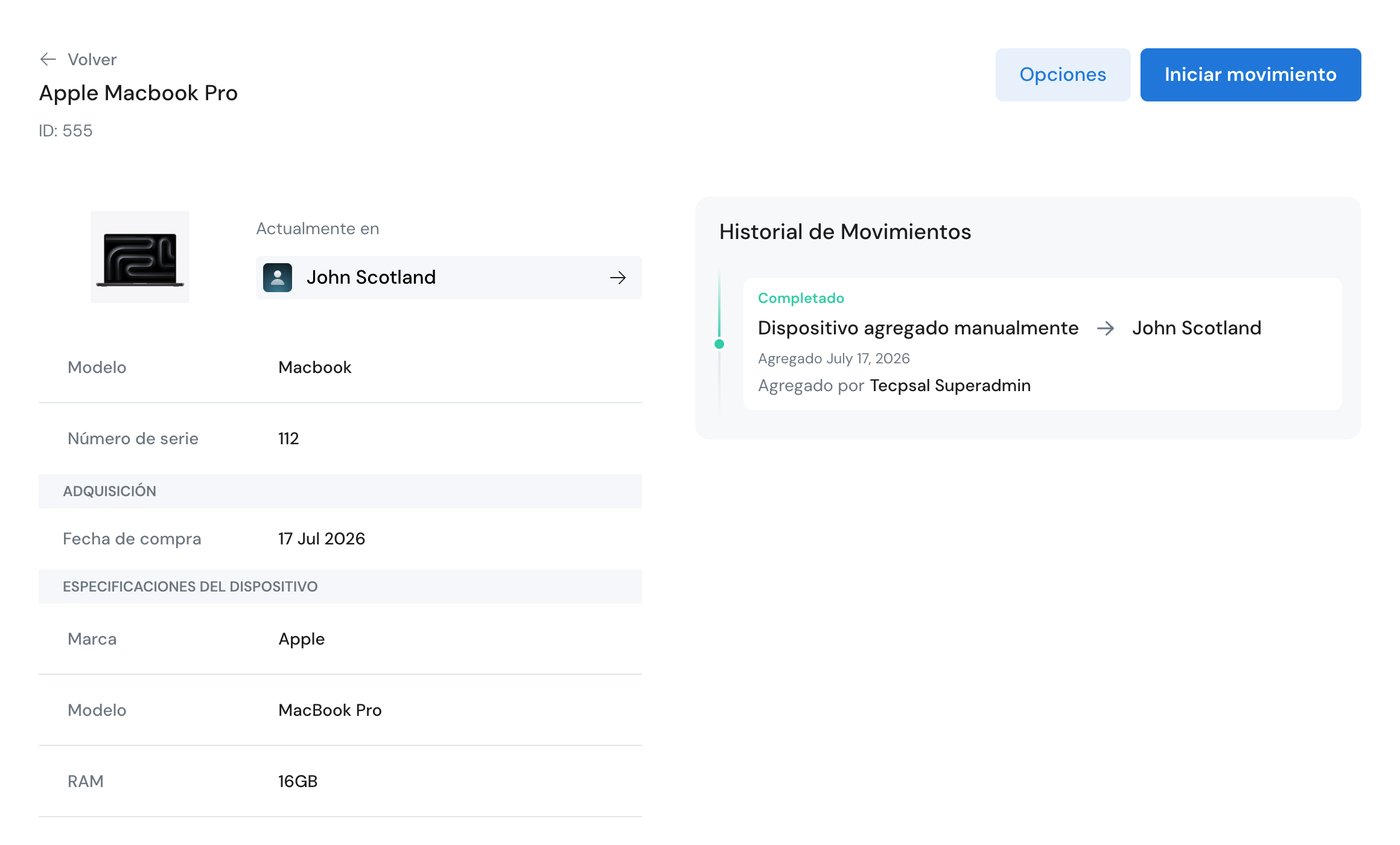
Abrí el equipo
- 1Tocá el equipo para abrirlo.
- 2En Actualmente en ves dónde está. Si lo tiene un Empleado, una Oficina o un depósito, podés abrirlo desde ahí.
- 3Más abajo están sus datos: modelo, número de serie, fecha de compra y especificaciones.
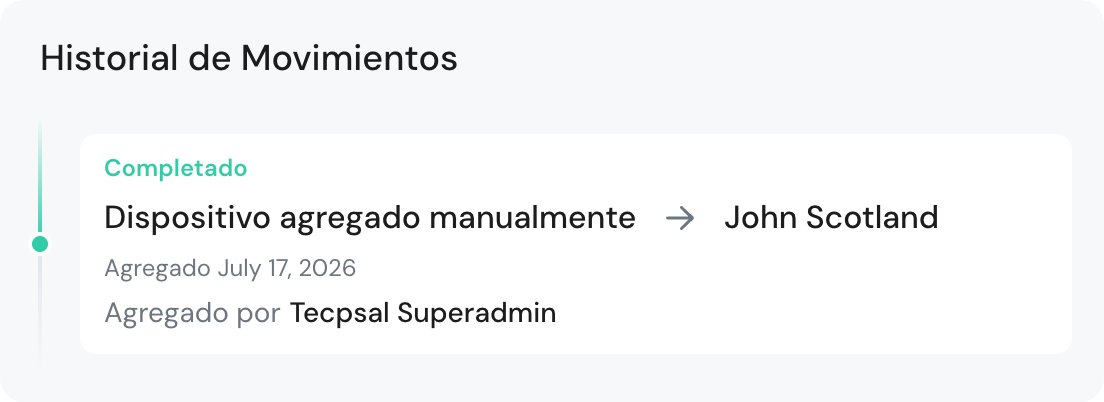
- 4A la derecha ves su historia: el Historial de Movimientos, los Tickets de Soporte y las Notas.
También llegás al mismo detalle desde un Empleado, una Oficina, En Depósito, un movimiento o un ticket.
Agregar un equipo
Registrá los equipos que tu empresa ya tiene. Los que comprás a través de Tecspal se agregan solos cuando se entrega la orden.
Registrá el equipo
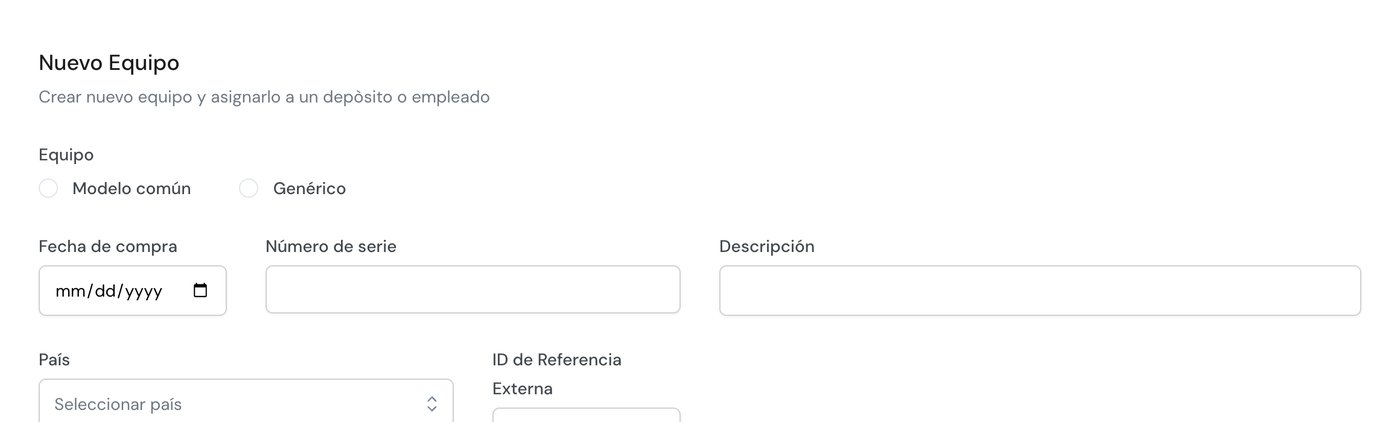
- 1Andá a menú lateral → Equipos → Agregar.
- 2Elegí Modelo común y buscá el modelo, o Genérico si no está en la lista.
- 3Completá la fecha de compra, el número de serie, la descripción, el país y, si querés, tu ID de referencia externa.
- 4Tocá Enviar.
Atajo: desde el detalle de un Empleado → Nuevo dispositivo → Registrar un dispositivo existente.
Editar un equipo
Corregí o completá los datos de un equipo.
Editá el equipo
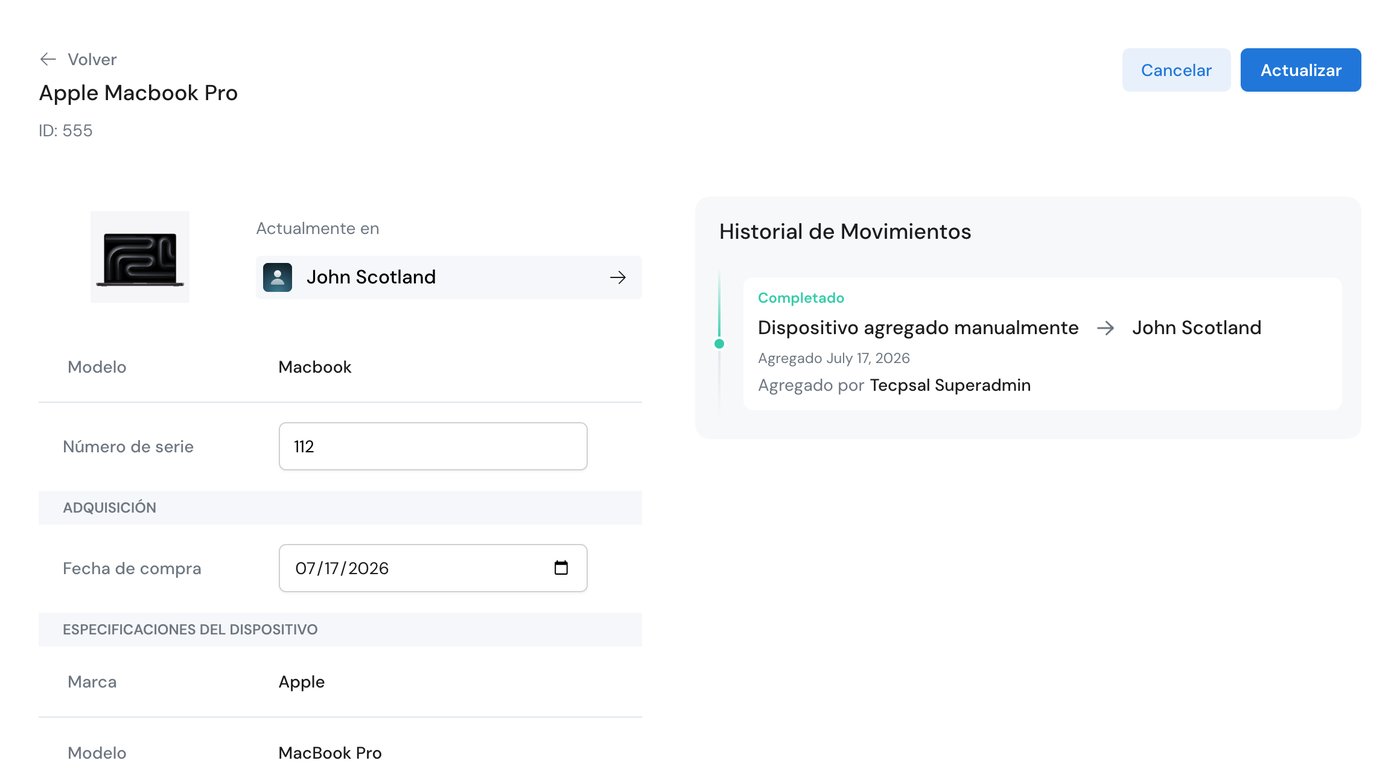
- 1Abrí el equipo.
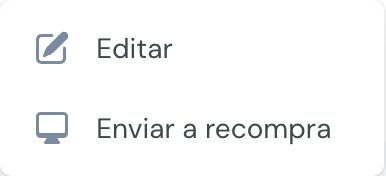
- 2Tocá Opciones → Editar.
- 3Cambiá los datos que necesites.
- 4Tocá Actualizar.
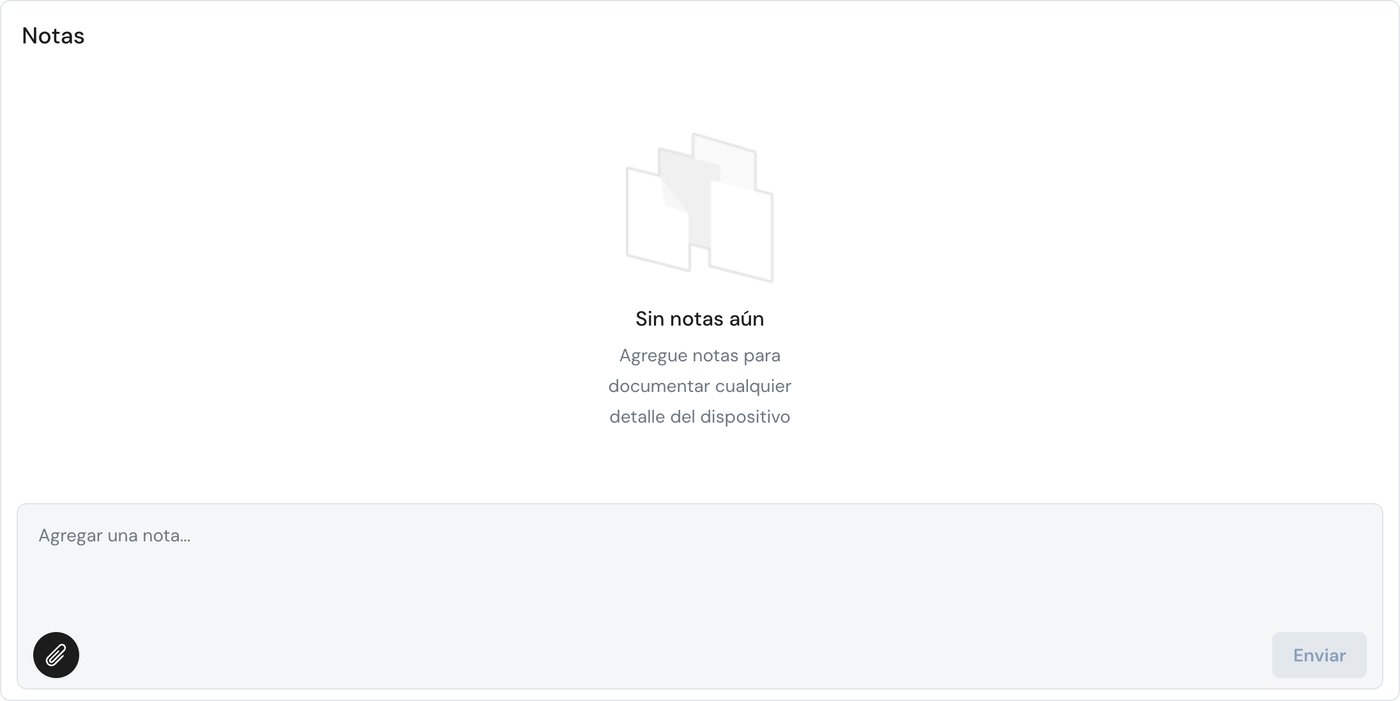
Agregar una nota
Dejá información útil sobre el equipo, con imágenes si hace falta.
Agregá la nota
- 1Abrí el equipo.
- 2En Notas, escribí tu nota. Para sumar una imagen, tocá el clip.
- 3Tocá Enviar.
Qué más podés hacer desde un equipo
Desde el detalle del equipo arrancan otros procesos.
Otras acciones
- Moverlo a otro Empleado, Oficina o depósito: Iniciar movimiento. Ver el capítulo Movimientos. No se puede si el equipo ya está en un movimiento o tiene un ticket abierto.
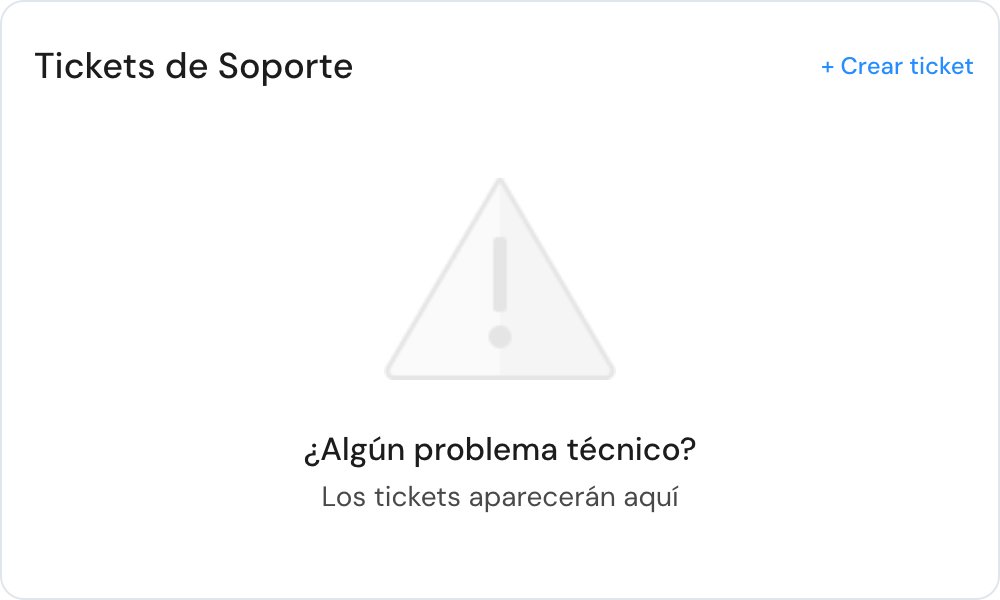
- Pedir soporte técnico: en Tickets de Soporte, tocá + Crear ticket. Ver el capítulo Soporte técnico.
- Venderlo a Tecspal: Opciones → Enviar a recompra. Ver el capítulo Buyback.
Empleados
Las personas de tu empresa que reciben o devuelven equipos.
- 4.1Ver tus Empleados
- 4.2Agregar Empleados
- 4.3El detalle de un Empleado
- 4.4Editar un Empleado
- 4.5Darle un equipo nuevo
- 4.6Hacer el offboarding
- 4.7Desactivar un Empleado
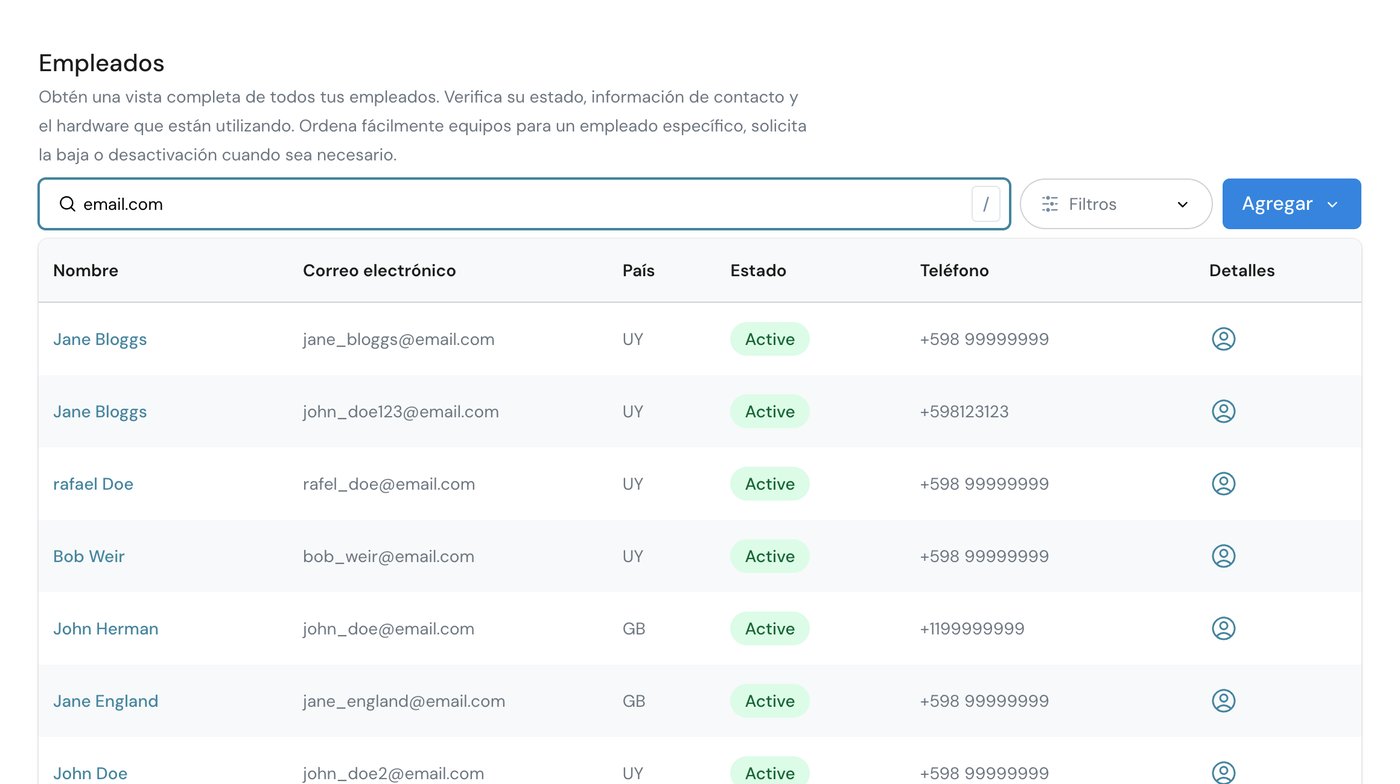
Ver tus Empleados
Consultá las personas de tu empresa y sus equipos.
Encontrá un Empleado
- 1Andá a menú lateral → Empleados.
- 2Para buscar, escribí el nombre o el email del Empleado.
- 3Tocá el Empleado para abrirlo.
Agregar Empleados
Cargá a las personas antes de mandarles equipos: de a una o varias a la vez con un archivo CSV.
De a uno
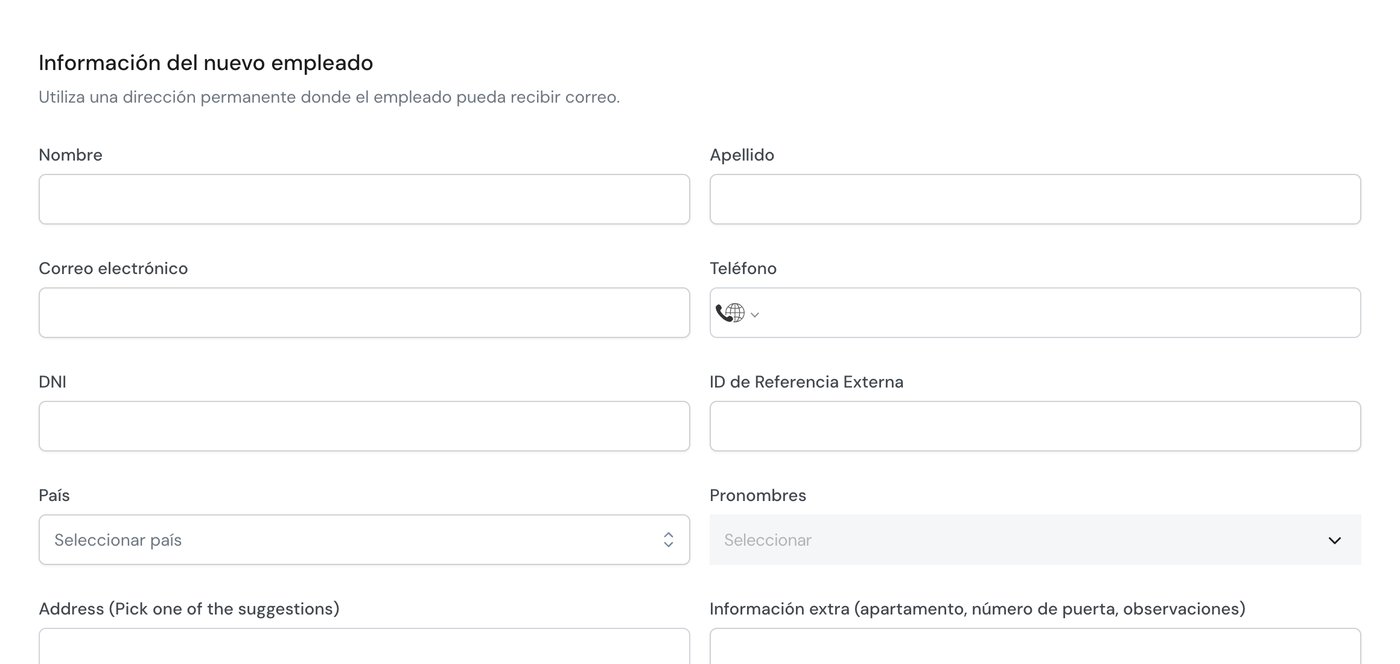
- 1Andá a menú lateral → Empleados → Agregar y elegí cargar uno.
- 2Completá nombre, apellido, email y teléfono (elegí el código de país).
- 3Cargá el DNI. Si es de Brasil, también el CPF.
- 4Elegí el país.
- 5Escribí la dirección y elegí una de las sugerencias. Si hace falta, sumá información extra (apartamento, número de puerta).
- 6Completá el código postal.
- 7Tocá Enviar.
También podés crear un Empleado en el momento, al elegir el destino de una orden o de un movimiento.
Varios a la vez con un CSV
- 8Andá a menú lateral → Empleados → Agregar y elegí la carga masiva.
- 9Prepará el archivo CSV con una fila por Empleado.
- 10Antes de subirlo, revisá que cada email aparezca una sola vez en el archivo.
- 11Completá el DNI de cada Empleado (y el CPF si es de Brasil): se pide al crear órdenes y movimientos.
- 12Subí el archivo.
- 13Revisá que los Empleados aparezcan en Empleados.
Si una fila tiene un error, no se carga ningún Empleado del archivo. Corregí el archivo y volvé a subirlo.
El detalle de un Empleado
Sus datos, sus equipos y su historia.
Qué muestra
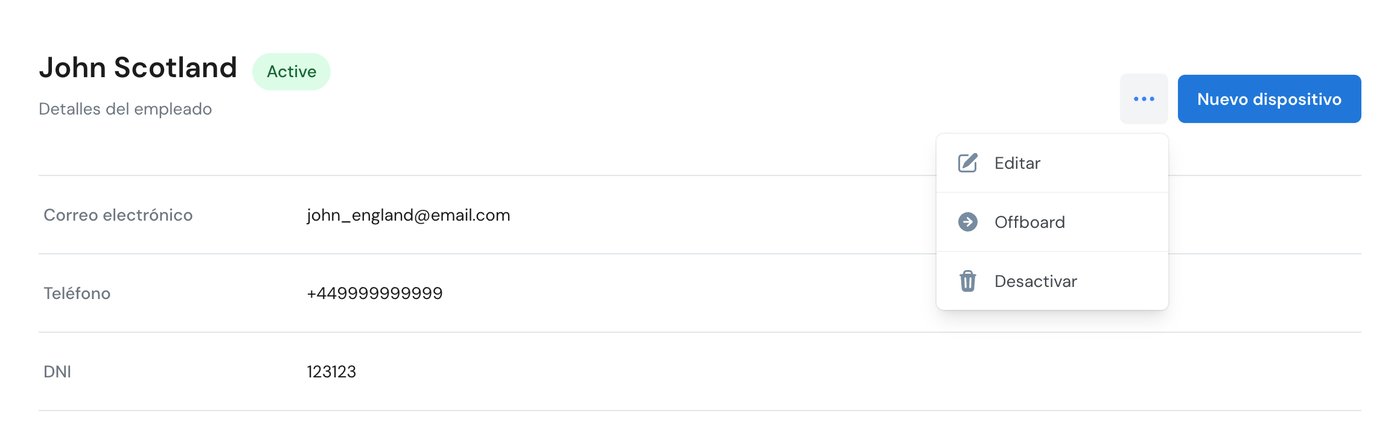
- Datos: email, teléfono, DNI (y CPF en Brasil), dirección, código postal y referencia externa. Si falta el DNI, dice Missing.
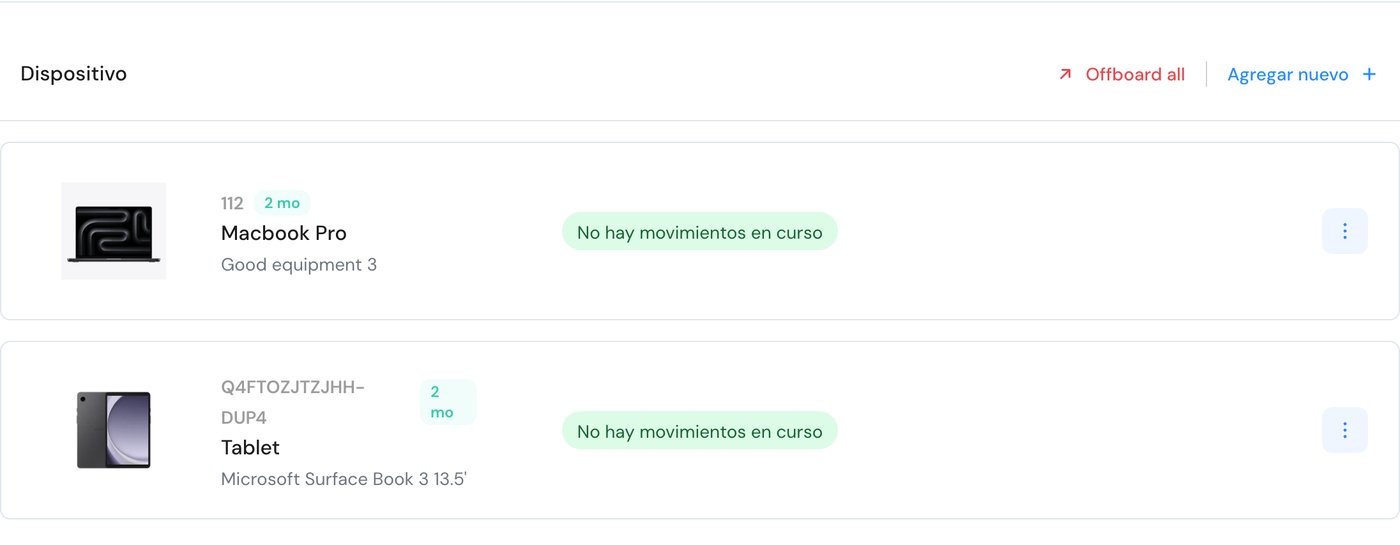
- Sus equipos, en la sección Dispositivo. Tocá uno para abrir el equipo.
- Su historial de movimientos.
- Notas, con imágenes.
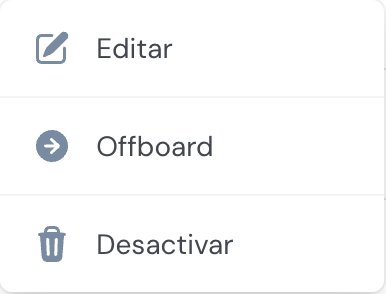
- Acciones: arriba a la derecha están Nuevo dispositivo y el menú ···, con Editar, Offboard y Desactivar.
Editar un Empleado
Actualizá los datos de una persona.
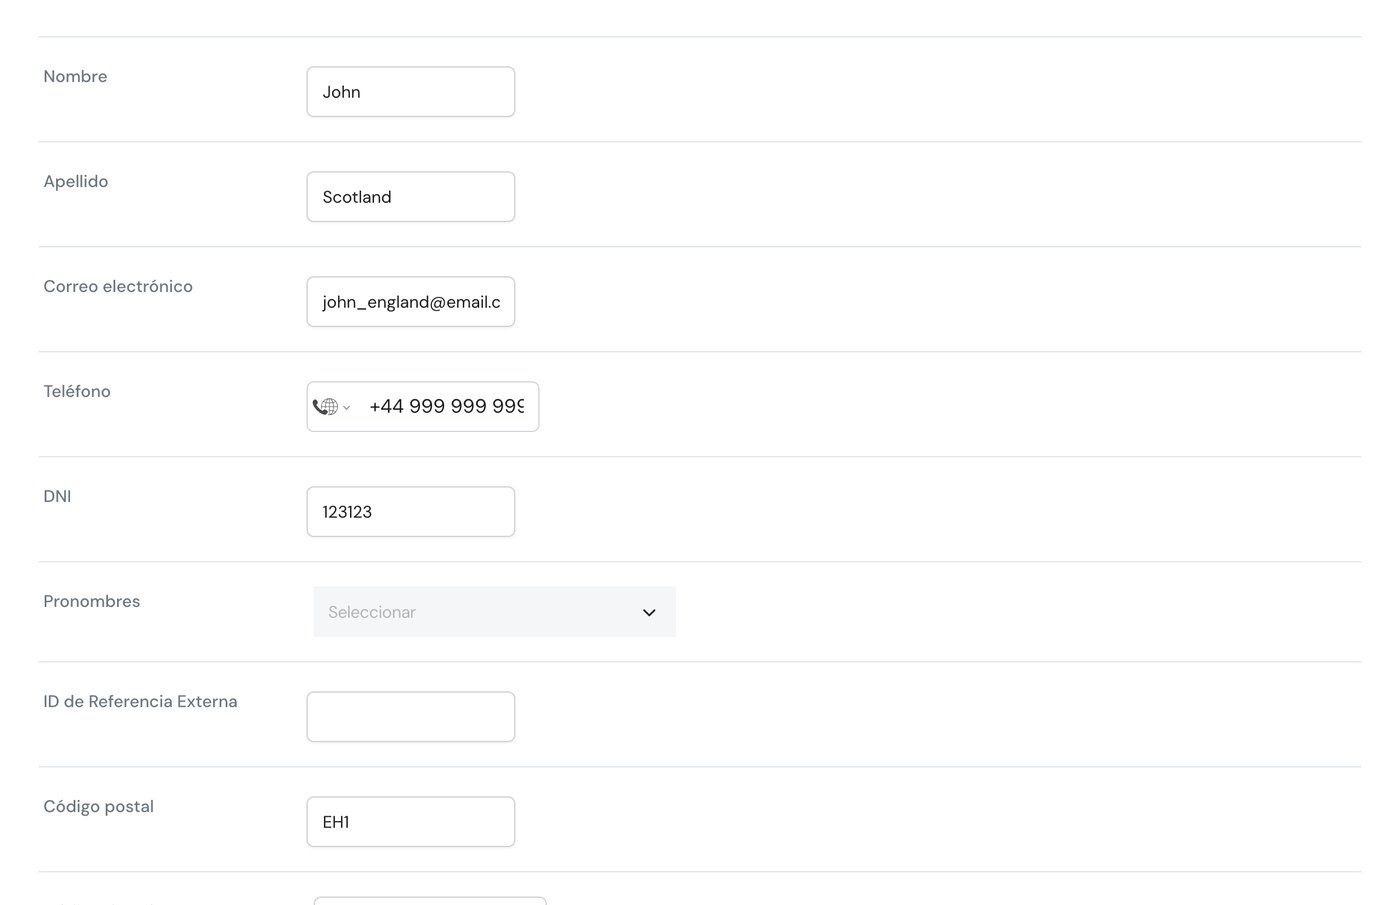
Editá el Empleado
- 1Abrí el Empleado.
- 2En el menú ···, tocá Editar.
- 3Cambiá los datos que necesites.
- 4Volvé a elegir la dirección de las sugerencias, aunque no cambie.
- 5Guardá.
Si cambiás el país del Empleado, también cambia el país de sus equipos.
Darle un equipo nuevo
Desde el Empleado, con la persona ya cargada como destino.
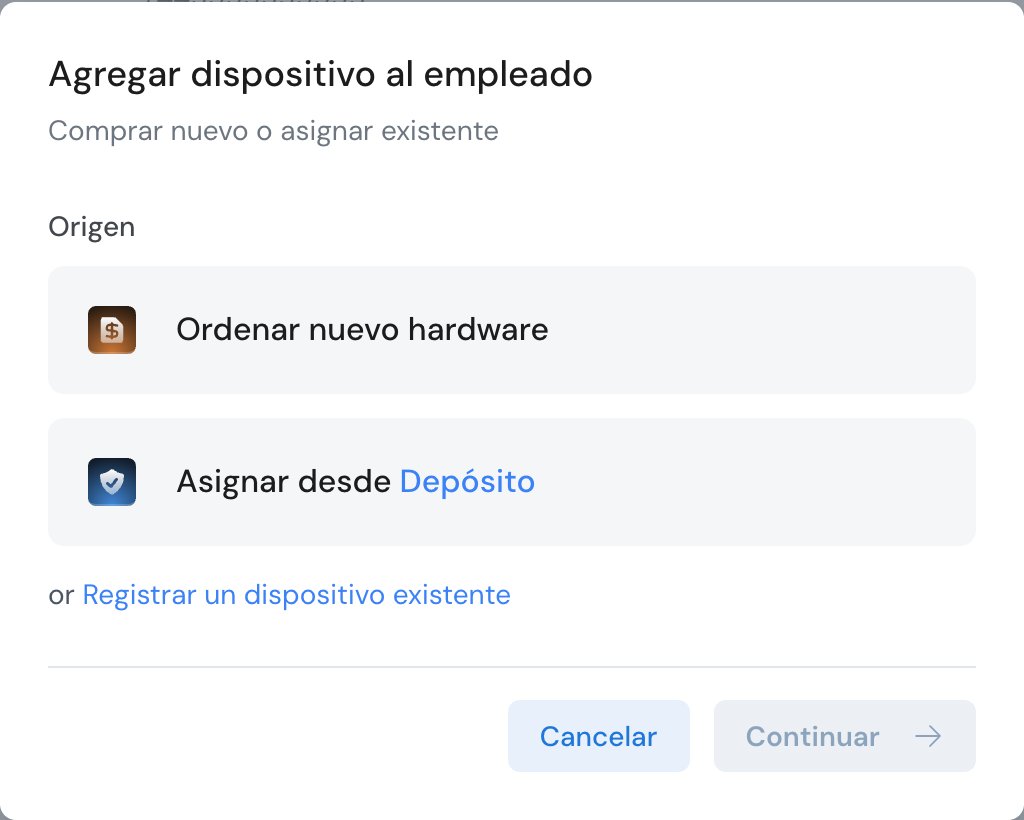
Usá Nuevo dispositivo
- 1Abrí el Empleado.
- 2Tocá Nuevo dispositivo.
- 3Elegí una opción:
- Ordenar nuevo hardware: crea una orden para el Empleado. Ver Crear una orden.
- Asignar desde Depósito: le manda un equipo que tenés guardado en Tecspal. Ver el capítulo Equipos en storage y oficinas.
- Registrar un dispositivo existente: suma a la plataforma un equipo que ya tiene. Ver Agregar un equipo.
- 4Tocá Continuar.
Hacer el offboarding
Cuando una persona deja tu empresa, pedí que Tecspal retire sus equipos.
Elegí los equipos y las fechas
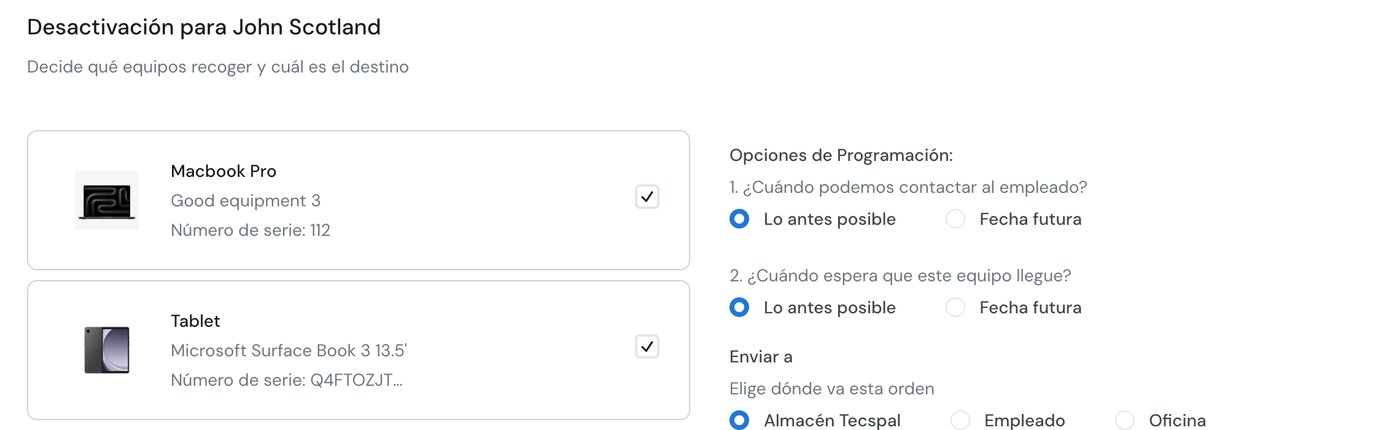
- 1Abrí el Empleado.
- 2En el menú ···, tocá Offboard. También podés usar Offboard all en la sección Dispositivo.
- 3Revisá los equipos: vienen todos marcados. Destildá los que no se retiran.
- 4En ¿Cuándo podemos contactar al empleado?, elegí Lo antes posible.
- 5En ¿Cuándo espera que este equipo llegue?, elegí Lo antes posible o una Fecha futura.
Elegí el destino y enviá
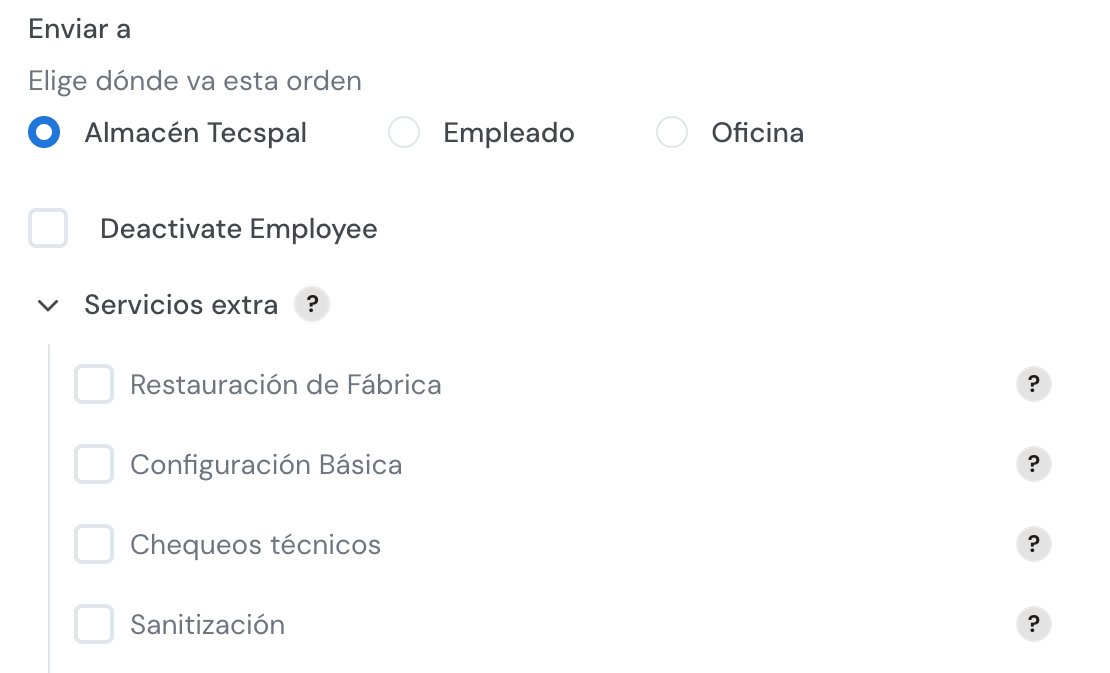
- 6En Enviar a, elegí a dónde van los equipos:
- Almacén Tecspal: Tecspal los retira y los guarda. Si son PC o Mac, en Servicios extra podés pedir Restauración de Fábrica, Configuración Básica, Chequeos técnicos o Sanitización.
- Empleado u Oficina: elegí el destino y quién hace el envío, Tecspal o tu empresa.
- 7Tocá Enviar.
Todos los equipos elegidos van al mismo destino. Si querés mandar algunos a otro lado, hacé un segundo offboarding.
Antes de enviar, la plataforma revisa que el Empleado tenga teléfono y DNI (y CPF en Brasil). Si falta algo, te ofrece completarlo.
¿Qué pasa después?
Se crea un movimiento y Tecspal coordina el retiro con el Empleado. Lo seguís en Solicitudes de movimiento.
Desactivar un Empleado
Cuando una persona ya no está en tu empresa y no tiene equipos pendientes.
Desactivá el Empleado
- 1Abrí el Empleado.
- 2En el menú ···, tocá Desactivar.
Un Empleado desactivado deja de aparecer al crear órdenes y movimientos. Sus datos y su historia quedan guardados.
Movimientos
Cómo pedir que Tecspal mueva equipos entre Empleados, Oficinas y el depósito, y cómo seguir cada envío.
- 5.1Qué es un movimiento
- 5.2Mover un equipo
- 5.3Otros lugares desde donde arranca
- 5.4Seguir un movimiento
- 5.5Los estados de un movimiento
- 5.6Cambiar o cancelar un movimiento
Qué es un movimiento
Un movimiento es el envío de equipos de un lugar a otro: del depósito a un Empleado, de un Empleado al depósito, entre Empleados, o hacia o desde una Oficina.
Tipos y quién hace el envío
La plataforma elige el tipo sola, según el origen y el destino:
- Onboarding: el equipo sale del Almacén Tecspal hacia un Empleado u Oficina.
- Offboarding: el equipo vuelve al Almacén Tecspal.
- Off + On: el equipo va de un lugar a otro sin pasar por el depósito, por ejemplo entre dos Empleados.
Quién hace el envío: si lo hace Tecspal, coordina con el Empleado, retira, entrega y te avisa en cada paso. Si lo hace Mi empresa, el movimiento queda terminado en el momento y el equipo cambia de lugar enseguida: usalo para registrar un envío que ya hicieron ustedes. Si el movimiento sale del depósito o llega a él, siempre lo hace Tecspal.
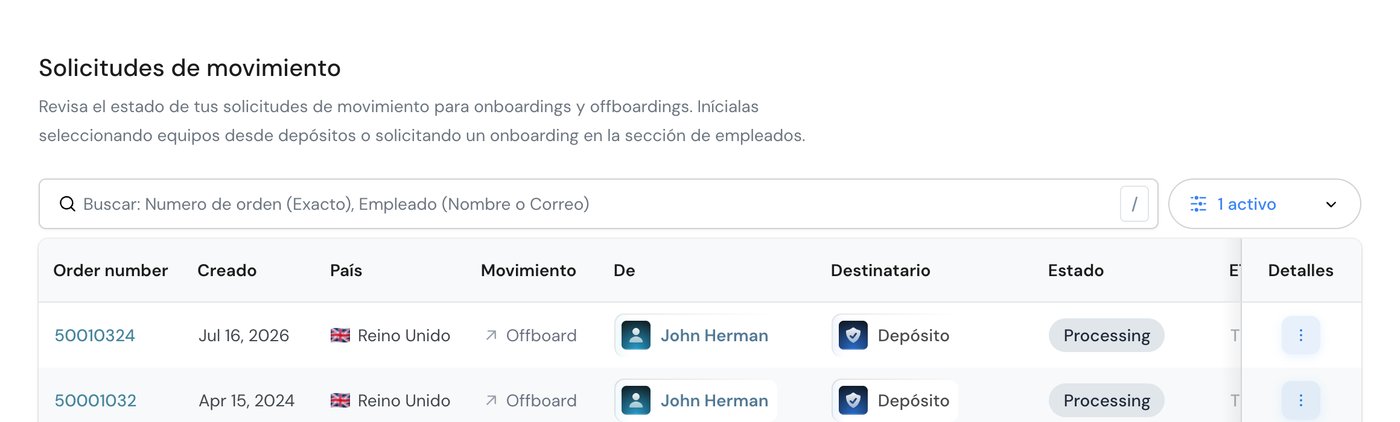
Mover un equipo
Mandá un equipo a otro Empleado, a una Oficina o al depósito.
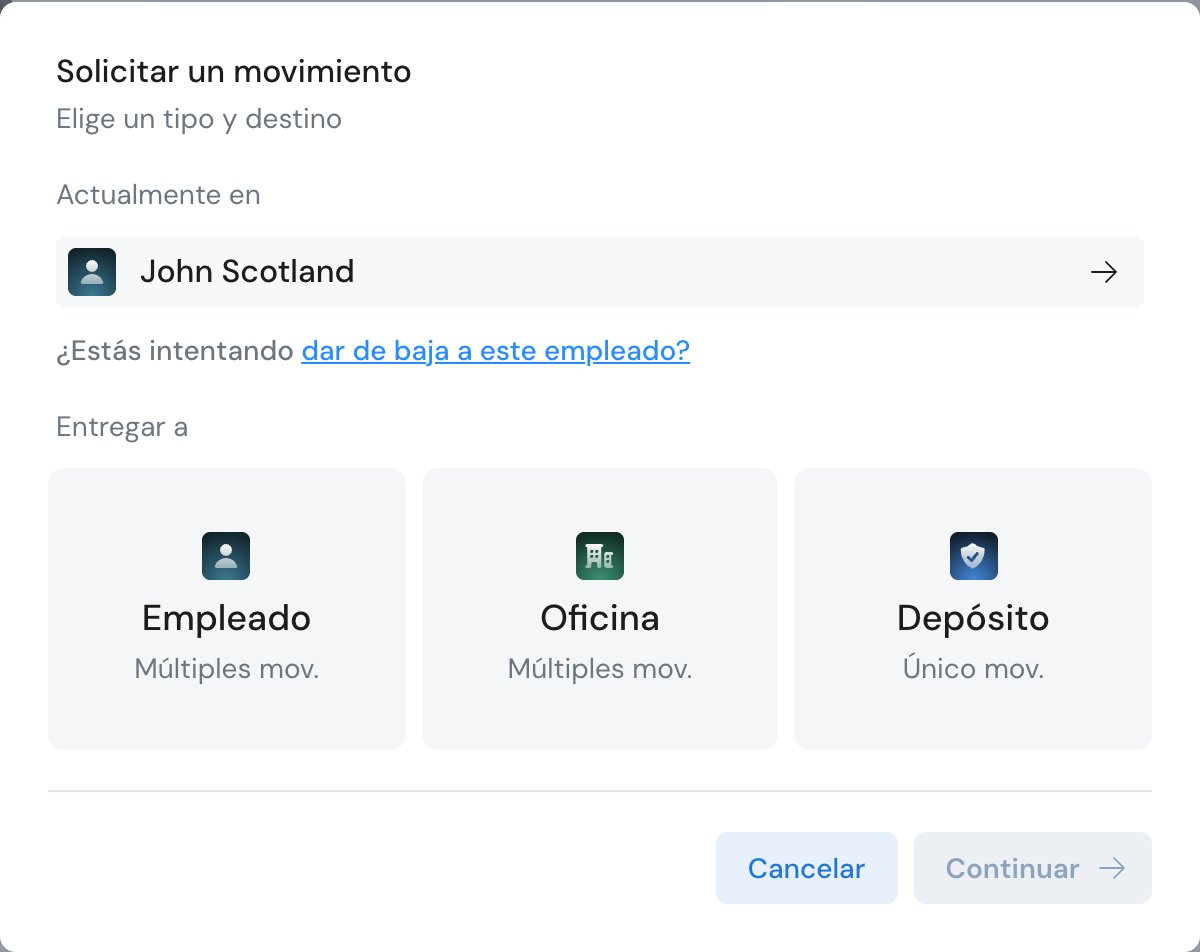
Elegí el tipo de destino
- 1Andá a menú lateral → Equipos y abrí el equipo.
- 2Tocá Iniciar movimiento.
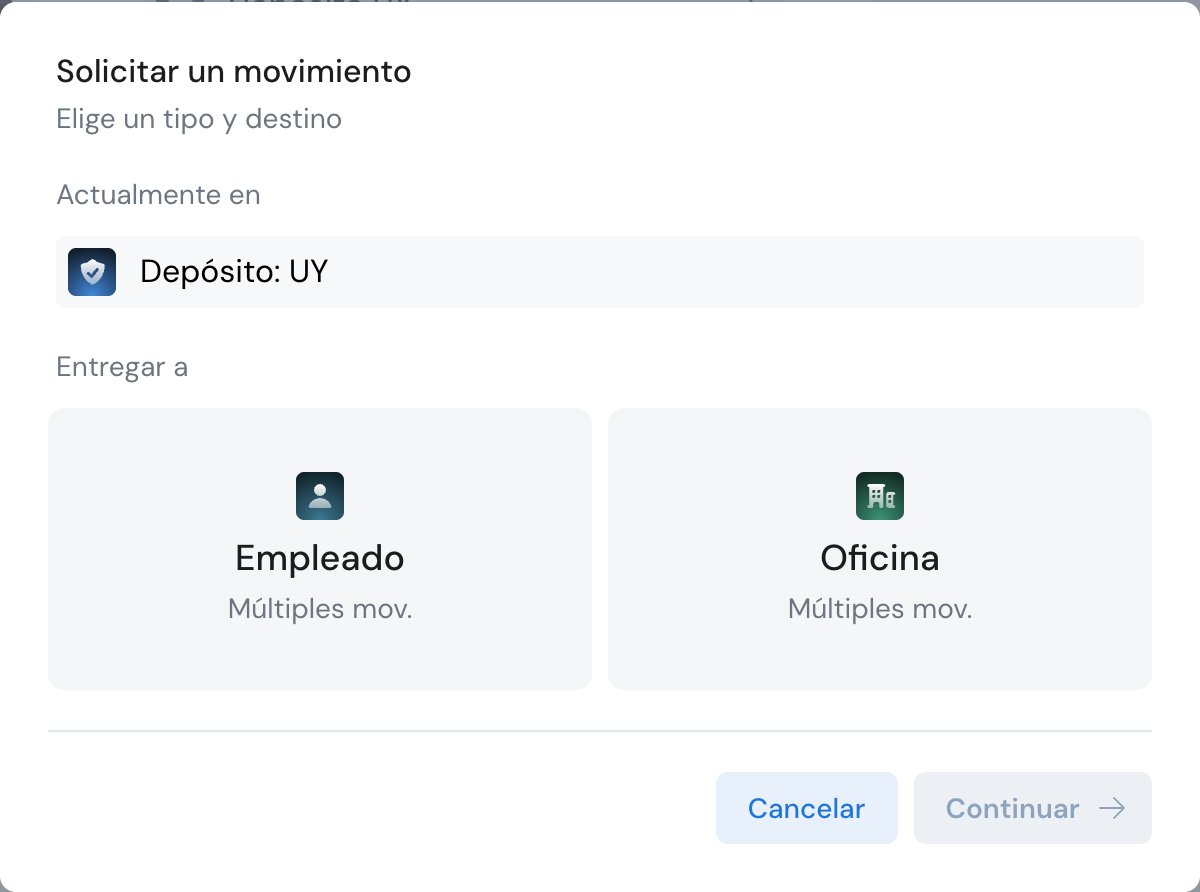
- 3En Entregar a, elegí Empleado, Oficina o Depósito. Si el equipo ya está en el depósito, las opciones son Empleado u Oficina.
- 4Tocá Continuar.
Si el equipo lo tiene un Empleado que deja la empresa, usá el link dar de baja a este empleado. Ver Hacer el offboarding.
No se puede mover un equipo que ya está en un movimiento o que tiene un ticket abierto.
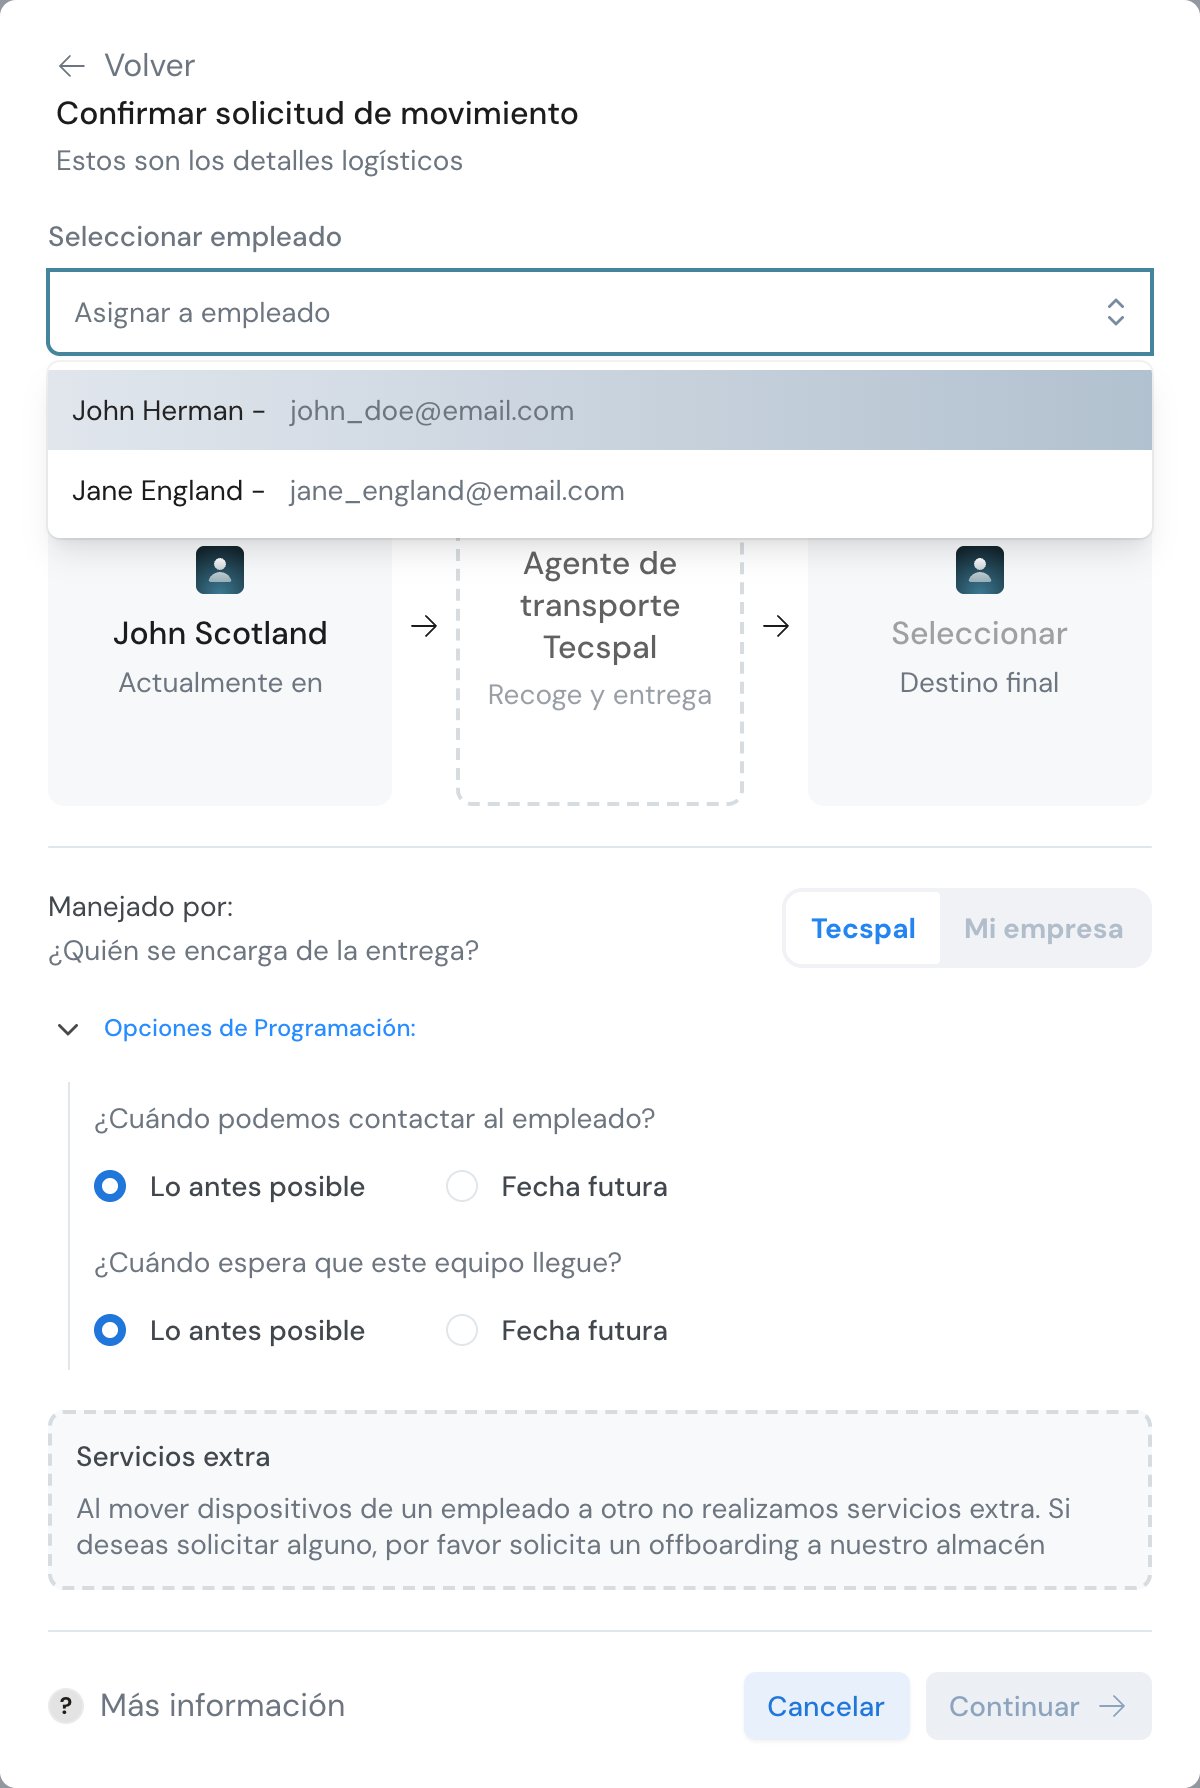
Confirmá los detalles
- 5Elegí el Empleado o la Oficina de destino (por ejemplo, en Seleccionar empleado).
- 6En Manejado por, elegí Tecspal o Mi empresa.
- 7En ¿Cuándo podemos contactar al empleado?, elegí Lo antes posible.
- 8En ¿Cuándo espera que este equipo llegue?, elegí Lo antes posible o una Fecha futura.
- 9Tocá Continuar y confirmá.
Entre Empleados no se hacen servicios extra. Si el equipo necesita alguno (por ejemplo, Sanitización), pedí un offboarding al depósito.
¿Qué pasa después?
Si lo maneja Tecspal, el movimiento queda en Processing: te llega un email y el Empleado recibe un WhatsApp para coordinar. Lo seguís en Solicitudes de movimiento.
Otros lugares desde donde arranca
Varios procesos crean un movimiento solos.
Dónde más se crean
- El offboarding de un Empleado: ver Hacer el offboarding.
- En Depósito: para mandar equipos guardados a un Empleado u Oficina. Ver el capítulo Equipos en storage y oficinas.
- Una Oficina: para mandar sus equipos a un Empleado o al depósito. Ver el capítulo Equipos en storage y oficinas.
- Un ticket de soporte: Tecspal lleva el equipo a service y lo devuelve. Ver el capítulo Soporte técnico.
- Un buyback: Tecspal lleva el equipo al comprador. Ver el capítulo Buyback.
Seguir un movimiento
Consultá en qué paso está cada envío.
Encontrá el movimiento
- 1Andá a menú lateral → Solicitudes de movimiento.
- 2Para buscar, escribí el número de orden completo o el nombre o el email del Empleado.
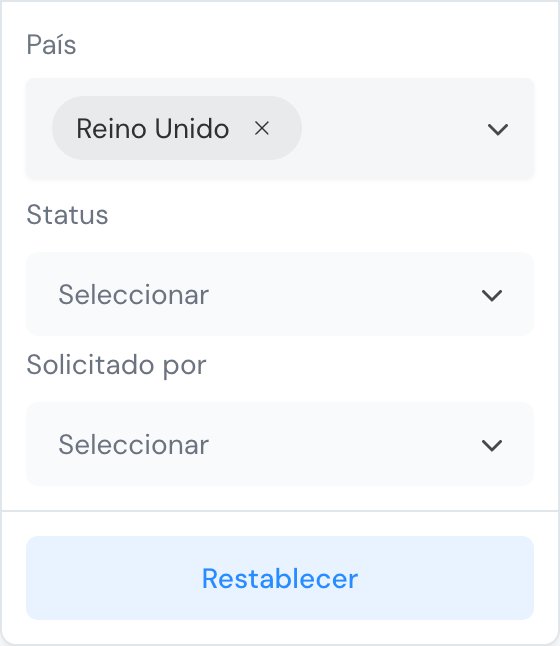
- 3Para acotar la lista, filtrá por País, Status o Solicitado por.
- 4Tocá el movimiento para abrirlo.
Cada fila muestra el número, la fecha, el país, el tipo, el origen, el destino y el estado.
Mirá el detalle
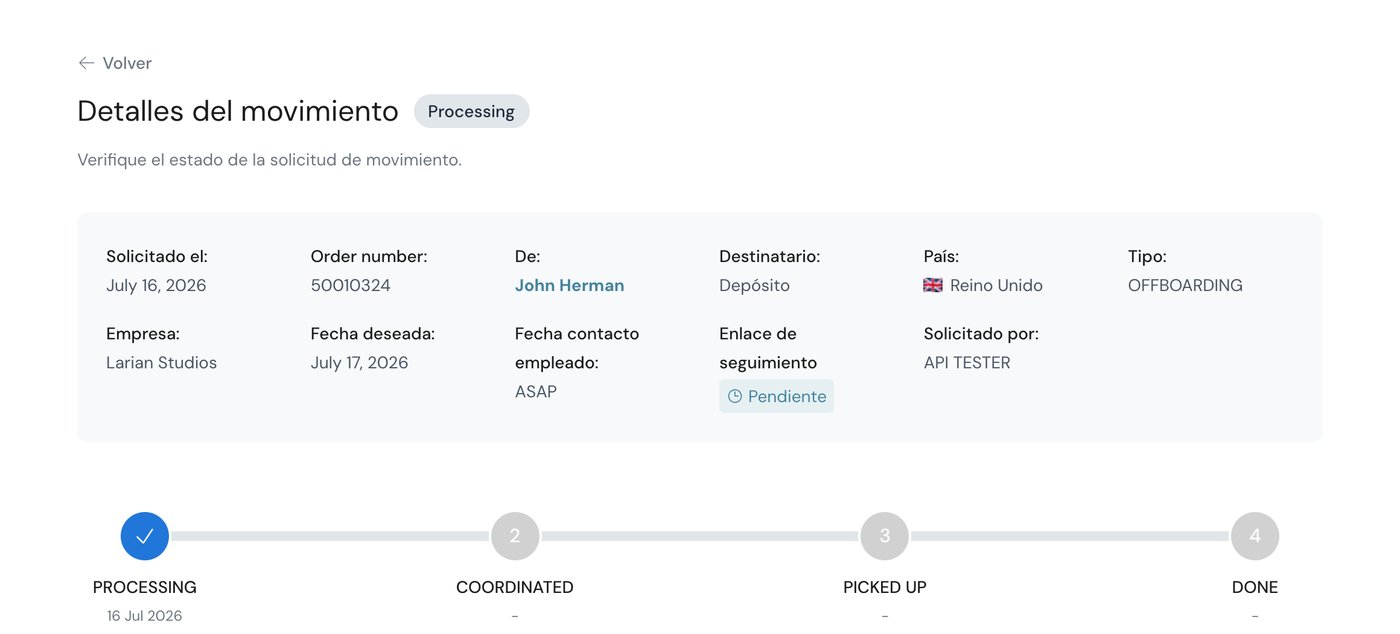
- Arriba ves el origen, el destino, el tipo, la fecha esperada y cuándo se contacta al Empleado.
- Cuando Tecspal carga el tracking, en Enlace de seguimiento aparece un Link al envío.
- La barra muestra el paso en el que está.
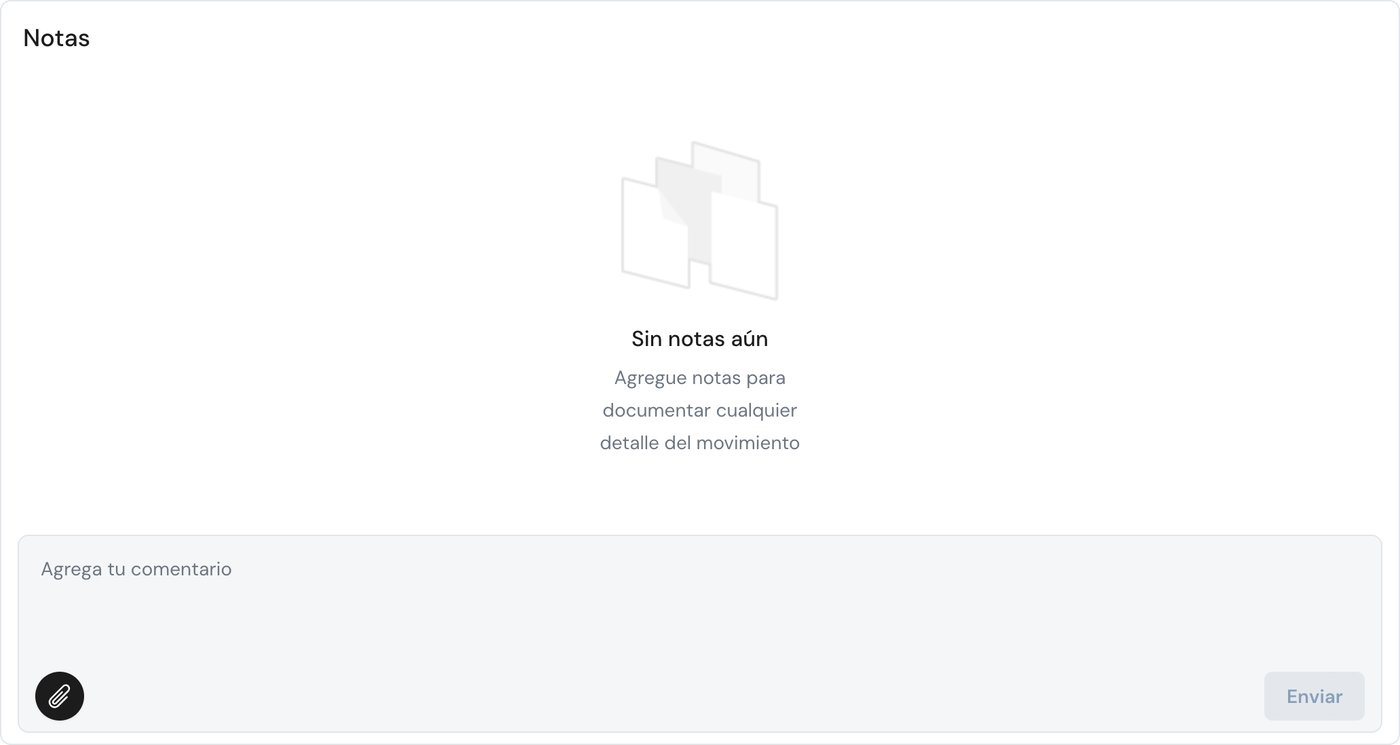
- Más abajo están los equipos y las Notas, donde podés escribirle a Tecspal sobre ese movimiento.
Los estados de un movimiento
Qué significa cada paso y cuándo te avisamos.
Los pasos
- Processing: Tecspal recibió el pedido. Email a tu empresa y WhatsApp al Empleado.
- Coordinated: Tecspal coordinó con el Empleado. Email.
- Picked up: Tecspal retiró el equipo (no aplica a los onboardings). Email.
- Done: el equipo llegó y cambió de lugar en la plataforma. Email.
- Cancelled: el movimiento se canceló.
- Blocked: Tecspal lo frenó por algún motivo. Consultá con tu account manager.
Cuando se carga el tracking, te llega un email y al Empleado un WhatsApp.

Cambiar o cancelar un movimiento
El estado de un movimiento lo cambia Tecspal.
Pedí el cambio
- 1Abrí el movimiento.
- 2En Notas, contale a Tecspal qué necesitás cambiar o si querés cancelarlo.
- 3Tocá Enviar. Si es urgente, escribile también a tu account manager.
Soporte técnico
Cómo abrir un ticket de soporte técnico, seguirlo y aprobar la reparación.
- 6.1Cuándo se abre un ticket
- 6.2Abrir un ticket
- 6.3Seguir tus tickets
- 6.4Aprobar la reparación
- 6.5Cuando termina la reparación
- 6.6Cancelar un ticket
- 6.7Comentar un ticket
- 6.8Los estados de un ticket
Cuándo se abre un ticket
Un ticket es un pedido de soporte técnico sobre uno o más equipos.
Dos formas
- Lo abrís vos, desde un equipo, cuando tiene un problema. Ver Abrir un ticket.
- Se abre solo cuando pedís servicios extra en una orden o en un offboarding (por ejemplo, Configuración Básica o Sanitización): Tecspal abre un ticket por cada PC o Mac. No tenés que hacer nada.
Abrir un ticket
Pedí soporte para un equipo de tu empresa.
Creá el ticket
- 1Abrí el equipo (menú lateral → Equipos).
- 2En Tickets de Soporte, tocá + Crear ticket.
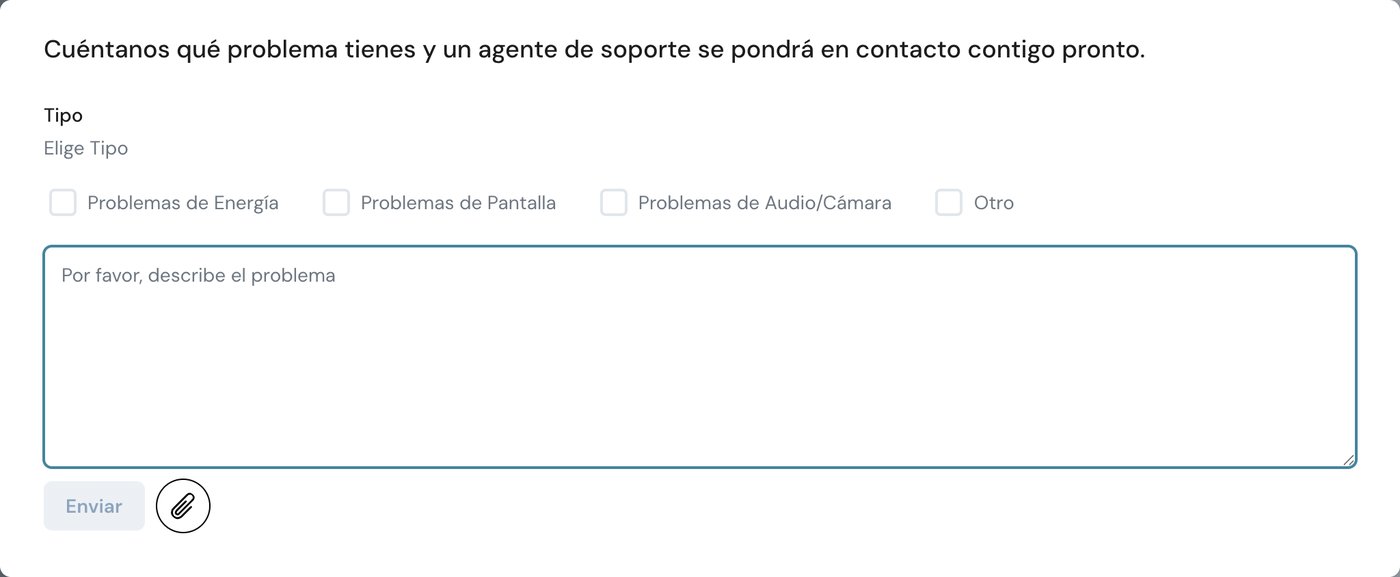
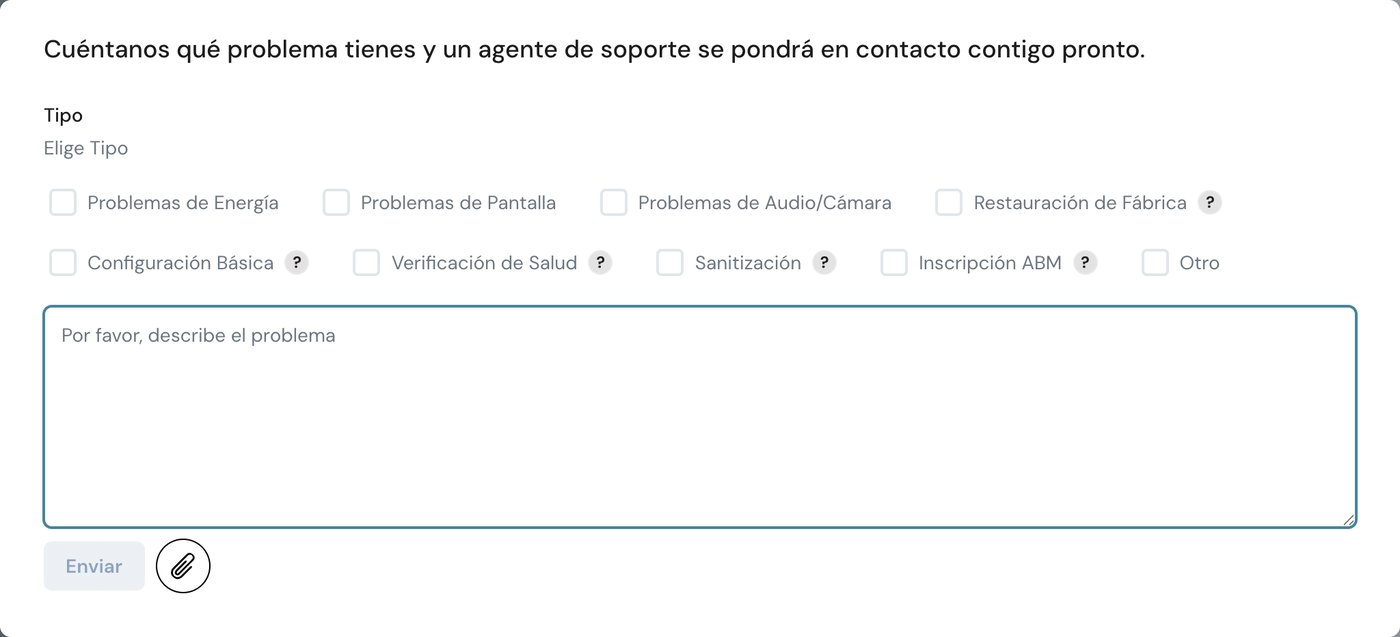
- 3En Tipo, marcá uno o más tipos de problema. Los tipos dependen de dónde está el equipo:
- Si lo tiene un Empleado o está en una Oficina: Problemas de Energía, Problemas de Pantalla, Problemas de Audio/Cámara u Otro.
- Si está en el depósito de Tecspal: además, Restauración de Fábrica, Configuración Básica, Verificación de Salud, Sanitización, y Extracción de Hash (PC) o Inscripción ABM (Mac).
- 4Describí el problema. Si hace falta, adjuntá un archivo con el clip.
- 5Tocá Enviar.
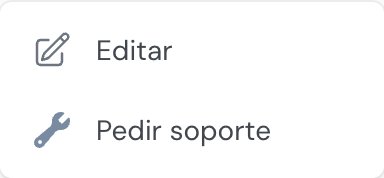
Atajo: desde el detalle de un Empleado, en el menú de la tarjeta del equipo → Pedir soporte.
Seguir tus tickets
Consultá el estado de todos los tickets de tu empresa.
Encontrá el ticket
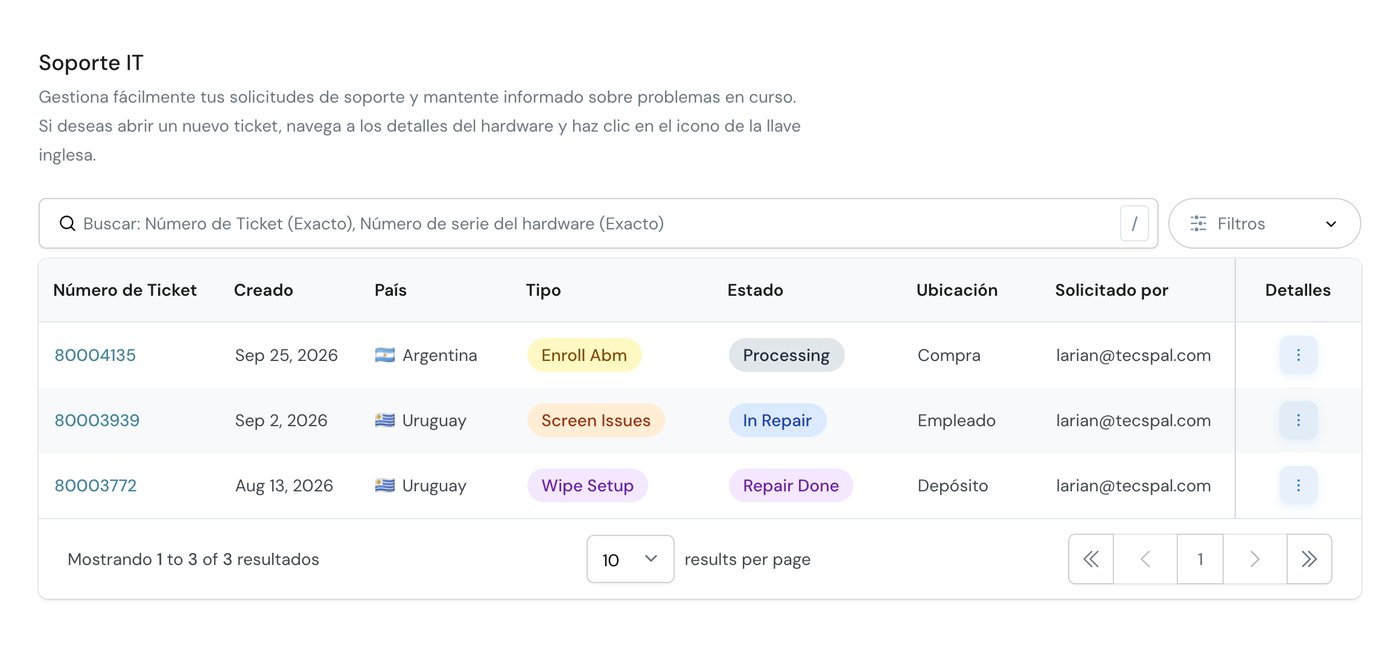
- 1Andá a menú lateral → Soporte IT.
- 2Para buscar, escribí el número de ticket o el número de serie completo.
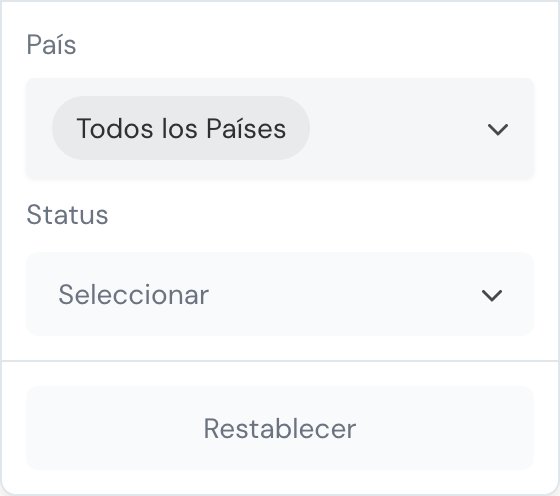
- 3Para acotar la lista, tocá Filtros y filtrá por país o estado.
- 4Tocá el ticket para abrirlo.
Aprobar la reparación
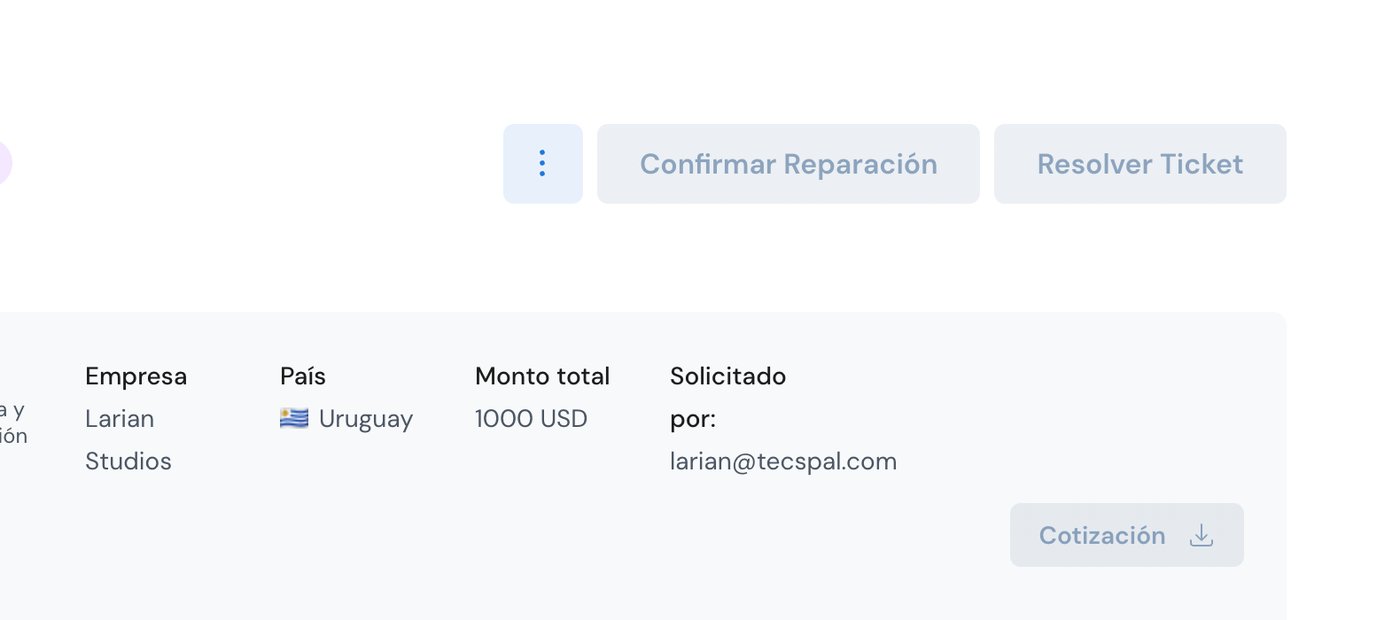
Cuando Tecspal termina el diagnóstico, el ticket pasa a Diagnostic ready y te llega un email.
Aprobá o cancelá
- 1Abrí el ticket.
- 2Revisá el diagnóstico y el precio. Para descargar la cotización en PDF, tocá Cotización.
- 3Para aprobar, tocá Confirmar Reparación. El ticket pasa a In repair.
- 4Si no querés hacer la reparación, cancelá el ticket. Ver Cancelar un ticket.
Cuando termina la reparación
Cuando la reparación termina, el ticket pasa a Repair done y te llega un email.
Tecspal cierra el ticket
- Tecspal devuelve el equipo y cierra el ticket. Cuando se cierra, pasa a Done.
- Si querés que el equipo vuelva a otro lugar (por ejemplo, a otro Empleado o al depósito), avisale a Tecspal en los comentarios del ticket. Ver Comentar un ticket.

Cancelar un ticket
Podés cancelar mientras el ticket está en Processing o Diagnostic ready.
Cancelá el ticket
- 1Abrí el ticket.
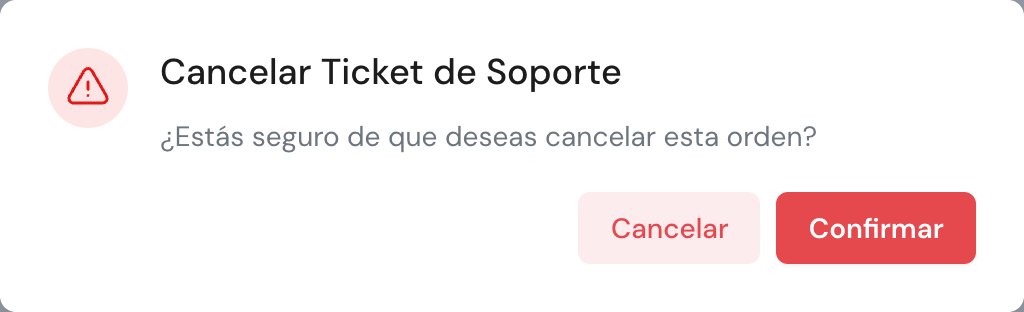
- 2En el menú ⋮, tocá cancelar.
- 3En Cancelar Ticket de Soporte, tocá Confirmar.
Comentar un ticket
Hablá con Tecspal sobre ese problema puntual.
Dejá un comentario
- 1Abrí el ticket.
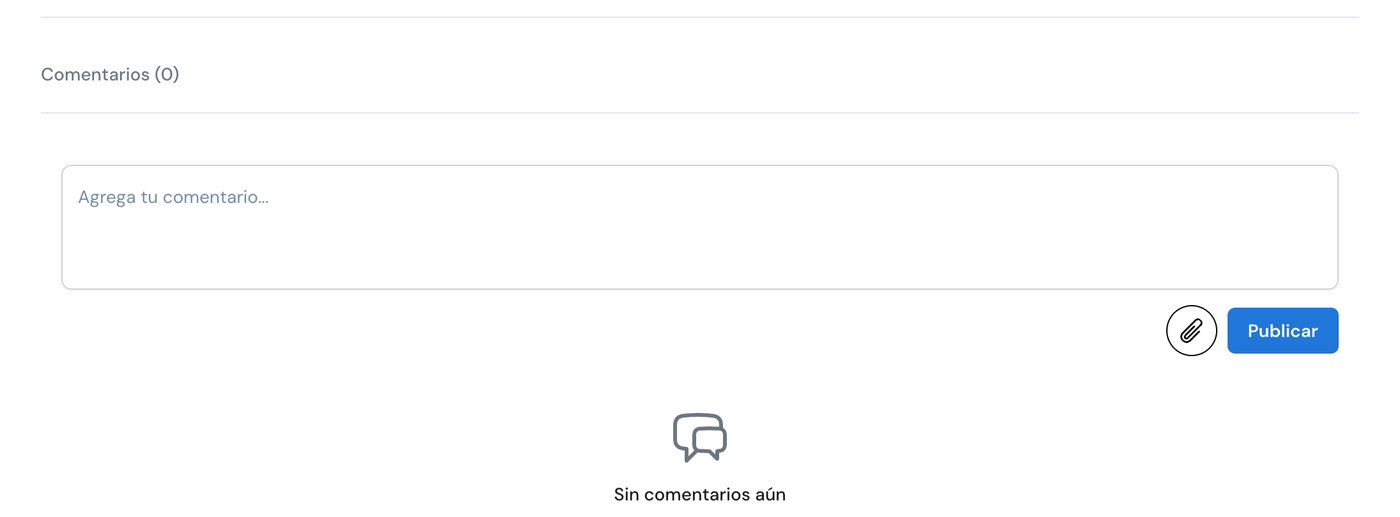
- 2Escribí tu mensaje en Agrega tu comentario. Si hace falta, adjuntá un archivo con el clip.
- 3Tocá Publicar. Tecspal te responde en el mismo ticket.
Los estados de un ticket
Qué significa cada paso.
Los pasos
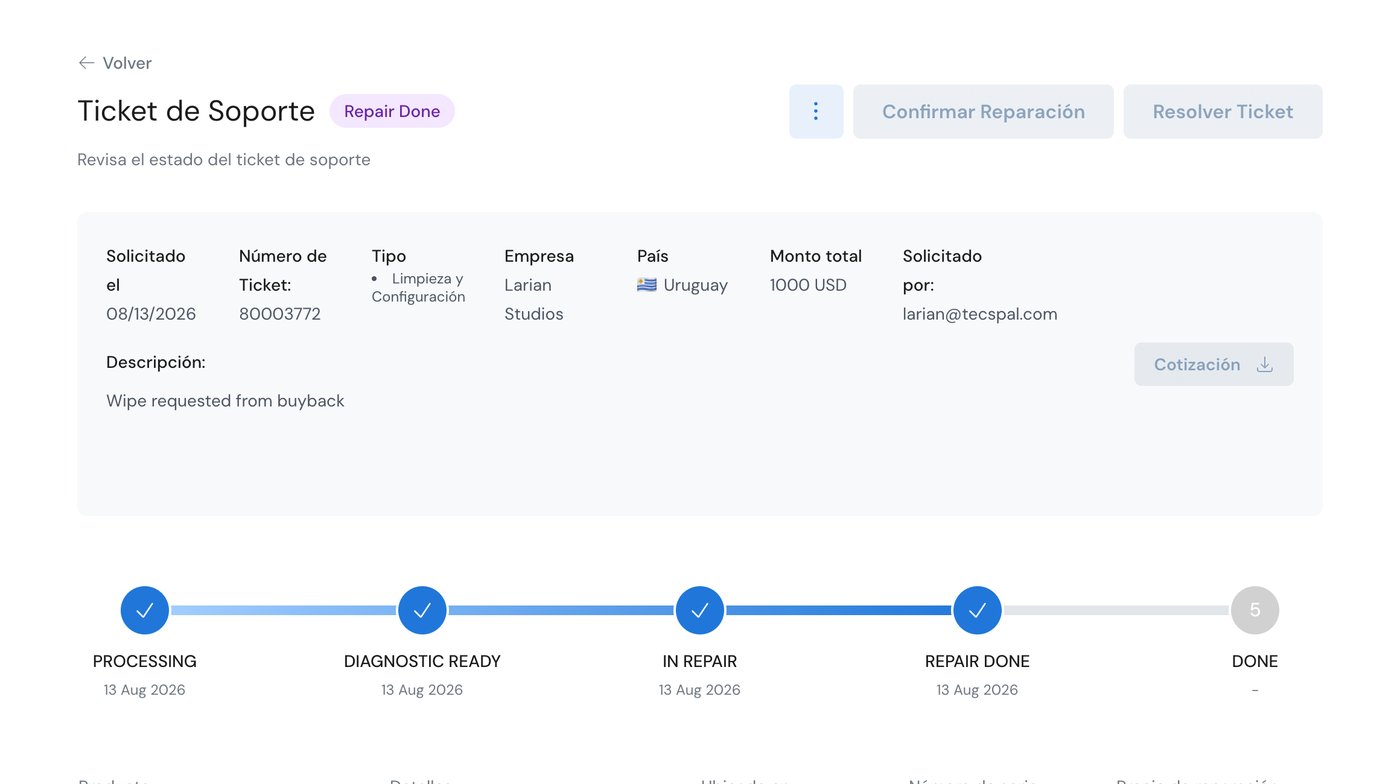
- Processing: Tecspal recibió el ticket.
- Customer pending: Tecspal espera algo de vos. Revisá los comentarios.
- Diagnostic ready: hay diagnóstico y precio. Aprobá o cancelá.
- In repair: aprobaste y el equipo se está reparando.
- Repair done: la reparación terminó. Tecspal devuelve el equipo y cierra el ticket.
- Done: Tecspal cerró el ticket.
- Cancelled: cancelado.
Equipos en storage y oficinas
Los equipos guardados en el depósito de Tecspal y las Oficinas de tu empresa.
- 7.1Ver tus equipos en depósito
- 7.2Mandar equipos guardados
- 7.3Vender equipos guardados
- 7.4Las Oficinas
- 7.5Crear una Oficina
- 7.6Ver y editar una Oficina
Ver tus equipos en depósito
Consultá los equipos de tu empresa que están guardados en el depósito de Tecspal.
Encontrá los equipos
- 1Andá a menú lateral → En Depósito.
- 2Arriba ves tarjetas con la cantidad de equipos por tipo. Tocá una para ver solo ese tipo.
- 3Elegí el país con las banderas.
- 4Para acotar la lista, filtrá por condición (nuevo o usado), borrado, dañado, o si el equipo está en un movimiento, tiene un ticket o está en buyback.
Cada fila muestra el modelo, el número de serie, la descripción, la fecha de compra, el depósito y si el equipo es nuevo o usado, está borrado o dañado.
Mandar equipos guardados
Pedí que Tecspal mande equipos del depósito a un Empleado o a una Oficina.
Elegí los equipos y el destino
- 1Andá a menú lateral → En Depósito.
- 2Elegí el país. Sin país no se pueden seleccionar equipos.
- 3Seleccioná los equipos. No se pueden elegir los que están en un movimiento o tienen un ticket abierto.
- 4Tocá el botón para mover.
- 5Elegí el Empleado o la Oficina. Tiene que ser del mismo país.
- 6Enviá. Tecspal coordina la entrega.
Si algún equipo está marcado como dañado, la plataforma te avisa antes de enviarlo.
Atajo: desde el detalle de un Empleado → Nuevo dispositivo → Asignar desde Depósito. El Empleado ya viene elegido.
¿Qué pasa después?
Se crea un movimiento de tipo Onboarding y Tecspal coordina la entrega. Lo seguís en Solicitudes de movimiento.
Vender equipos guardados
Ofrecéle a Tecspal los equipos que ya no usás.
Pedí el buyback
- 1En En Depósito, elegí el país y seleccioná los equipos.
- 2Tocá Enviar a recompra.
- 3Seguí los pasos del capítulo Buyback.
Las Oficinas
Una Oficina es un lugar de tu empresa adonde Tecspal manda equipos o desde donde los retira.
El office manager
- Cada Oficina tiene un office manager: la persona que recibe o entrega los equipos.
- No es un usuario de la plataforma: no entra ni recibe emails.
- Recibe por WhatsApp los avisos de cada envío que llega a la Oficina o sale de ella.
Crear una Oficina
Cargá una Oficina para poder mandarle equipos.
Cargá los datos
- 1Andá a menú lateral → Oficinas → Agregar.
- 2Completá el nombre y el país.
- 3Escribí la dirección y elegí una de las sugerencias. Completá el código postal y, si querés, las observaciones.
- 4Cargá el teléfono de la Oficina.
- 5Completá los datos del office manager: nombre, apellido, teléfono y email. A ese teléfono le llegan los WhatsApp.
- 6Guardá.
El país no se puede cambiar después. También podés crear una Oficina en el momento, al iniciar un movimiento desde un equipo.
Ver y editar una Oficina
Sus datos, sus equipos y sus notas.
Abrí la Oficina
- 1Andá a menú lateral → Oficinas y tocá la Oficina.
- 2Mirá sus datos y la tabla de equipos que están ahí. Podés buscar y filtrar por tipo.
- 3Para cambiar los datos, tocá editar, cambiá lo que necesites y guardá.
- 4Para dejar información útil, escribí una nota. Podés sumar imágenes.
En una Oficina no se puede cambiar el país.
Buyback
Cómo venderle a Tecspal los equipos usados de tu empresa.
- 8.1Qué es el buyback
- 8.2Pedir un buyback
- 8.3Seguir tus buybacks
- 8.4Aprobar o rechazar la cotización
- 8.5Qué pasa después de aprobar
- 8.6Cancelar un buyback
- 8.7Los estados de un buyback
Qué es el buyback
Tecspal le compra a tu empresa los equipos usados que ya no necesita.
Cómo funciona
- 1Elegís los equipos que querés vender y contás en qué estado están.
- 2Tecspal los revisa y te manda una cotización.
- 3Si la aceptás, Tecspal coordina el retiro de los equipos.
- 4Cuando el proceso termina, los equipos quedan dados de baja en la plataforma.
Pedir un buyback
Podés pedirlo para uno o varios equipos a la vez, estén en el depósito de Tecspal o los tenga un Empleado.
Elegí los equipos
- Un equipo: abrí el equipo → Opciones → Enviar a recompra.
- Varios equipos: desde Pedidos de Recompra, seleccioná los equipos en la lista de todos tus equipos.
- Equipos guardados: desde En Depósito, elegí el país, seleccioná los equipos y tocá Enviar a recompra.
Un equipo no puede estar en dos buybacks a la vez.
Contá cómo está cada equipo
- 1Indicá si tiene cargador.
- 2Elegí su estado, de A (el mejor) a D.
- 3Si hace falta, agregá una nota (por ejemplo, un detalle de la carcasa o de la batería).
- 4Si el equipo está en el depósito de Tecspal, indicá si querés que se borre.
- 5Enviá el pedido.
¿Qué pasa después?
Tecspal recibe el pedido, revisa los equipos y prepara la cotización.
Seguir tus buybacks
Consultá en qué etapa está cada pedido.
Encontrá el pedido
- 1Andá a menú lateral → Pedidos de Recompra.
- 2Las pestañas agrupan los pedidos según la etapa: los que esperan cotización, los listos para que los apruebes, los aprobados y el historial.
- 3Tocá un pedido para ver sus equipos y su estado.
Desde el pedido también podés escribirle a Tecspal.
Aprobar o rechazar la cotización
Cuando Tecspal termina la cotización, te avisamos con una notificación en la plataforma (la campana del menú lateral).
Decidí
- 1Abrí el pedido.
- 2Revisá el total que Tecspal te ofrece por los equipos.
- 3Si estás de acuerdo, aprobá la cotización.
- 4Si no, cancelá el pedido. Ver Cancelar un buyback.
Qué pasa después de aprobar
Tecspal se encarga del resto.
Los próximos pasos
- Si pediste que se borre algún equipo, Tecspal lo borra.
- Tecspal coordina el retiro de cada equipo. Lo podés seguir en Solicitudes de movimiento.
- Si un equipo tiene un ticket abierto o está en otro movimiento, el retiro espera a que eso termine.
- Cuando termina, los equipos quedan dados de baja: en Equipos aparecen como Deactivated.
Cancelar un buyback
Si no querés seguir con la venta, cancelá el pedido.
Cancelá el pedido
- 1Abrí el pedido.
- 2Cancelalo y confirmá.
Si algún equipo ya había salido, Tecspal lo devuelve al depósito.
Los estados de un buyback
Qué significa cada etapa. Los nombres en pantalla pueden variar un poco.
Las etapas
- Submitted: enviaste el pedido.
- Processing: Tecspal está revisando los equipos.
- Quoted: la cotización está lista. Aprobala o cancelá.
- Approved: aprobaste la cotización.
- Coordinated: Tecspal coordinó el retiro de los equipos.
- Done: terminado. Los equipos quedan dados de baja.
- Cancelled: cancelado.
Usuarios
Quién puede entrar a la plataforma en tu empresa y qué puede hacer cada uno.
- 9.1Usuarios y Empleados
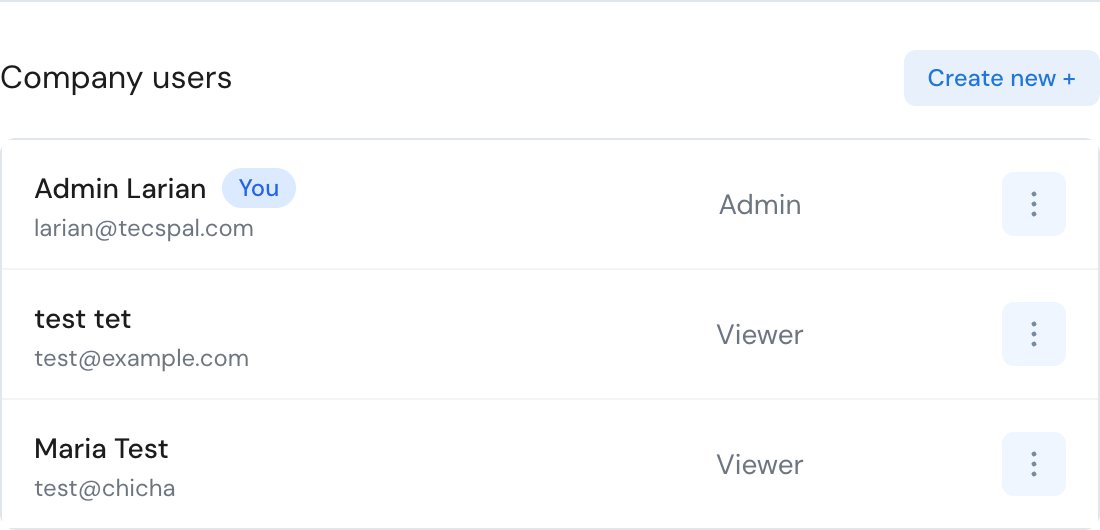
- 9.2Ver los usuarios de tu empresa
- 9.3Agregar un usuario
- 9.4Quitar un usuario
- 9.5Los roles
- 9.6Cambiar el rol de un usuario
Usuarios y Empleados
Son dos cosas distintas, aunque a veces tengan el mismo email.
La diferencia
- Usuario: una cuenta para entrar a la plataforma, con email y contraseña. Cada usuario tiene un rol que define qué puede hacer.
- Empleado: una persona de tu empresa a la que Tecspal le manda equipos o se los retira. No entra a la plataforma. Ver el capítulo Empleados.
Ver los usuarios de tu empresa
Los usuarios se gestionan desde Preferencias.
Encontrá la lista
- 1Abajo del menú lateral, tocá el nombre de tu empresa.
- 2Tocá Preferencias.
- 3Bajá hasta Usuarios de la empresa. Ahí ves cada usuario con su rol.
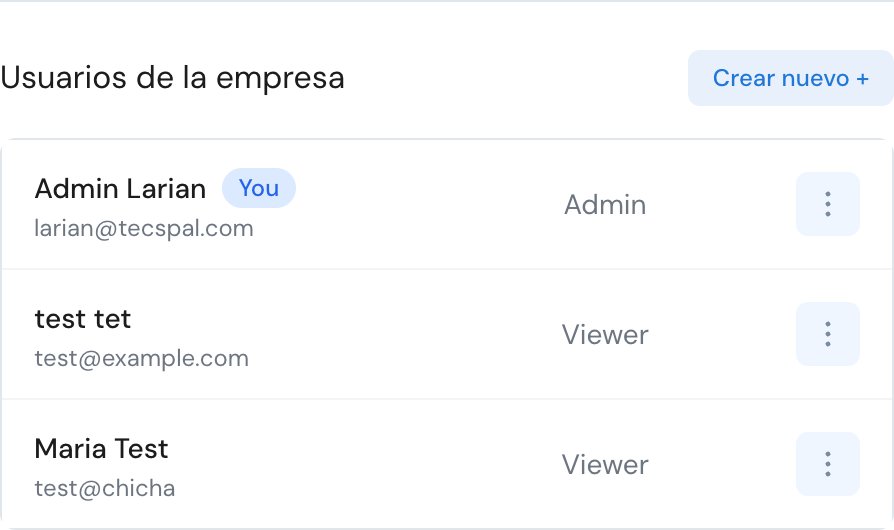
Agregar un usuario
Dale acceso a la plataforma a alguien de tu empresa.
Creá el usuario
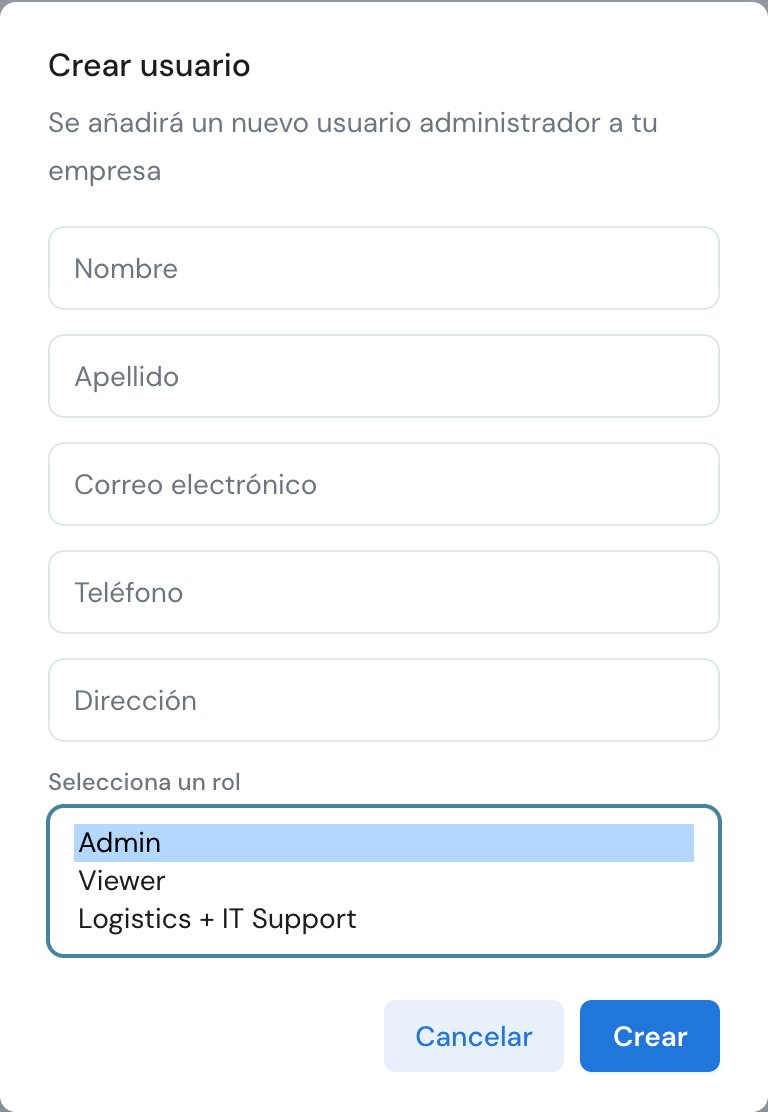
- 1En Usuarios de la empresa, tocá Crear nuevo +.
- 2Completá nombre, apellido, correo electrónico y, si querés, teléfono y dirección.
- 3En Selecciona un rol, elegí Admin, Viewer o Logistics + IT Support. Ver Los roles.
- 4Tocá Crear.
La persona recibe un email con su contraseña. Recomendale cambiarla la primera vez que entre: Preferencias → Perfil → Cambiar contraseña.
Quitar un usuario
Cuando alguien ya no necesita entrar a la plataforma.
Quitá el acceso
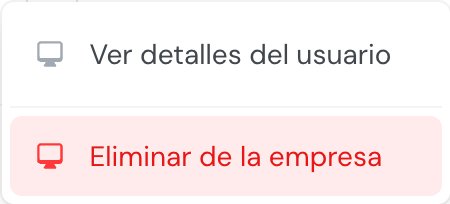
- 1En Usuarios de la empresa, abrí el menú ⋮ del usuario. Ahí también podés tocar Ver detalles del usuario.
- 2Tocá Eliminar de la empresa y confirmá.
La persona deja de poder entrar. Lo que creó (órdenes, movimientos, tickets) queda igual. Si lo quitaste por error, pedile a tu account manager que lo vuelva a sumar.
Los roles
Cada usuario tiene un solo rol. Elegí el que corresponda a lo que esa persona necesita hacer.
Los tres roles
- Admin: gestiona todo lo de tu empresa en la plataforma. Es el rol de quien pide equipos, aprueba cotizaciones y administra los usuarios.
- Logistics + IT Support: para quien se ocupa del día a día de los equipos: los registra, los mueve y pide soporte técnico. Puede consultar el resto, pero no pide equipos nuevos ni aprueba cotizaciones.
- Viewer: solo mira. Puede consultar órdenes, equipos, Empleados, movimientos, tickets y buybacks, pero no cambia nada.
Si no estás seguro de qué rol darle a alguien, consultá con tu account manager.
Cambiar el rol de un usuario
El rol de un usuario lo cambia Tecspal.
Pedí el cambio
- 1Escribile a tu account manager con el email del usuario y el rol nuevo.
- 2Cuando Tecspal lo cambie, el usuario tiene que cerrar sesión y volver a entrar para ver sus nuevos permisos.
Configuración de la empresa
Los datos de tu empresa que usan las órdenes y la facturación, y tus avisos por email.
- 10.1Dónde está la configuración
- 10.2Entidades legales
- 10.3Códigos ABM
- 10.4El catálogo de tu empresa
- 10.5Tu perfil y tu contraseña
- 10.6Notificaciones por email
Dónde está la configuración
Todo se configura desde Preferencias.
Entrá a Preferencias
- 1Abajo del menú lateral, tocá el nombre de tu empresa.
- 2Tocá Preferencias.
Arriba ves la configuración de tu empresa: los códigos ABM, las condiciones de pago y el límite de crédito. Las condiciones de pago y el límite de crédito los define Tecspal; si tenés dudas, consultá con tu account manager.
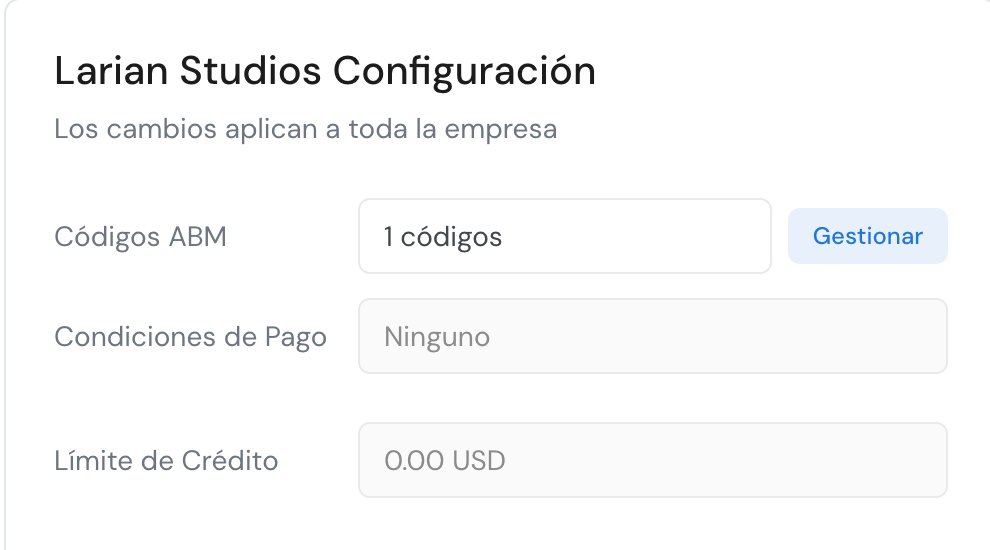
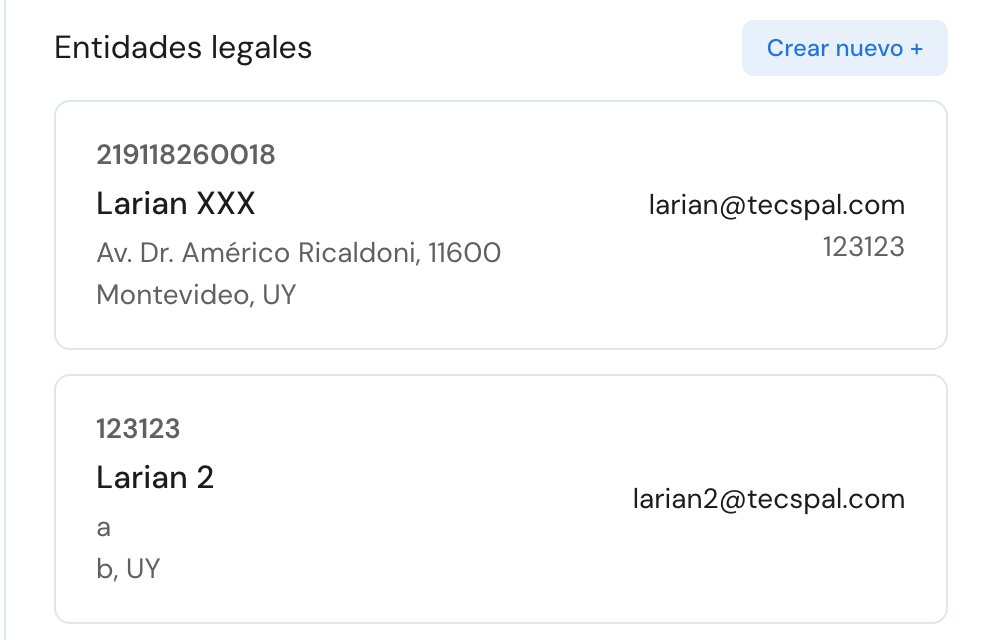
Entidades legales
Son los datos con los que Tecspal le factura a tu empresa: razón social, país, tax ID, dirección fiscal y email de facturación.
Agregá una entidad
- 1En Preferencias, andá a Entidades legales.
- 2Tocá Crear nuevo +.
- 3Completá los datos de facturación.
- 4Guardá.
Las entidades se eligen al crear una orden o al aceptar la cotización. Para corregir o borrar una entidad, o para elegir cuál se usa por defecto, pedíselo a tu account manager.
Códigos ABM
Si tu empresa usa Apple Business Manager, cargá sus códigos para que las Mac lleguen inscriptas.
Gestioná los códigos
- 1En Preferencias, al lado de Códigos ABM, tocá Gestionar.
- 2Agregá o revisá los códigos de tu empresa.
- 3Guardá.
Cuando pedís una Mac con Inscripción ABM, elegís el código al aceptar la cotización. Ver Aceptar la cotización.
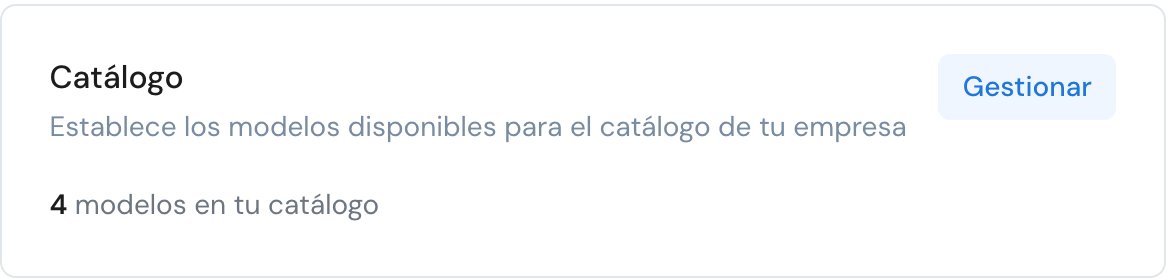
El catálogo de tu empresa
Elegí los modelos que tu empresa pide seguido, para encontrarlos más rápido.
Armá tu catálogo
- 1En Preferencias, en Catálogo, tocá Gestionar.
- 2Elegí los modelos.
- 3Guardá.
Al crear una orden, Elegir un modelo se abre en Our catalog con esos modelos. Igual podés ver todos en All models.
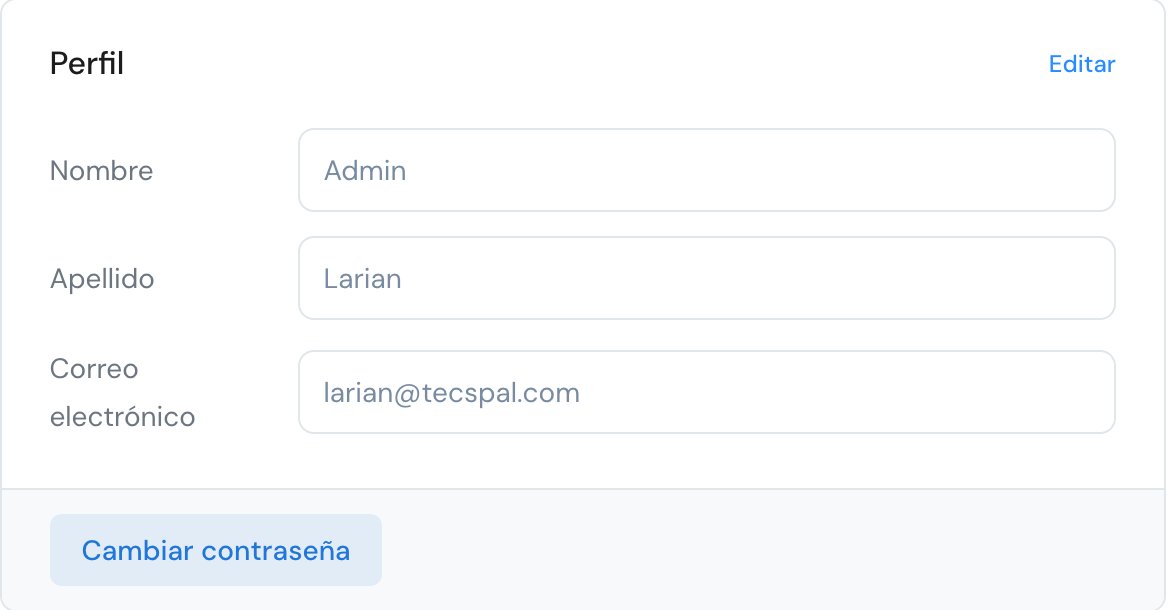
Tu perfil y tu contraseña
Tus datos personales y tu acceso.
Actualizá tus datos
- 1En Preferencias, en Perfil, tocá Editar para cambiar tu nombre o apellido.
- 2Para cambiar tu contraseña, tocá Cambiar contraseña.
Notificaciones por email
Elegí qué emails querés recibir de la plataforma.
Elegí tus avisos
- 1En Preferencias, andá a las notificaciones.
- 2Apagá los avisos que no quieras recibir: de órdenes (creada, cambios de estado, entregada, mensajes, ETA), de movimientos (creado, cambios de estado, terminado, mensajes) y de tickets (cambios de estado, terminado, mensajes).
Cada usuario elige sus propios avisos. Esto no cambia las notificaciones de la campana ni los WhatsApp que reciben los Empleados.
Glosario de estados
Qué significa cada estado que vas a ver en la plataforma.
- 11.1Estados de las órdenes
- 11.2Dónde está un equipo
- 11.3Estados de los Empleados
- 11.4Estados de los movimientos
- 11.5Estados de los tickets
- 11.6Estados del buyback
Órdenes
- Pending: enviaste el pedido y Tecspal está preparando la cotización.
- Quoted: la cotización está lista para que la aceptes o la canceles.
- Accepted: aceptaste la cotización.
- Coordinating: Tecspal está comprando los equipos y organizando la entrega.
- Coordinated: la entrega está coordinada y tiene fecha estimada (ETA).
- Delivered: los equipos llegaron. Aparecen en Equipos.
- Splitted: una orden de solo cotización se dividió en varias, una por destino.
- Cancelled: la orden se canceló.
Dónde está un equipo
Lo ves en Actualmente en, en el detalle del equipo.
Equipos
- Empleado: lo tiene una persona de tu empresa.
- Oficina: está en una Oficina de tu empresa.
- Depósito: está guardado en el depósito de Tecspal.
- In service: está en reparación o en un servicio técnico.
- Buyback: está en un proceso de venta a Tecspal.
- Deactivated: se dio de baja después de un buyback.
Además, cada equipo puede estar marcado como nuevo o usado, restaurado (con la información borrada) y dañado.
Empleados
- Active: la persona está en tu empresa y puede recibir equipos.
- Deactivated: la persona ya no está. No aparece al crear órdenes ni movimientos, pero sus datos y su historia quedan guardados.
Movimientos
- Processing: Tecspal recibió el pedido.
- Coordinated: Tecspal coordinó con el Empleado.
- Picked up: Tecspal retiró el equipo.
- Done: el equipo llegó y cambió de lugar en la plataforma.
- Cancelled: el movimiento se canceló.
- Blocked: Tecspal lo frenó. Consultá con tu account manager.
Tickets de soporte
- Processing: Tecspal recibió el ticket.
- Customer pending: Tecspal espera algo de vos. Revisá los comentarios.
- Diagnostic ready: hay diagnóstico y precio. Aprobá o cancelá.
- In repair: el equipo se está reparando.
- Repair done: la reparación terminó. Tecspal devuelve el equipo.
- Done: Tecspal cerró el ticket.
- Cancelled: el ticket se canceló.
Estados del buyback
Ver también Seguir tus buybacks. Los nombres en pantalla pueden variar un poco.
Buyback
- Submitted: enviaste el pedido.
- Processing: Tecspal está revisando los equipos.
- Quoted: la cotización está lista.
- Approved: aprobaste la cotización.
- Coordinated: Tecspal coordinó el retiro.
- Done: terminado. Los equipos quedan dados de baja.
- Cancelled: cancelado.
Manual para el Admin del cliente · tecspal.comPlatform manualThe Tecspal
platform manual
A step-by-step guide for the client Admin: order hardware, manage it and get support.
Draft · pilot version- 01Getting started
- 02Orders
- 03Hardware
- 04Employees
- 05Movements
- 06IT support
- 07Hardware in storage and offices
- 08Buyback
- 09Users
- 10Company settings
- 11Status glossary
Manual for the client Admin · tecspal.comGetting started
How to sign in and where to find everything.
- 1.1Sign in to the platform
- 1.2The side menu
- 1.3Your profile and Preferences
- 1.4Change the language
Sign in to the platform
Your account is created by Tecspal or by your company Admin. When it is ready, you get an email.
Sign in
- 1Find the welcome email from Tecspal: it includes your password.
- 2Open the platform.
- 3Enter your Email and Password.
- 4Click Log in.
- 5If your Google account uses the same email, you can also use Continue with Google.
We recommend changing your password the first time you sign in: Preferences → Profile → Change password.
For security, your session lasts 12 hours. After that, sign in again.
The side menu
Every section is in the side menu, on the left of the screen.
What each section is for
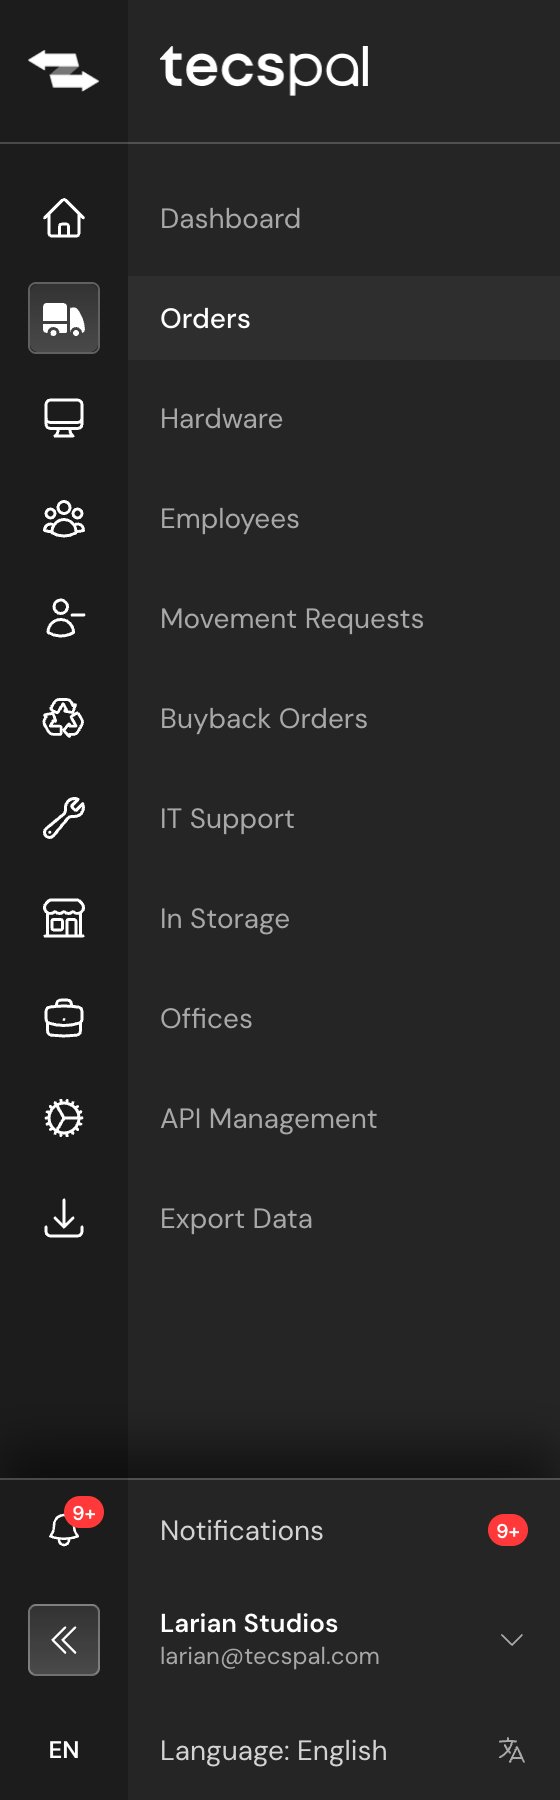
Your profile and Preferences
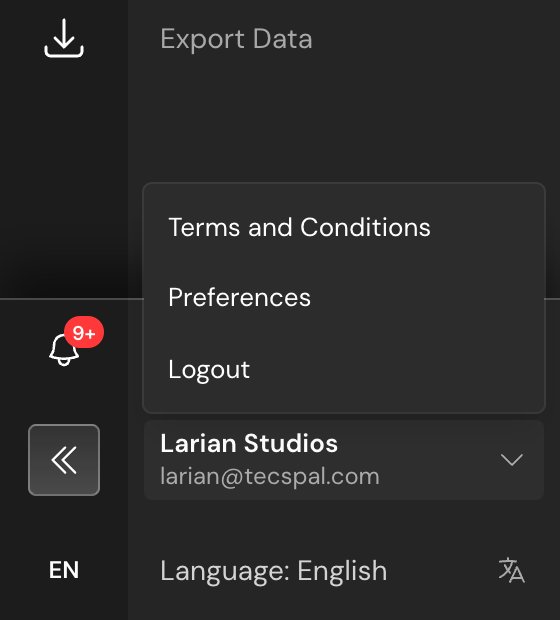
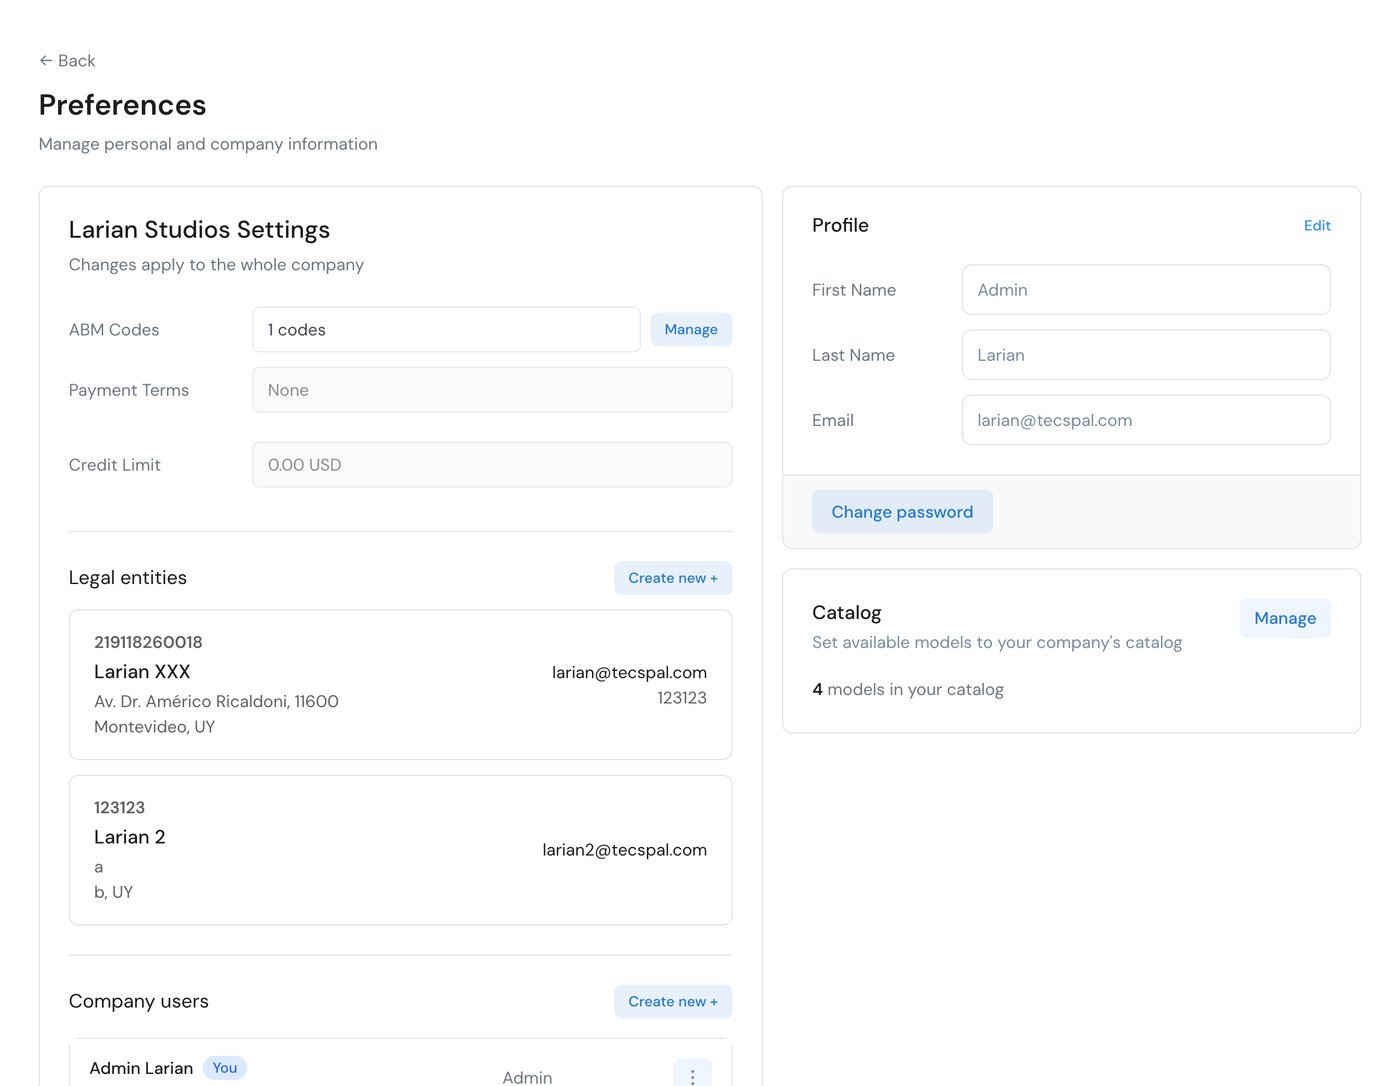
Your profile is at the bottom of the side menu. From there you open Preferences, where your company is set up.
Open Preferences
- 1At the bottom of the side menu, click your company name.
- 2Click Preferences.
In Preferences you will find: your company settings (ABM codes, payment terms and credit limit), Legal entities, Company users, your Profile and the Catalog. See the chapters Users and Company settings.
The same menu has Terms and Conditions and Logout.
Change the language
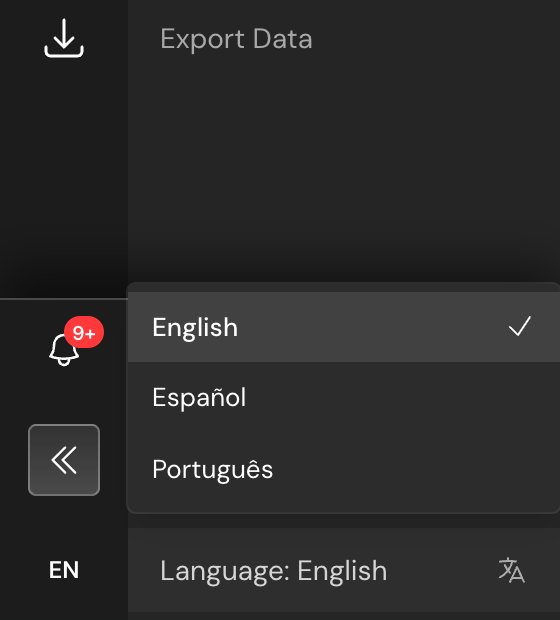
The platform is available in English, Spanish and Portuguese.
Change the language
- 1At the bottom of the side menu, click Language.
- 2Choose the language.
Status names (Pending, Quoted, Delivered, etc.) are shown in English in every language.
Orders
How to order new hardware, track each order and manage the quote.
- 2.1Create an order
- 2.2Track an order
- 2.3Accept the quote
- 2.4Download the quote as a PDF
- 2.5Comment on an order
- 2.6Edit an order
- 2.7Cancel an order
- 2.8Replicate in other countries
Create an order
Order new hardware for your company. Tecspal prepares a quote and, once you accept it, handles the purchase and delivery.
Before you start
- The country where the hardware is delivered.
- Where it goes: an Employee, an Office or Tecspal Storage.
- If it goes to an Employee: their ID number, and their CPF if they are in Brazil.
Where to do it
Side menu → Orders → New Order.
Shortcut: from an Employee's details → New device → Order new hardware. The Employee is already set as the destination.
Build your cart
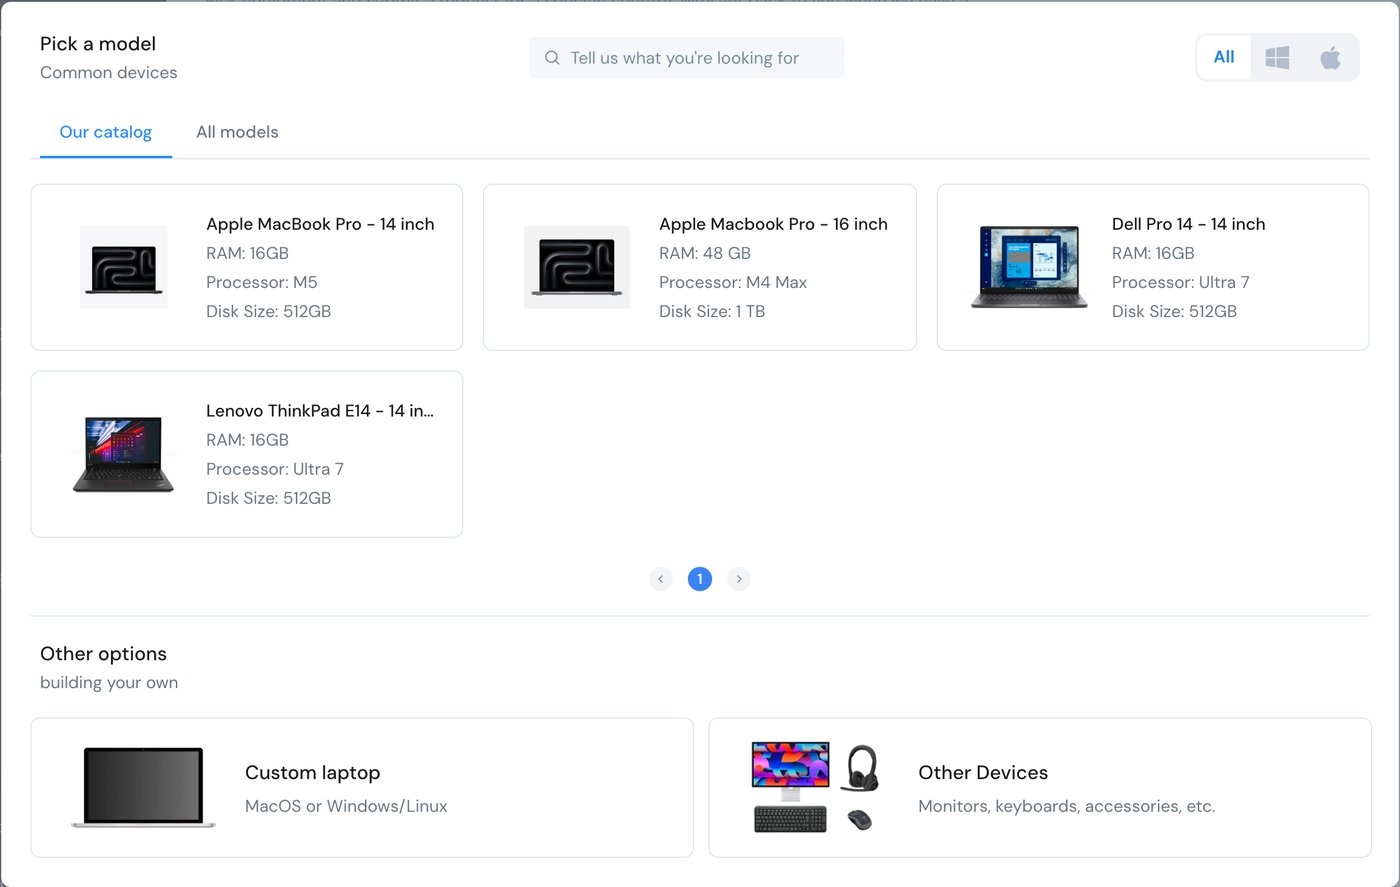
- 1Click Add equipment. Pick a model opens.
- 2Choose what to add:
- A catalog model: click it. If your company has its own catalog, it opens on Our catalog. To see every model, go to All models.
- Custom laptop: build a Mac or a PC to your specs (see part 2).
- Other Devices: monitors, keyboards and accessories. Describe what you need in the notes.
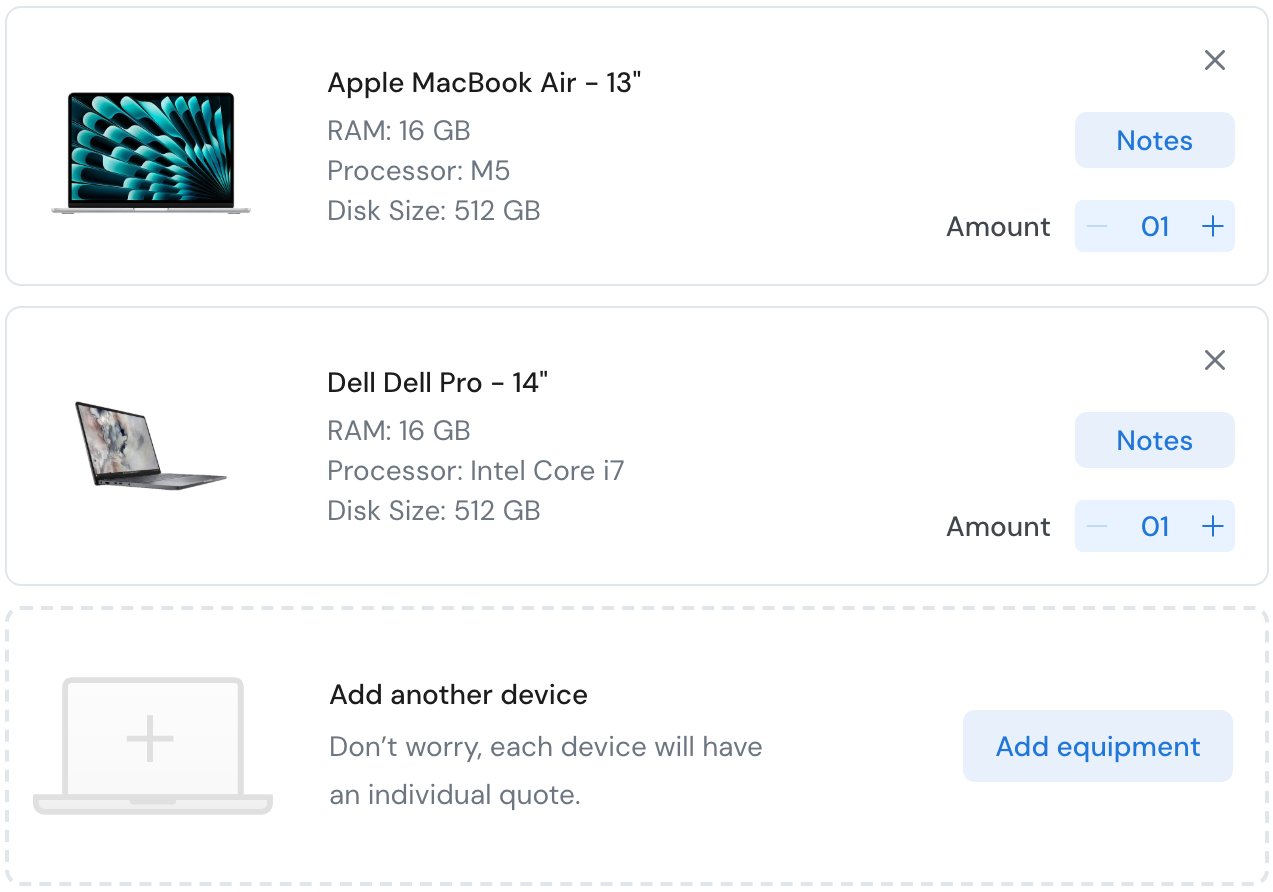
- 3In Amount, enter how many you need.
- 4If needed, click Notes and add a note to the item.
- 5To add another item, click Add equipment again. To remove one, click the X.
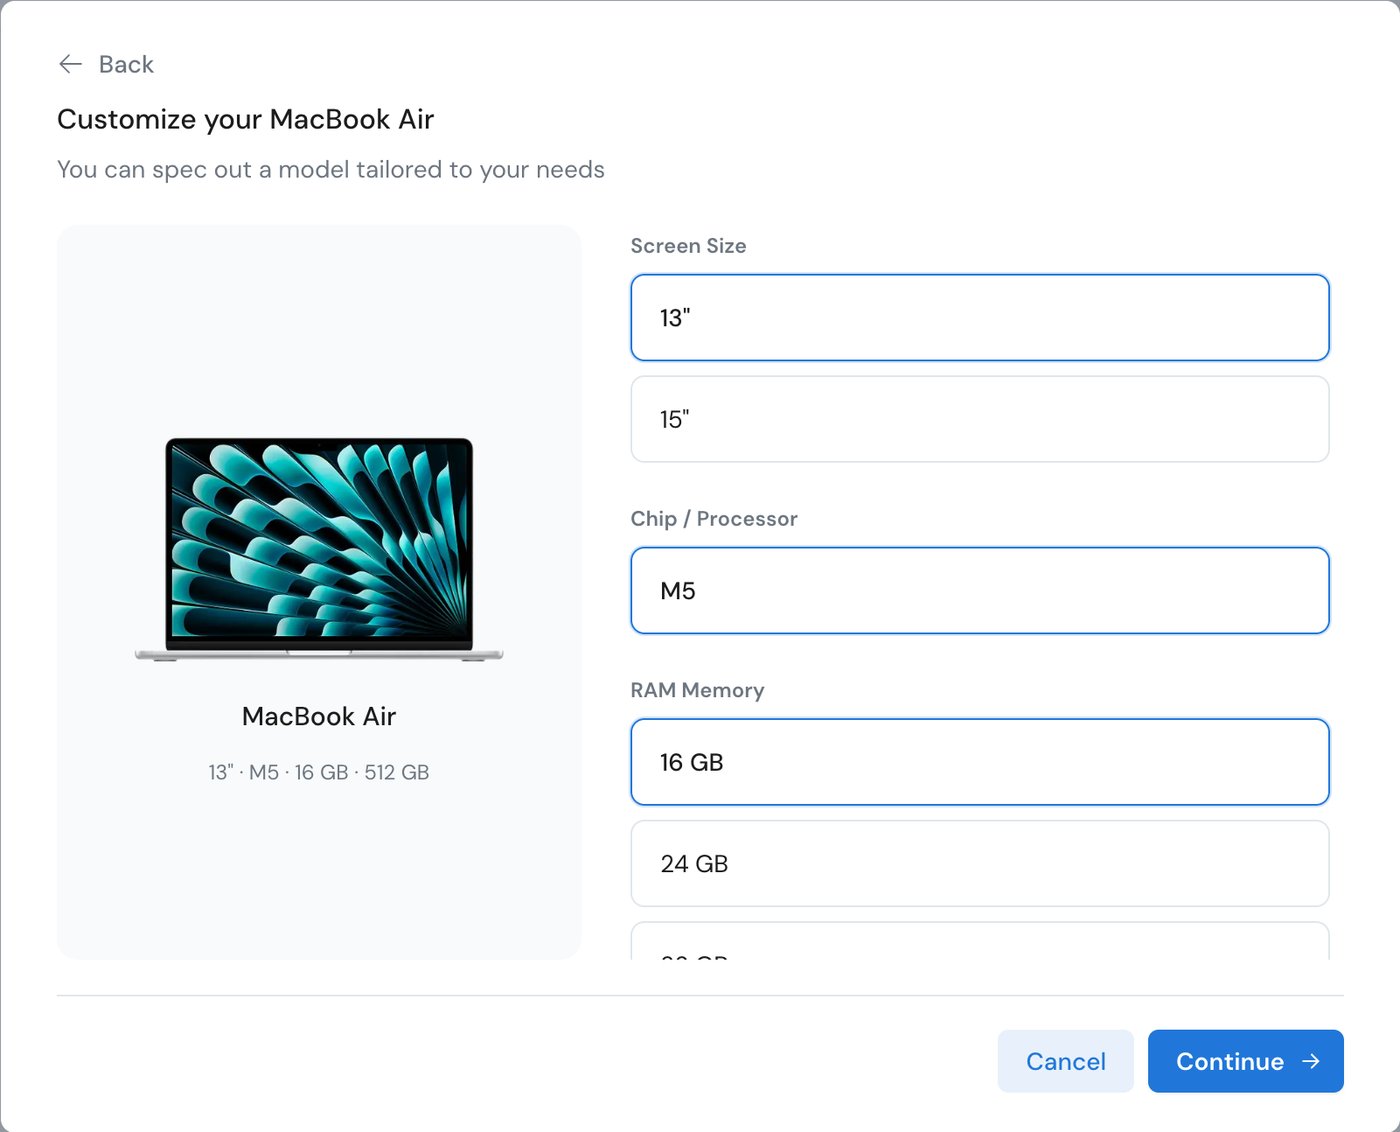
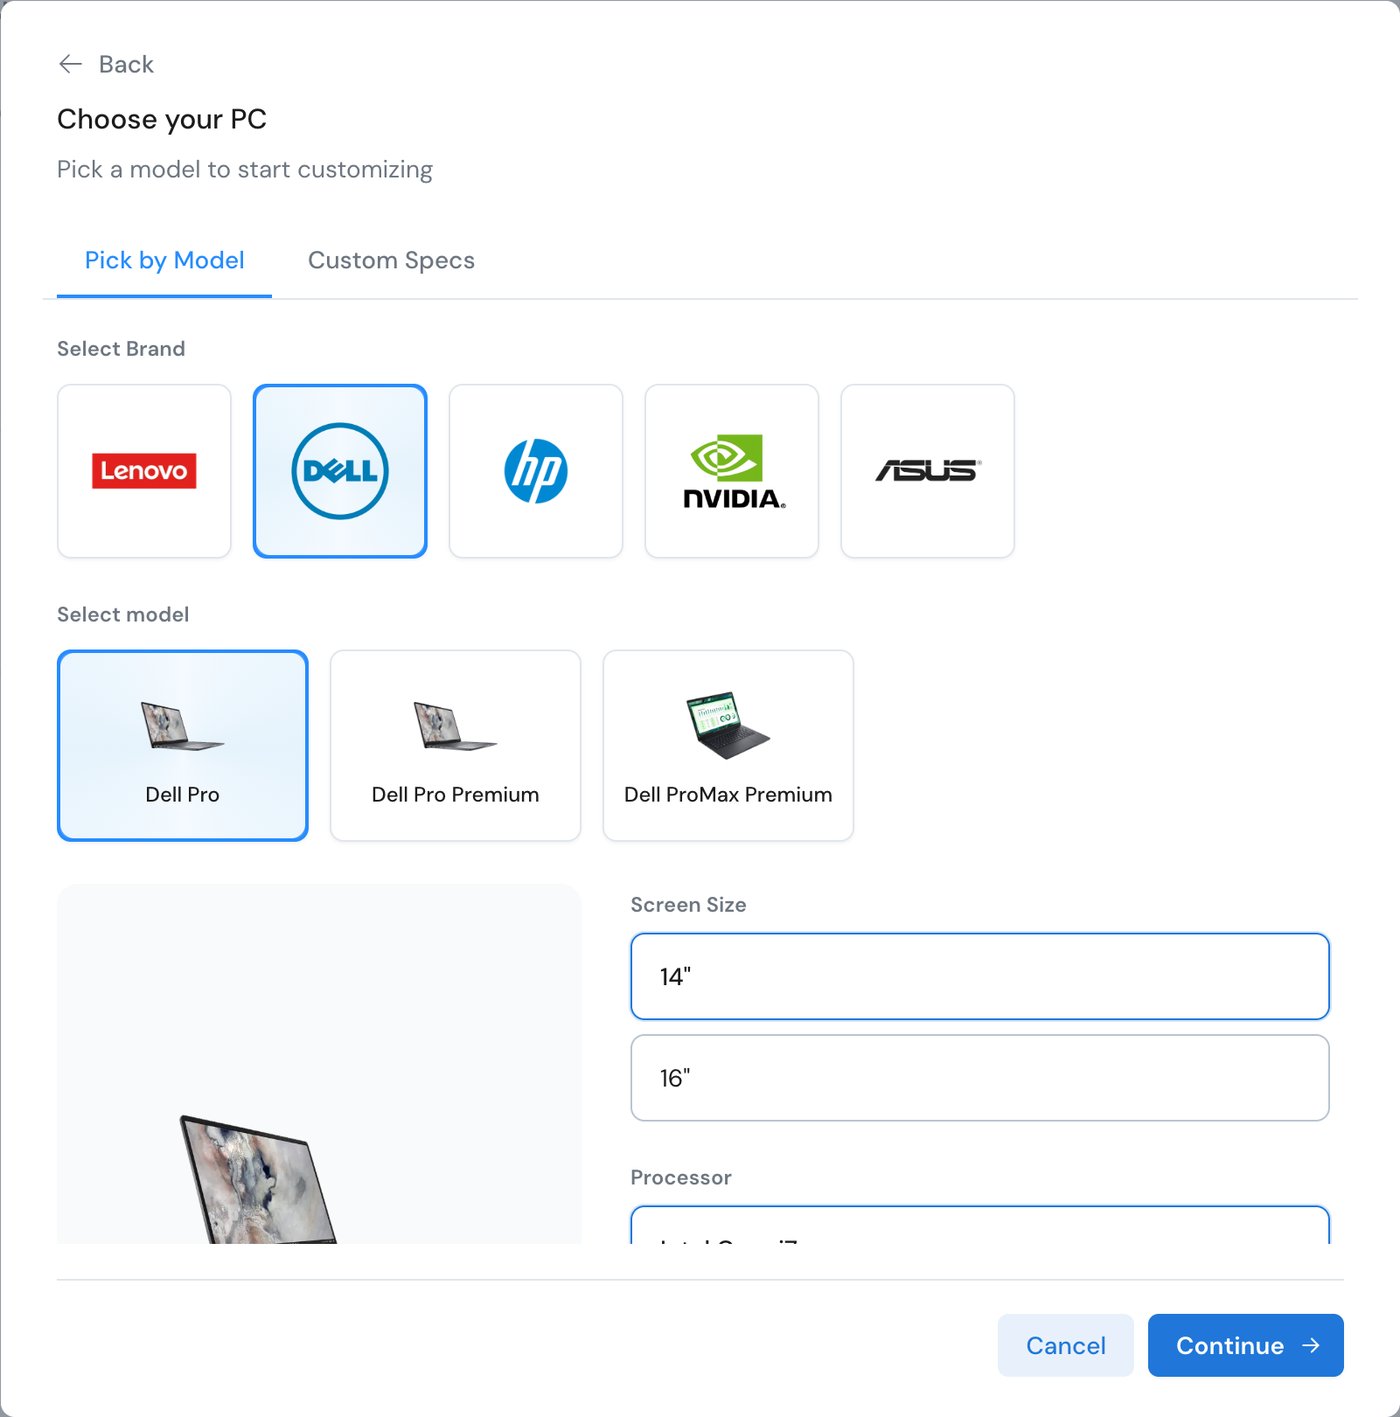
If you chose Custom laptop
- 6Mac: choose the screen size, chip, RAM and storage.
- 7PC: in Pick by Model, choose the brand, model and specs. If you can't find what you need, enter them in Custom Specs.
- 8Click Continue. The item is added to your cart.
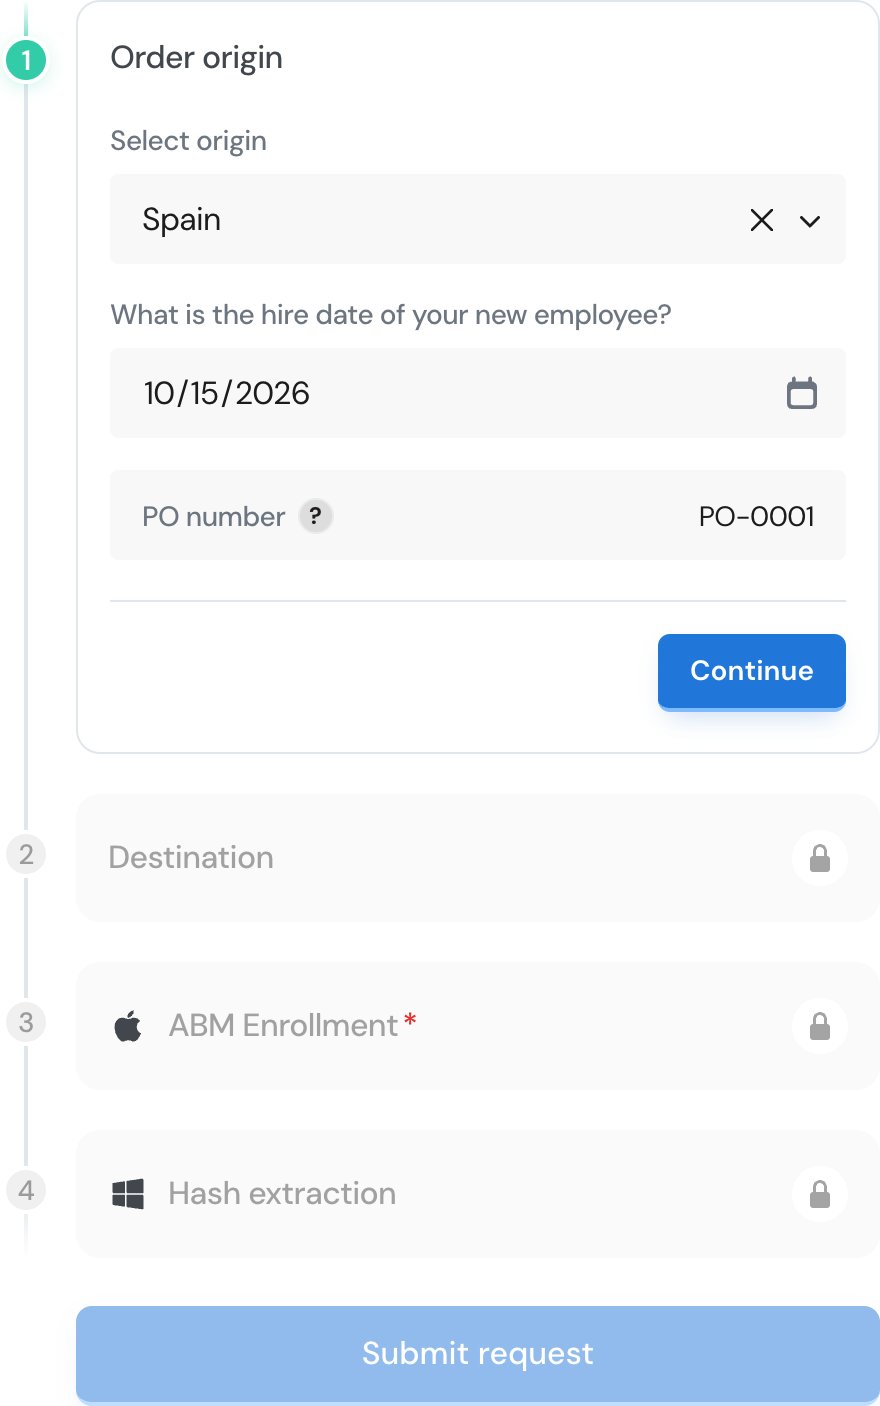
Fill in the origin
- 9In Select origin, choose the country.
- 10Choose the date you need the hardware (the screen asks for your new employee's hire date). It must be at least 4 days from today.
- 11If your company uses purchase orders, enter the PO number. It is optional.
- 12Click Continue.
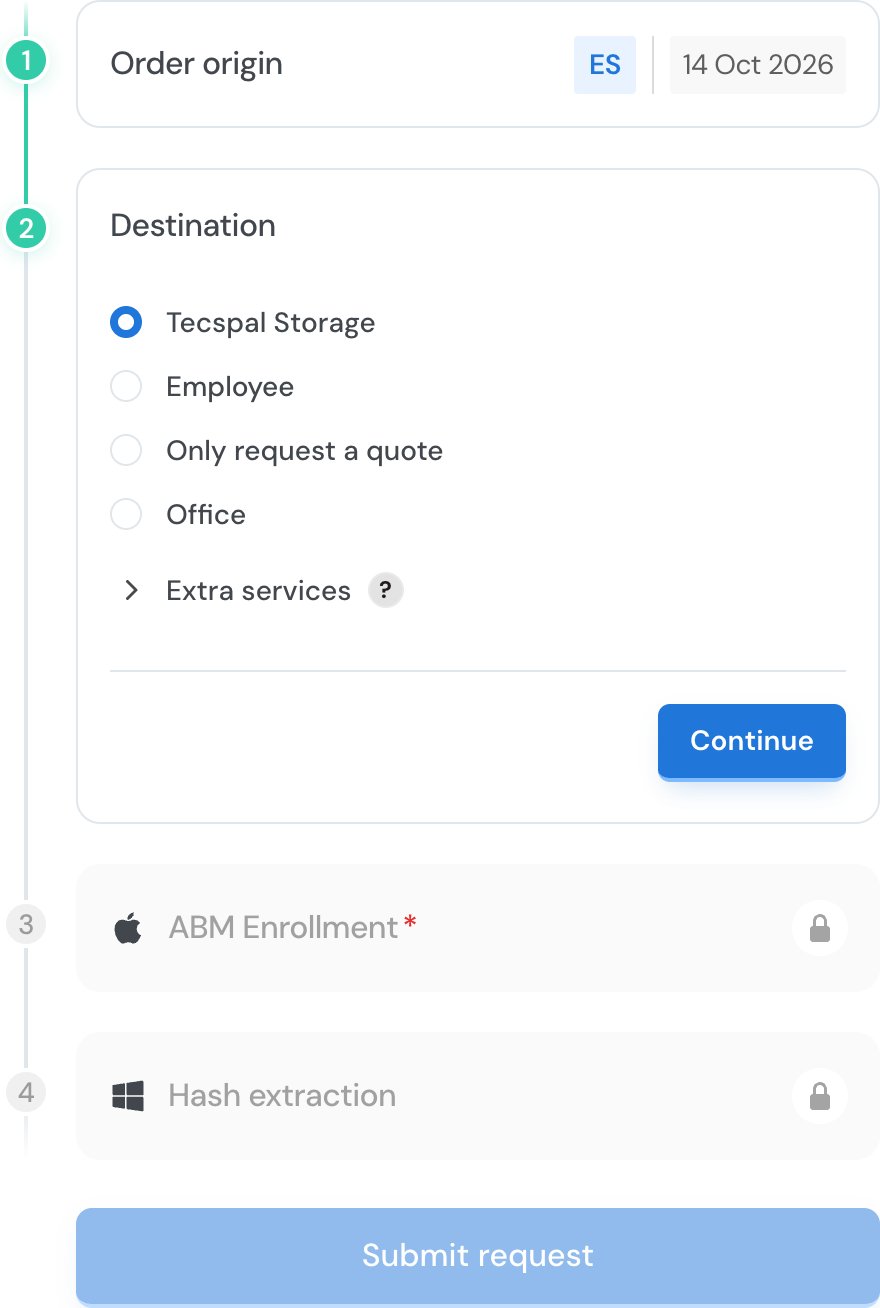
Choose the destination
- 13Choose where the hardware goes:
- Tecspal Storage: the hardware is kept in Tecspal's storage until you send it. If it isn't available in your country, ask your account manager.
- Employee: choose an Employee from the list or create a new one.
- Office: choose one of your company's Offices in that country.
- Only request a quote: if you don't know yet where it goes, you choose the destination when you accept the quote.
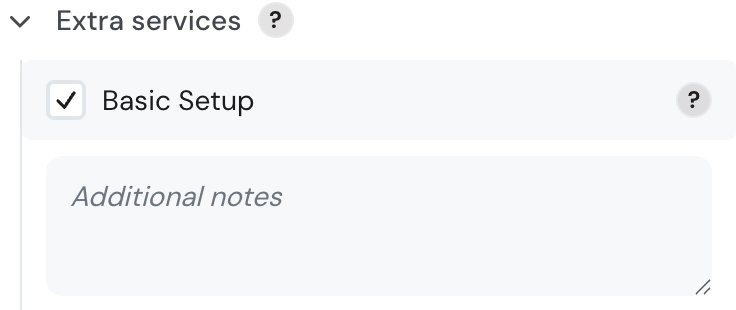
- 14If you want the hardware to arrive set up, open Extra services and check Basic Setup. It has an additional cost.
- 15Click Continue.
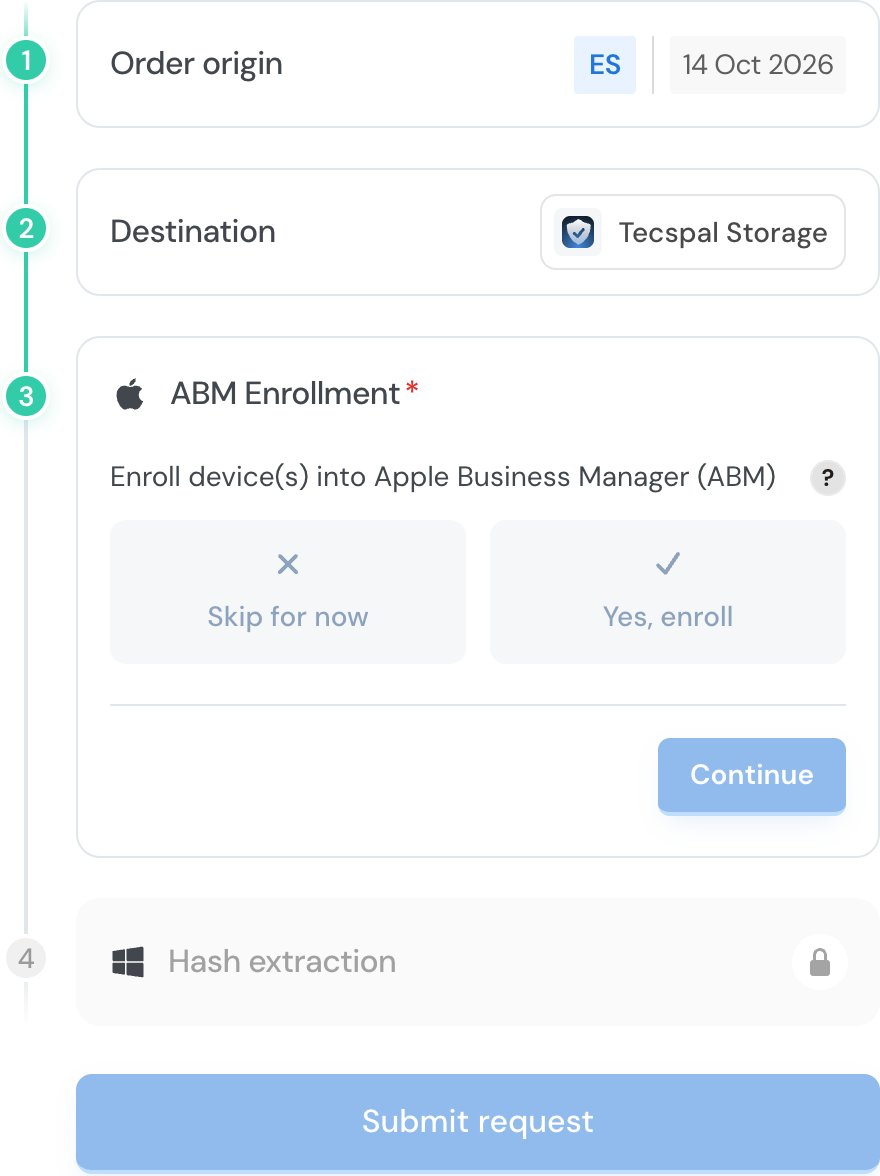
Services for Mac and PC
These steps only appear if you ordered a Mac or a PC.
- 16ABM Enrollment (if you ordered a Mac): choose Yes, enroll to enroll the Macs in Apple Business Manager, or Skip for now if you don't need it.
- 17Hash extraction (if you ordered a PC): choose whether you want it. It has an additional cost per device.
- 18Click Continue on each step.
Submit the order
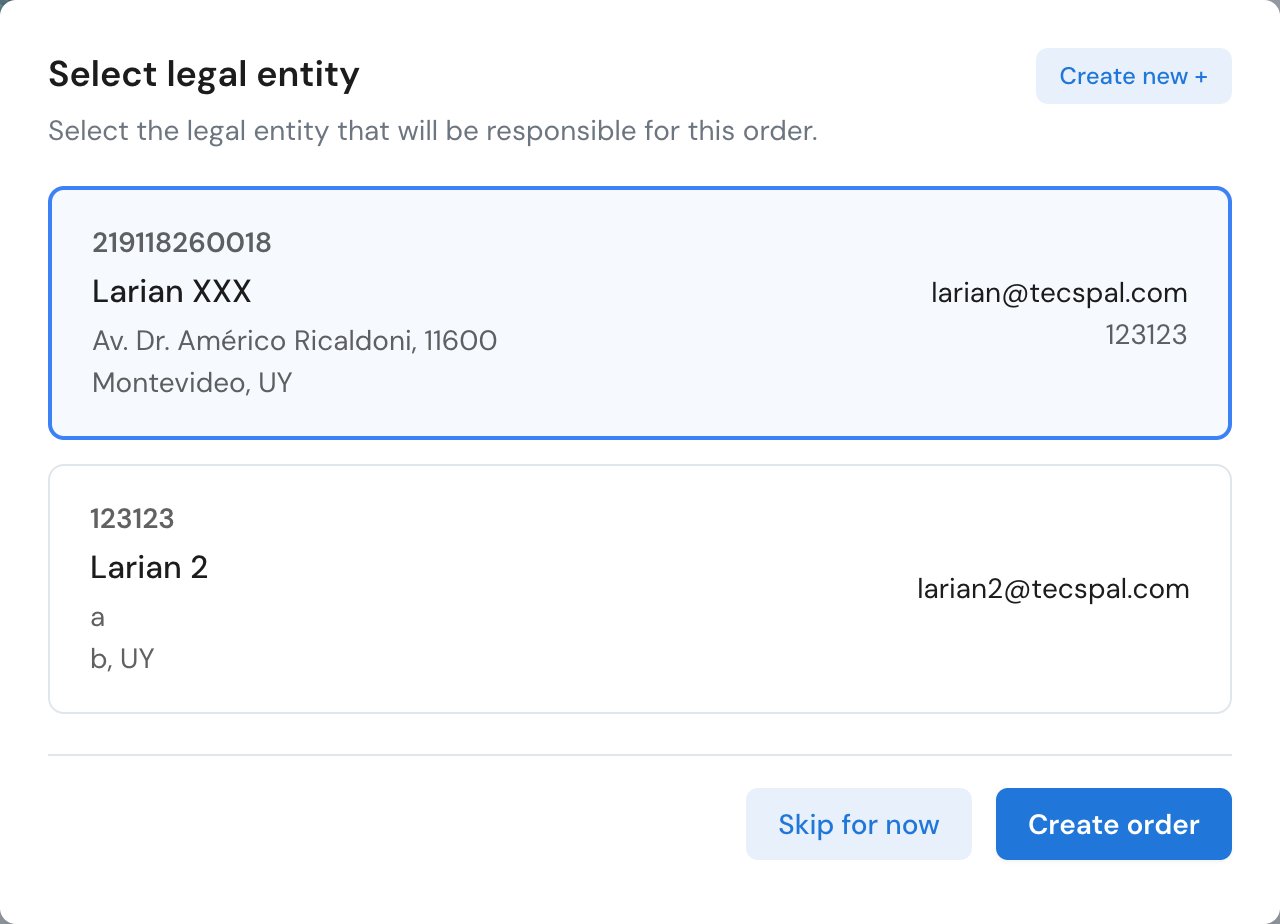
- 19Click Submit request.
- 20In Select legal entity, choose the billing entity.
- 21Click Create order.
What happens next?
The order is created in Pending status and you can see it in Orders. Tecspal prepares the quote and emails you when it moves to Quoted.
Track an order
Check each order's status and when it arrives.
Find the order
- 1Go to side menu → Orders.
- 2To search, type the Employee's name, the order number or the PO number.
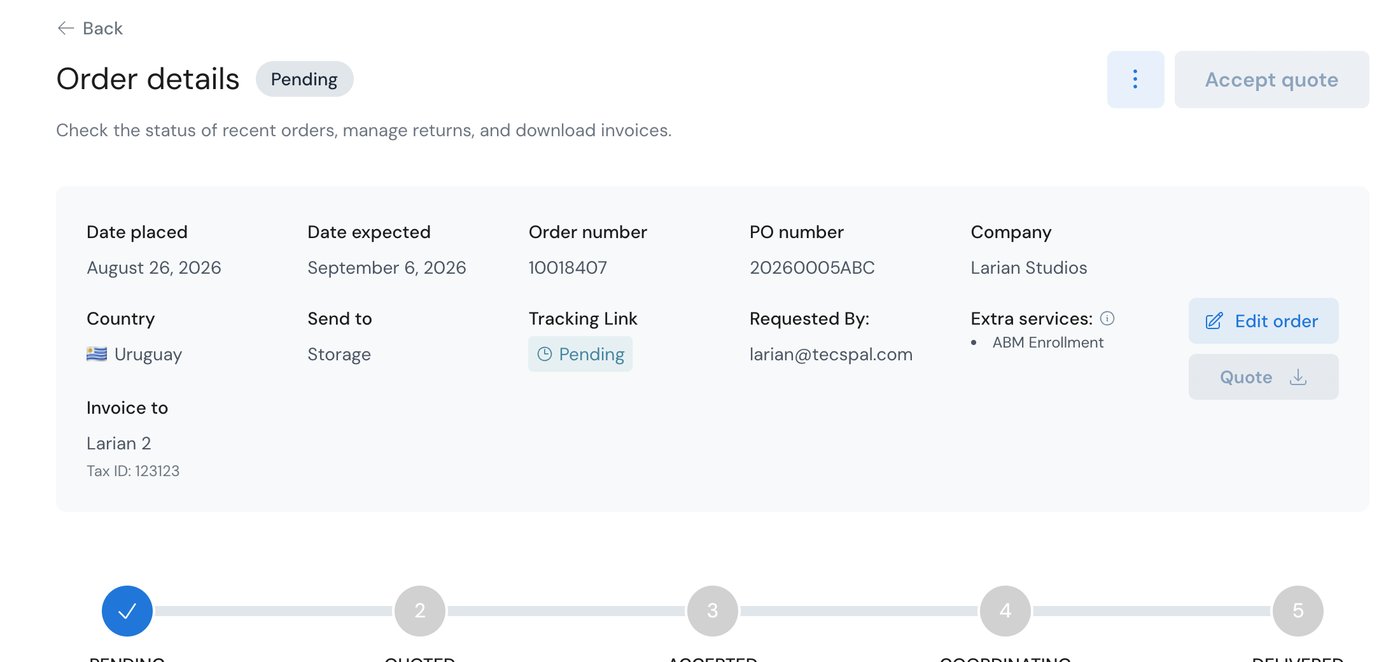
- 3To narrow the list, click Filters: country, status, destination (Deliver to), tracking status or who requested it (Requested By).
- 4To see the ones arriving first, use Sort by ETA.
What each row shows: number, date, country, destination, status, ETA, tracking and who requested it. If the shipment has tracking, you can open it from the row.
Open the details
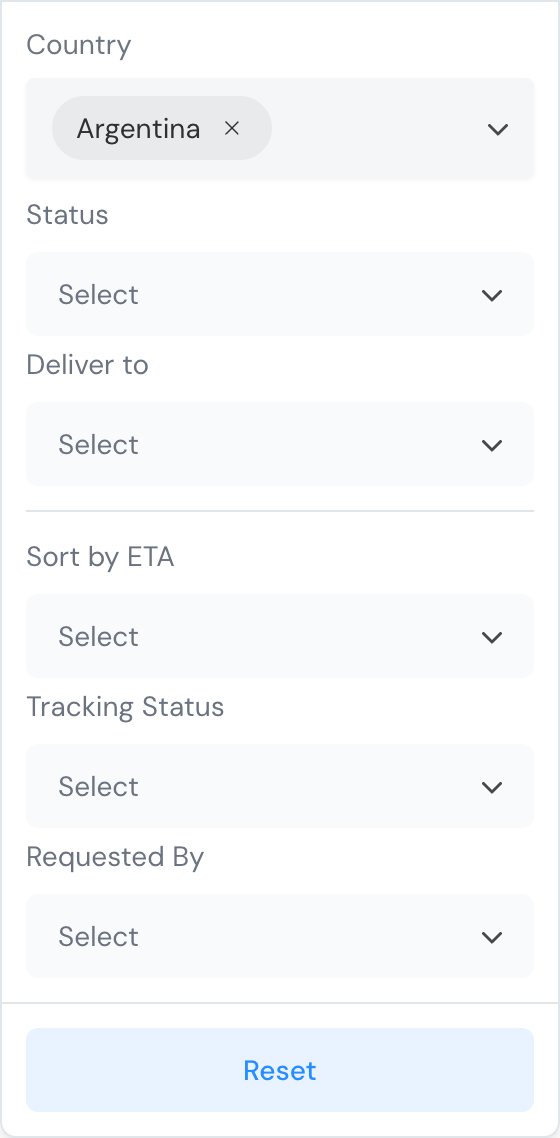
- 5Click the order to open it.
- 6At the top you see the status bar with the current step.
- 7Below are the order details and the list of items.

Order steps
If you requested a quote only, the bar shows fewer steps.
When we email you
- When the quote is ready (Quoted).
- When the delivery is coordinated (Coordinated).
- When tracking is added.
- When it is delivered (Delivered).
Accept the quote
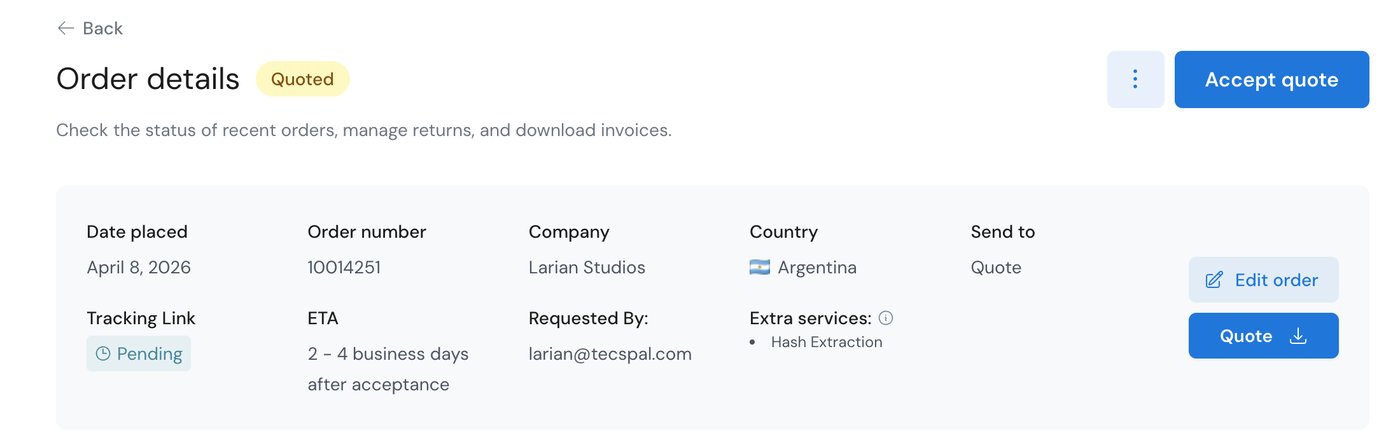
When the order moves to Quoted, review the quote and accept it so Tecspal can go ahead with the purchase.
Accept the quote
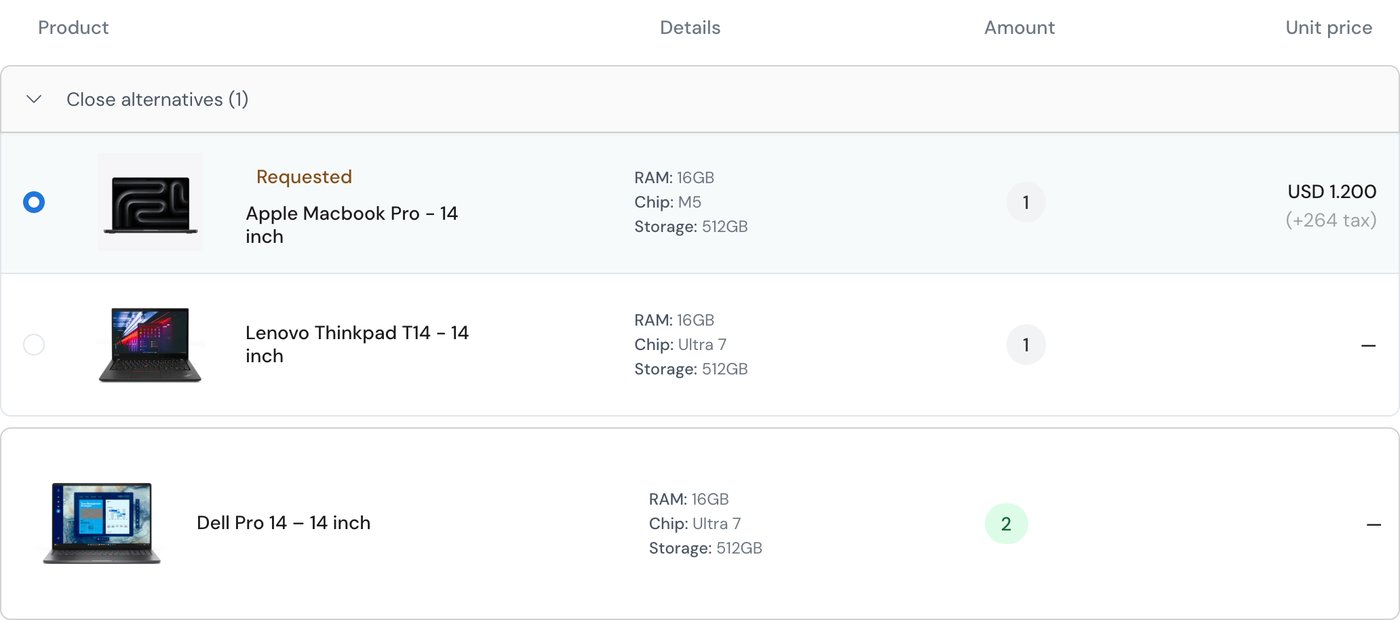
- 1Open the order.
- 2Review the items and prices.
- 3If Tecspal offers alternatives for an item (for example, because the requested model is out of stock), choose the one you prefer.
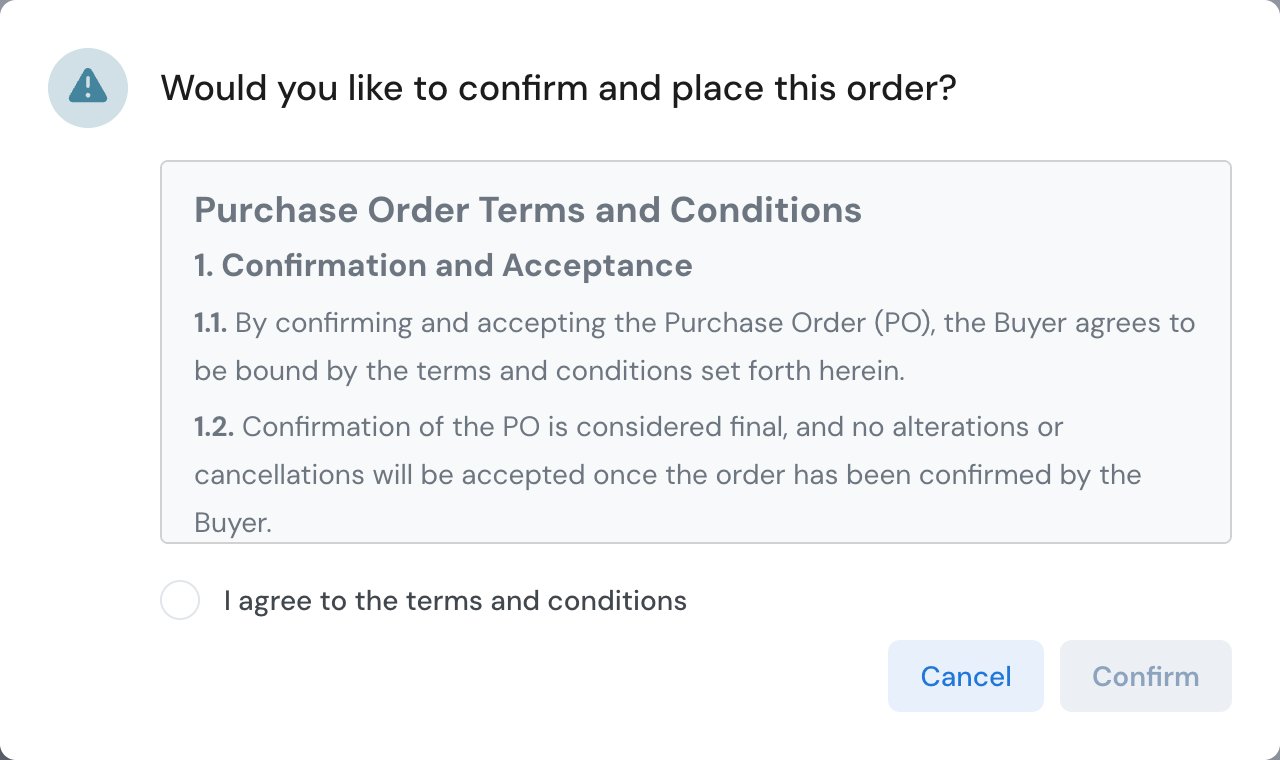
- 4Click Accept quote.
- 5Check I agree to the terms and conditions.
- 6If asked, choose the billing entity and, for Macs, the ABM code.
- 7Click Confirm.
If it was a quote-only order
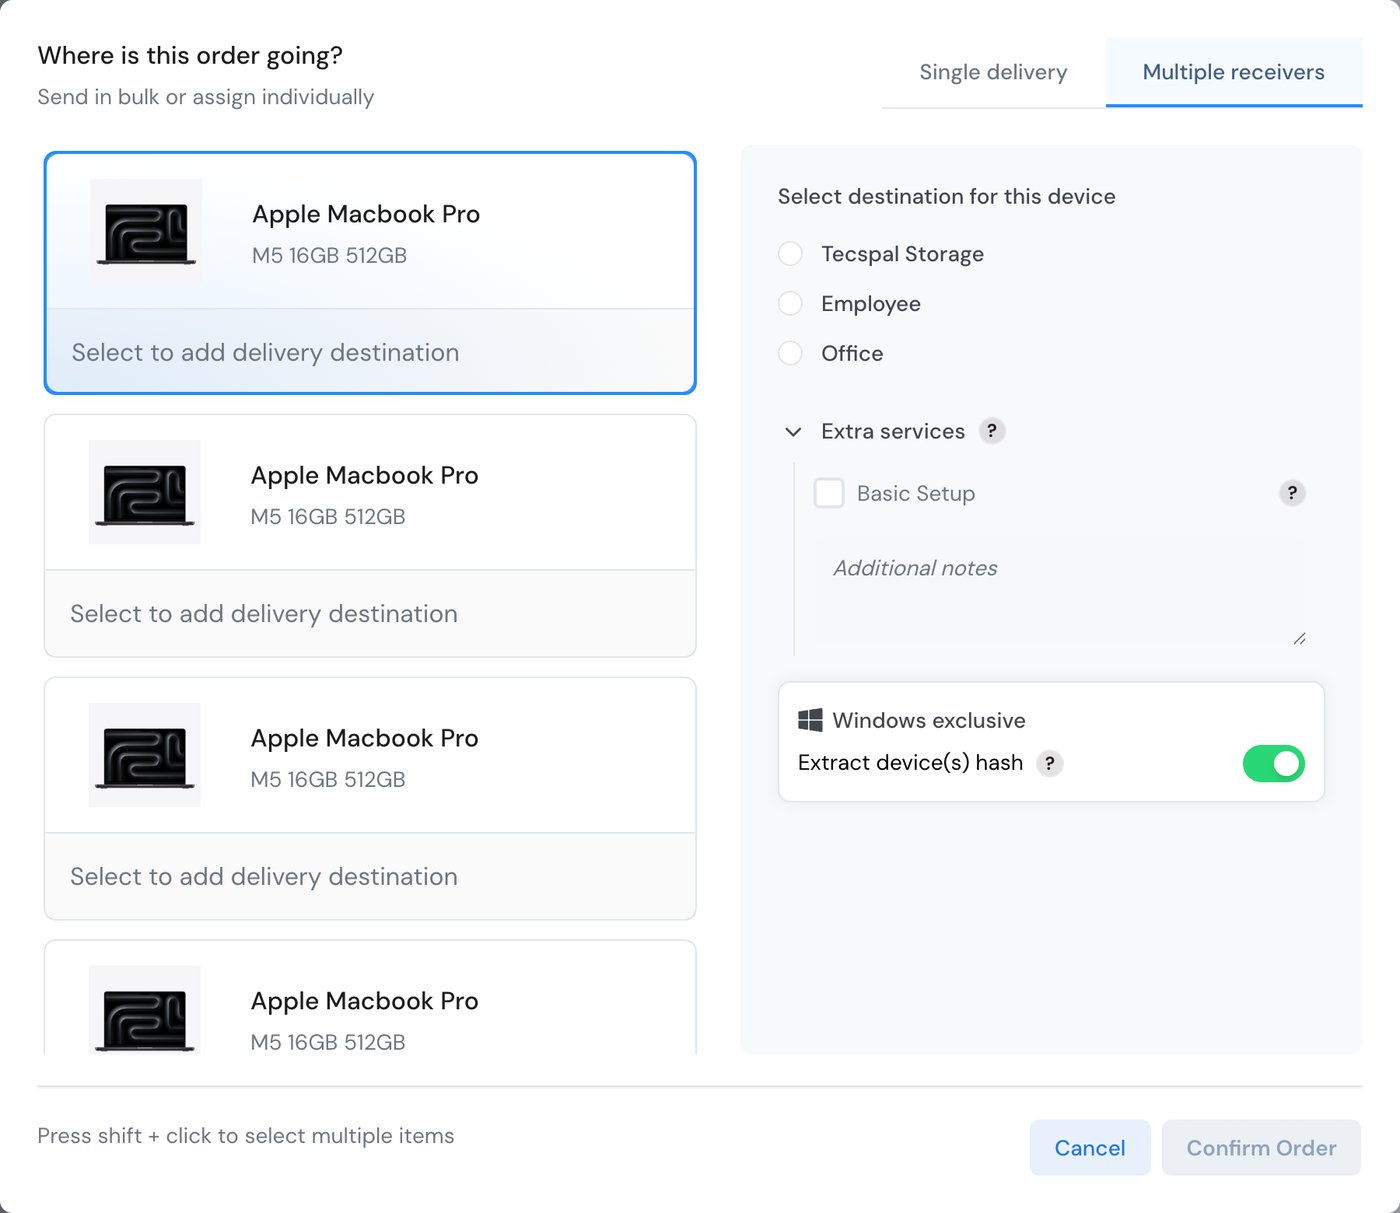
- 8When you accept, choose where the hardware goes:
- Single delivery: all items go to the same destination.
- Multiple receivers: choose a destination for each item. To select several at once, use shift + click.
- 9Click Confirm Order.
With multiple receivers, one order is created for each destination.
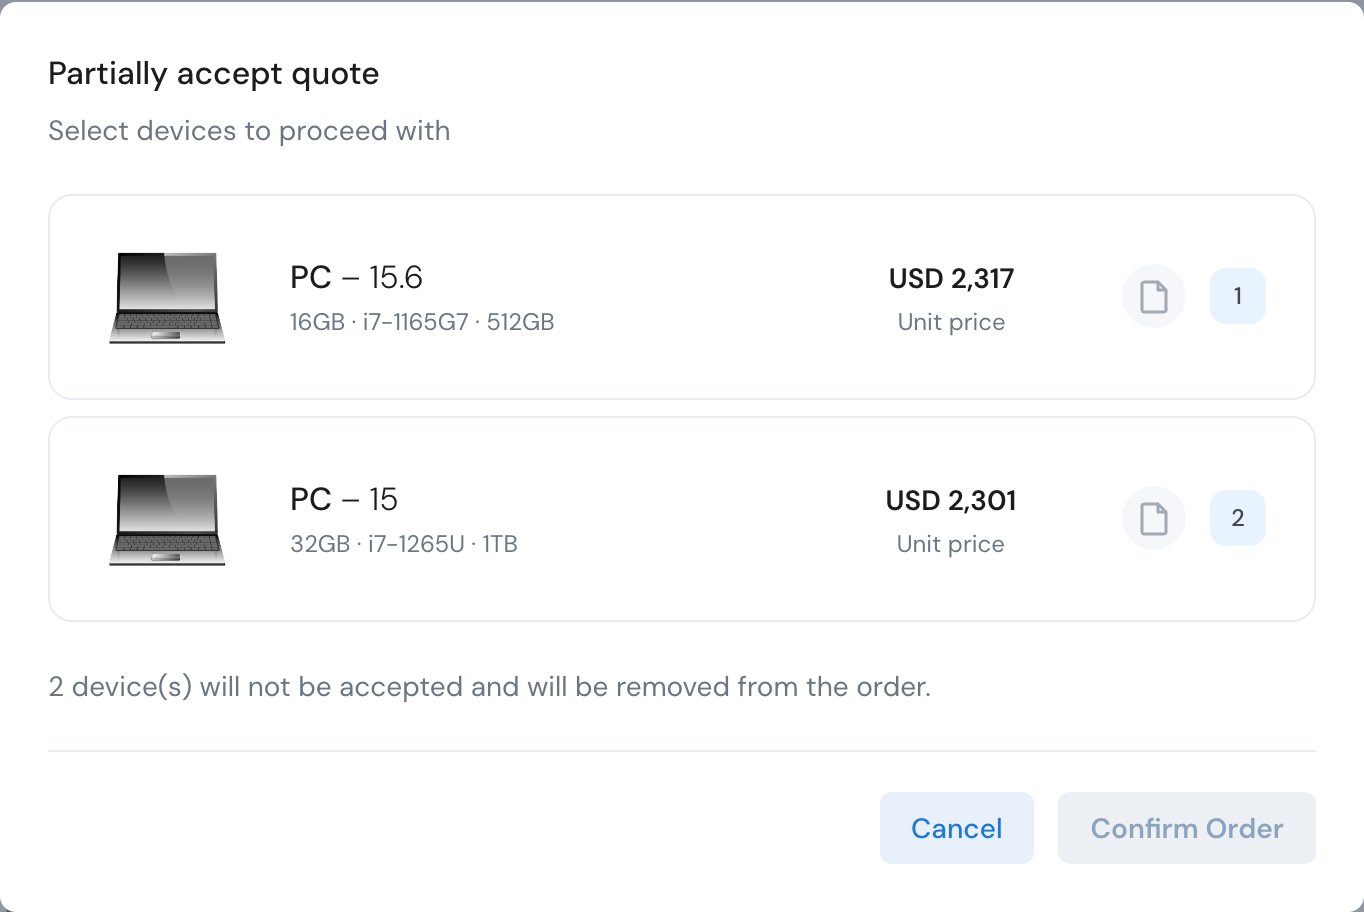
Accept only part of it
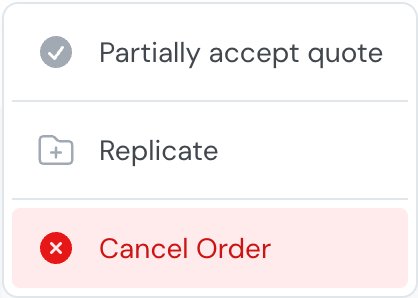
- 10In the ⋮ menu, click Partially accept quote.
- 11Select the items you accept. The rest are removed from the order.
- 12Click Confirm Order.
What happens next?
The order moves to Accepted, Tecspal calculates the estimated delivery date (ETA) and starts coordinating.
Download the quote as a PDF
Download the quote to share or file it.
Download the PDF
- 1Open the order.
- 2Click Quote.
- 3Choose the language: Spanish, English or Portuguese.
Available once the order is in Quoted.

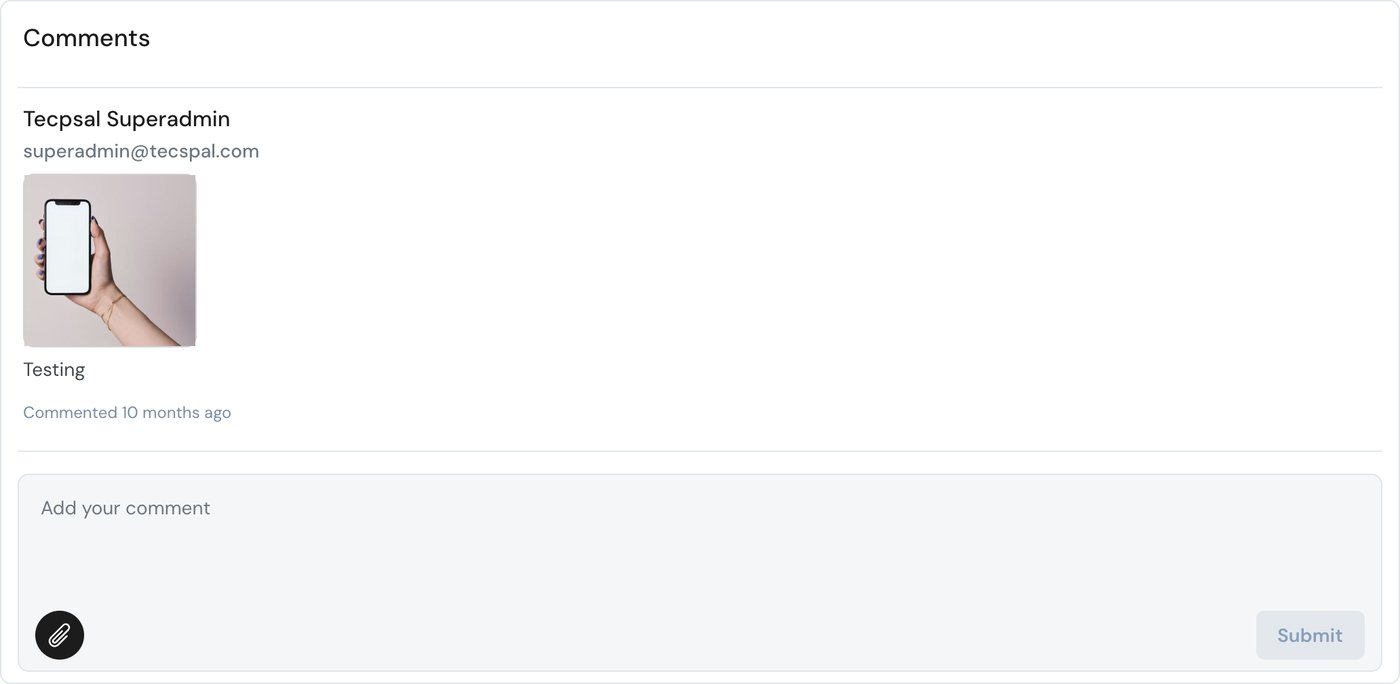
Comment on an order
Use comments to talk to Tecspal about a specific order.
Leave a comment
- 1Open the order.
- 2Type your message in Add your comment.
- 3If needed, attach a file with the paperclip.
- 4Click Submit. Tecspal is notified and replies on the same order.
Edit an order
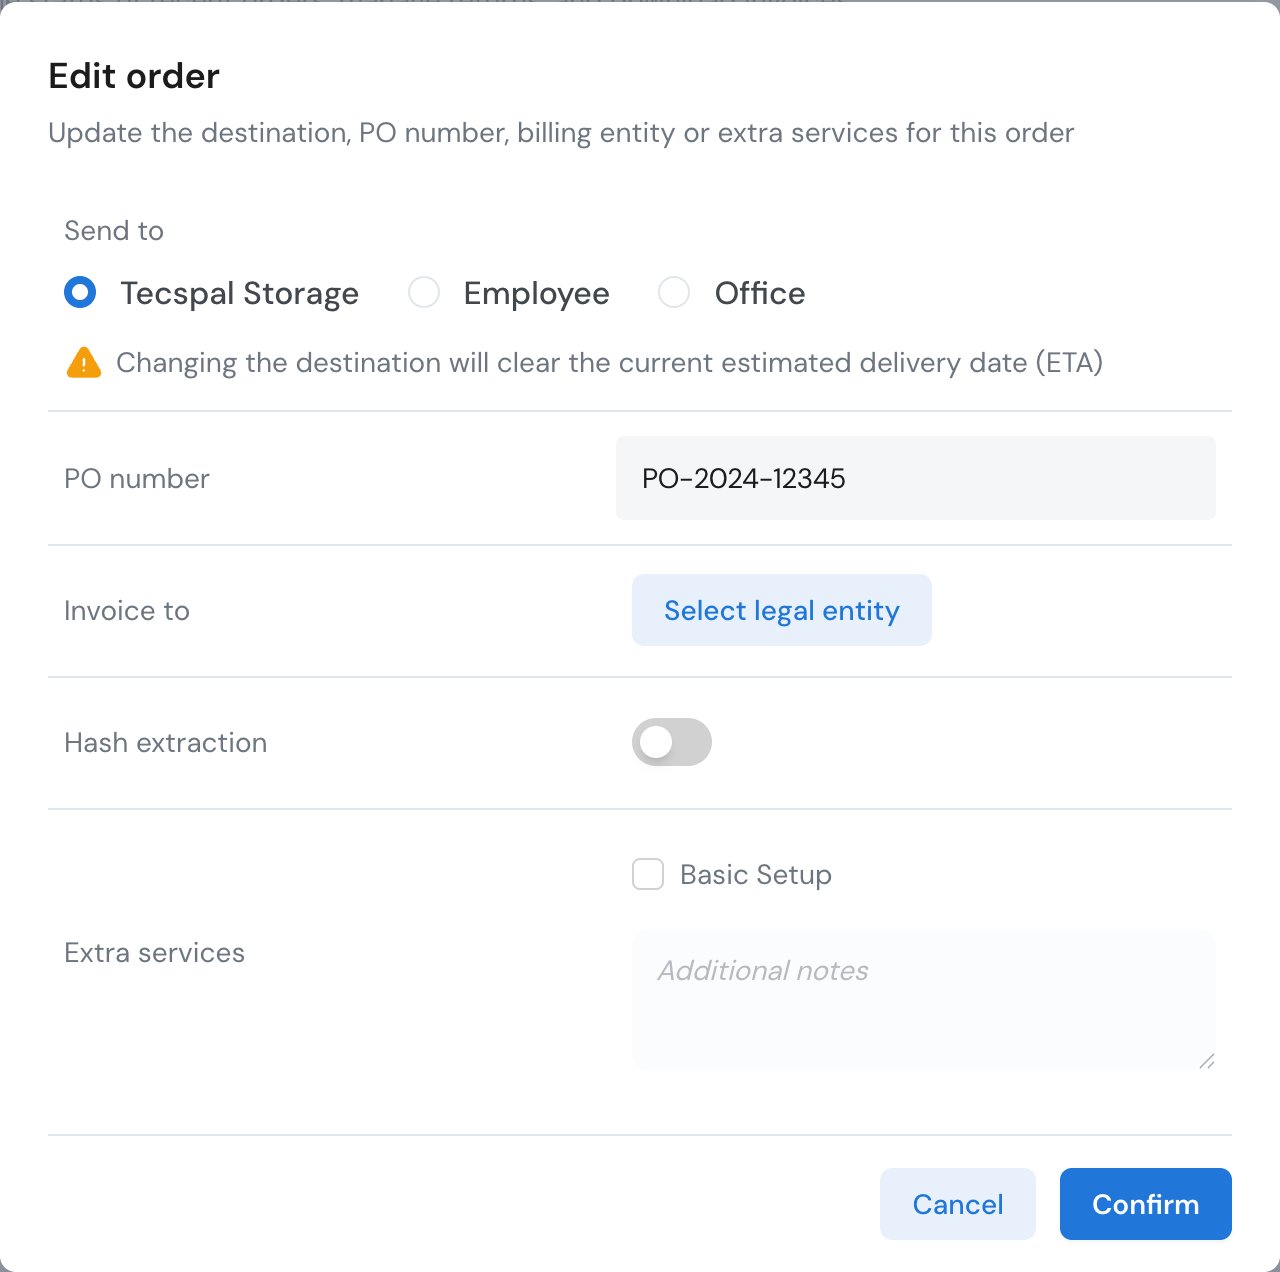
You can make small changes while the order is in Pending or Quoted.
Edit the order
- 1Open the order.
- 2Click Edit order.
- 3Change what you need: destination, PO number, billing entity, hash extraction or extra services.
- 4Click Confirm.
If you change the destination, the estimated delivery date (ETA) is cleared. For a quote-only order, choose the destination when you accept the quote.
After you accept the quote, the order can't be edited. If you need a change, leave a comment on the order.
Cancel an order
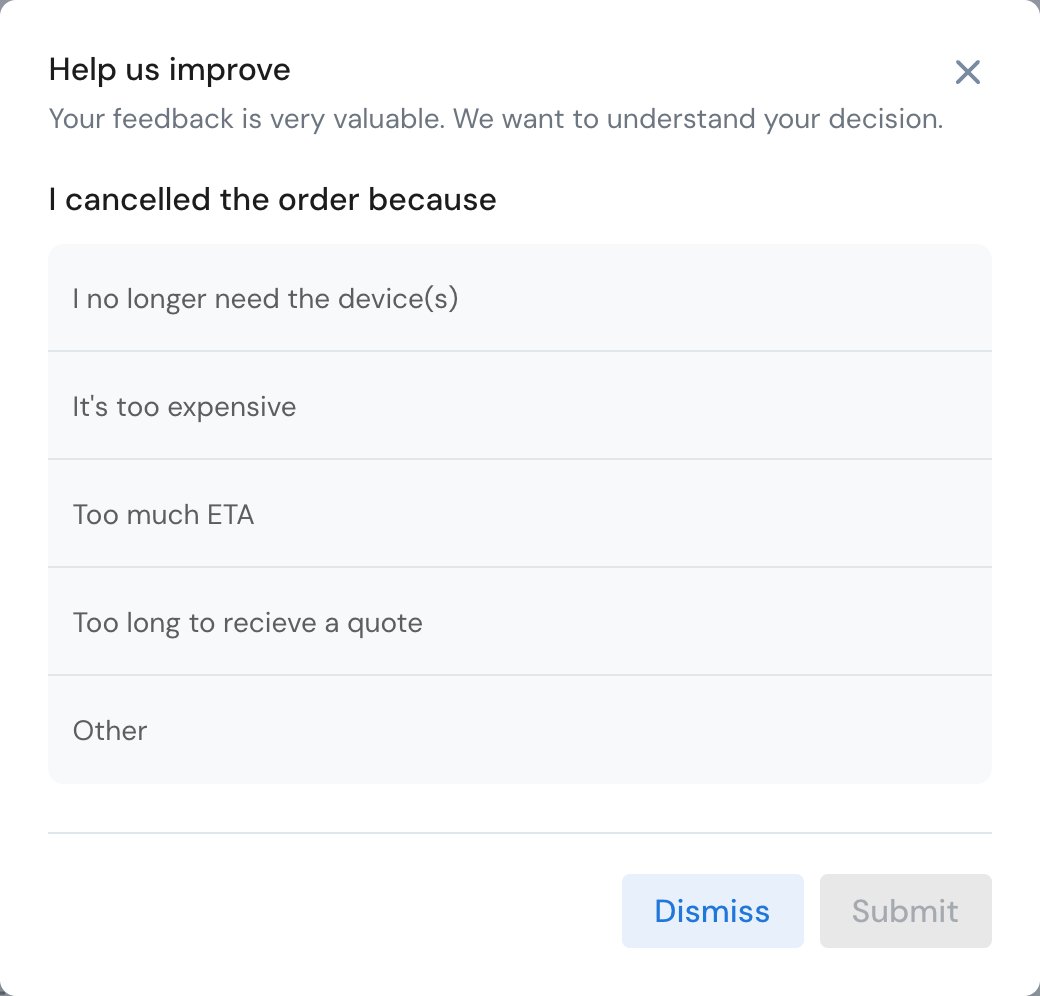
You can cancel while the order is in Pending or Quoted. If you don't want to accept a quote, cancel it.
Cancel the order
- 1Open the order.
- 2In the ⋮ menu, click Cancel Order.
- 3Choose the reason.
- 4Click Submit.
Replicate in other countries
Order the same items for other countries without entering them again.
Replicate the order
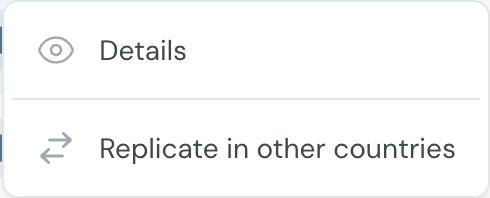
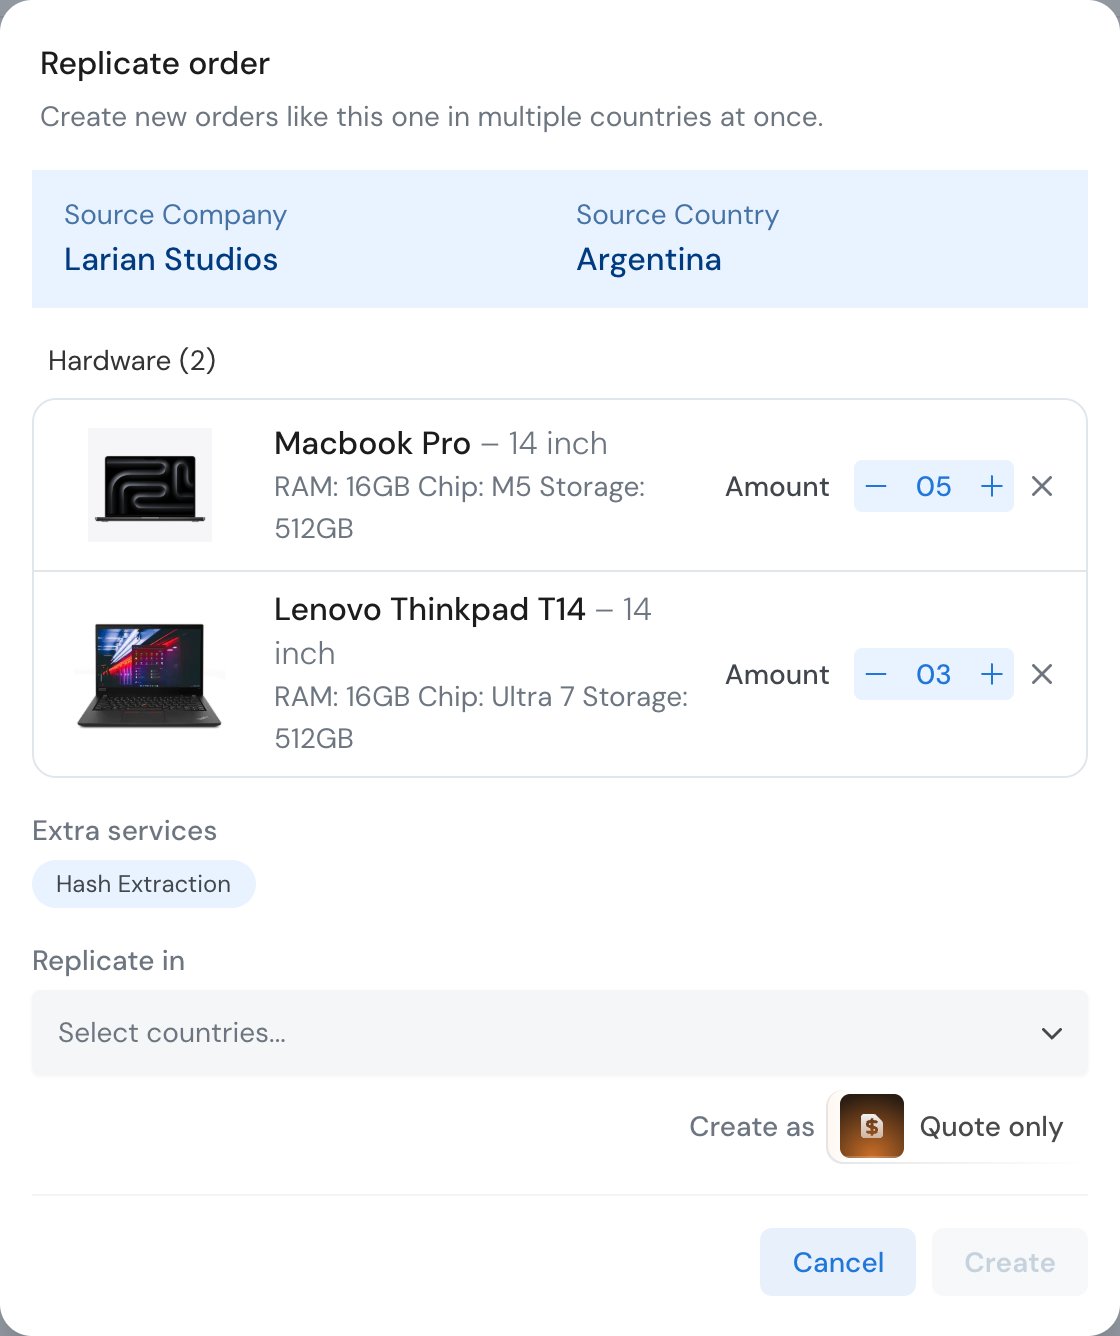
- 1In the Orders list, open the row menu and click Replicate in other countries. You can also do it from the ⋮ menu in the order details.
- 2If needed, adjust quantities or remove items.
- 3In Replicate in, choose the countries.
- 4Click Create.
The copies are created as quote only: you choose each destination when you accept the quote.
Hardware
View, register and manage your company's hardware.
- 3.1View your hardware
- 3.2Device details
- 3.3Add a device
- 3.4Edit a device
- 3.5Add a note
- 3.6More things you can do from a device
View your hardware
See all your company's hardware and where each device is.
Find a device
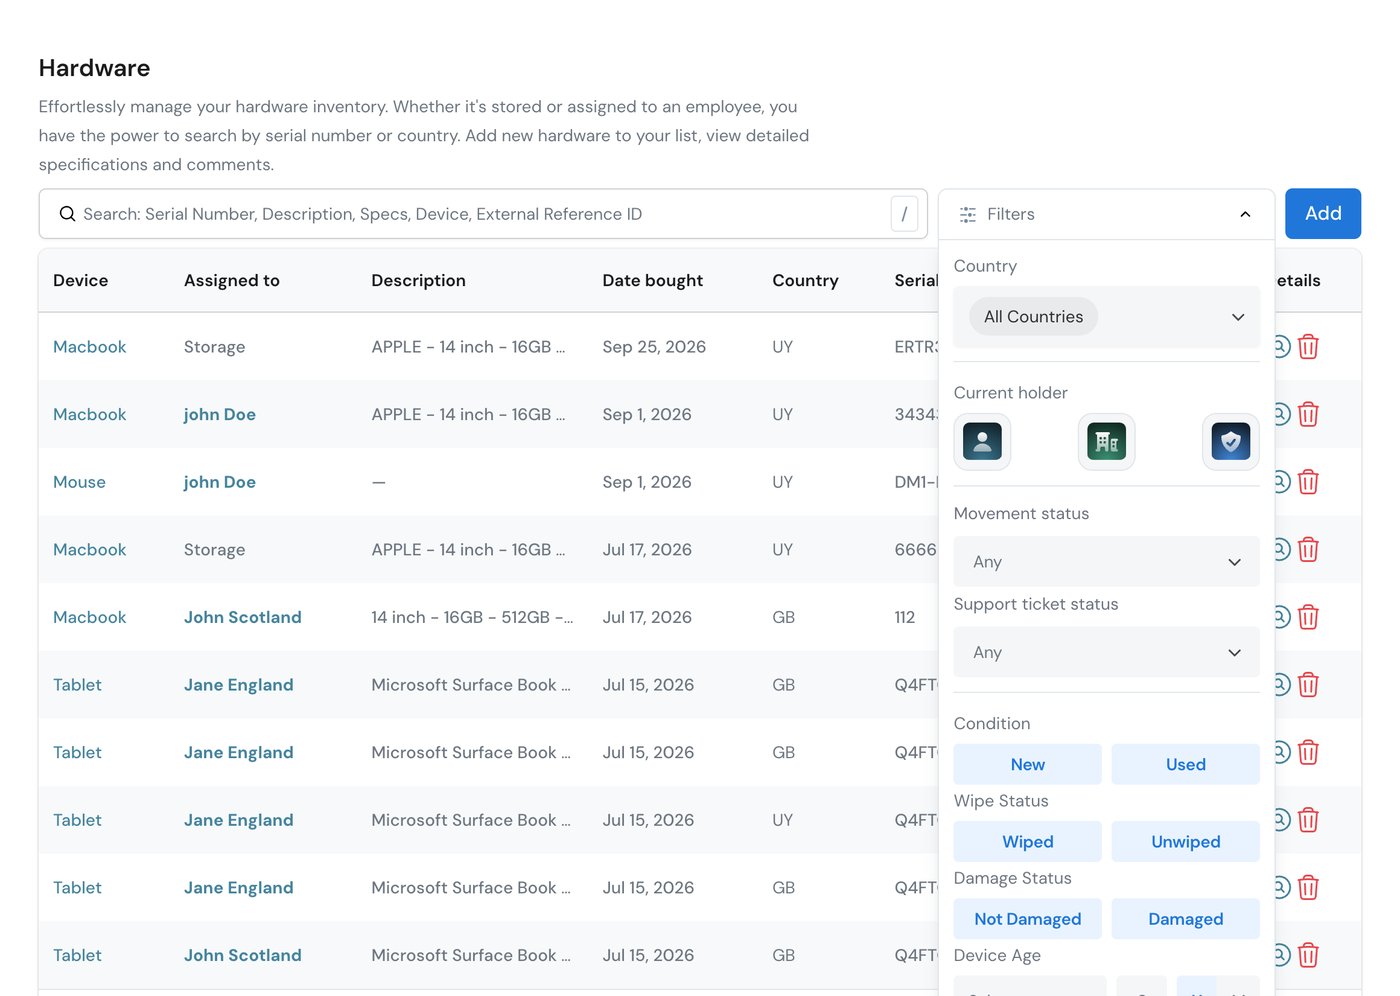
- 1Go to side menu → Hardware.
- 2To search, type the serial number, description, device or your external reference ID.
- 3To narrow the list, click Filters: country, condition (new or used), wipe status, damage status or device age.
What each row shows: the device, who it is assigned to, the description, purchase date, country and serial number.
Device details
Everything about a device in one place: where it is and its history.
Open the device
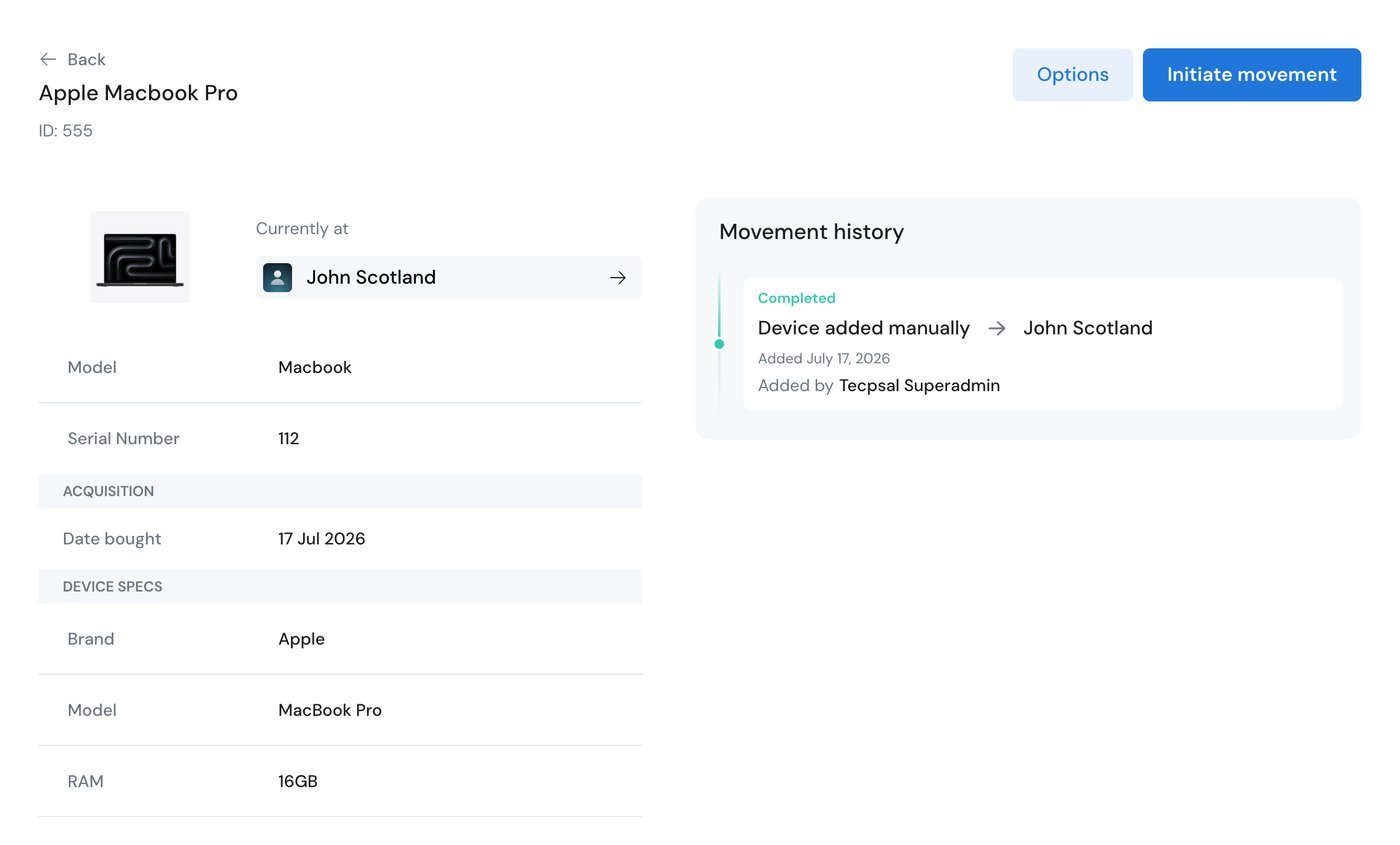
- 1Click the device to open it.
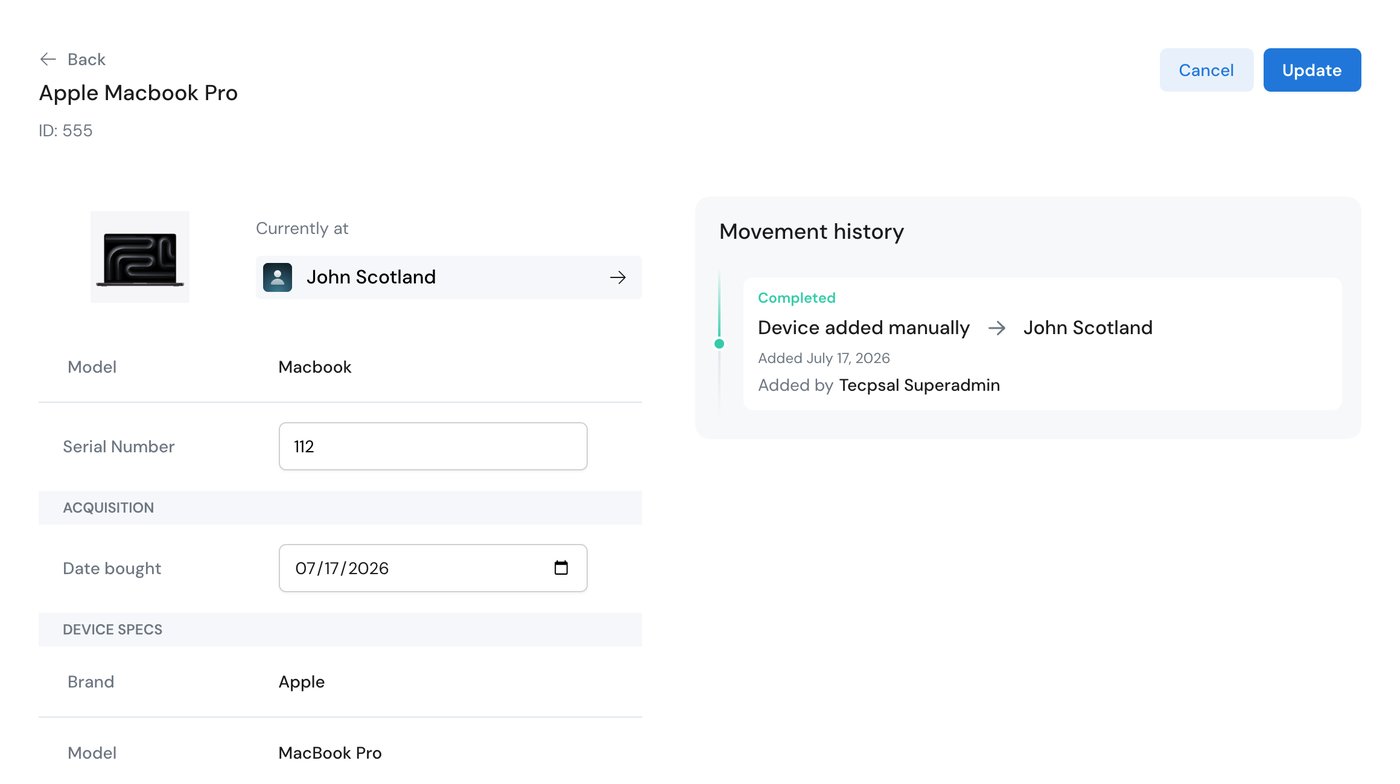
- 2Currently at shows where it is. If an Employee, Office or storage has it, you can open it from there.
- 3Below are its details: model, serial number, purchase date and specs.
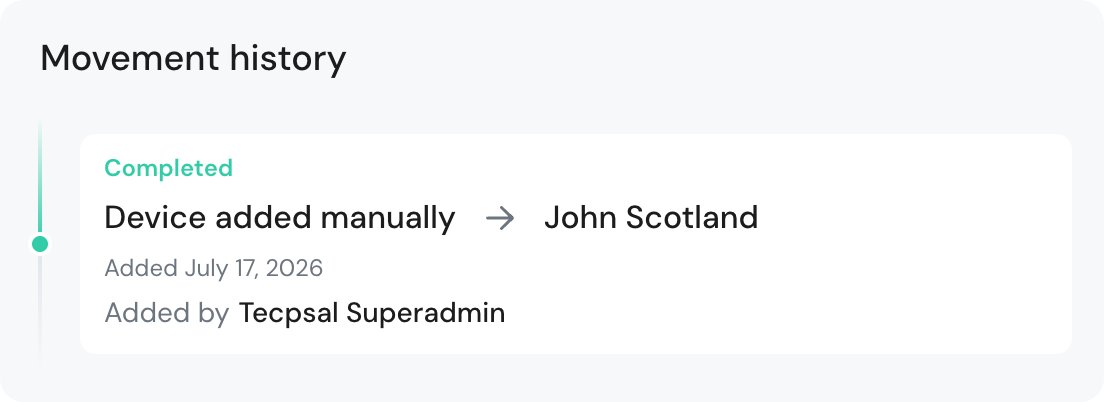
- 4On the right you see its history: Movement history, Support Tickets and Notes.
You can also reach the same page from an Employee, an Office, In Storage, a movement or a ticket.
Add a device
Register hardware your company already has. Hardware you buy through Tecspal is added automatically when the order is delivered.
Register the device
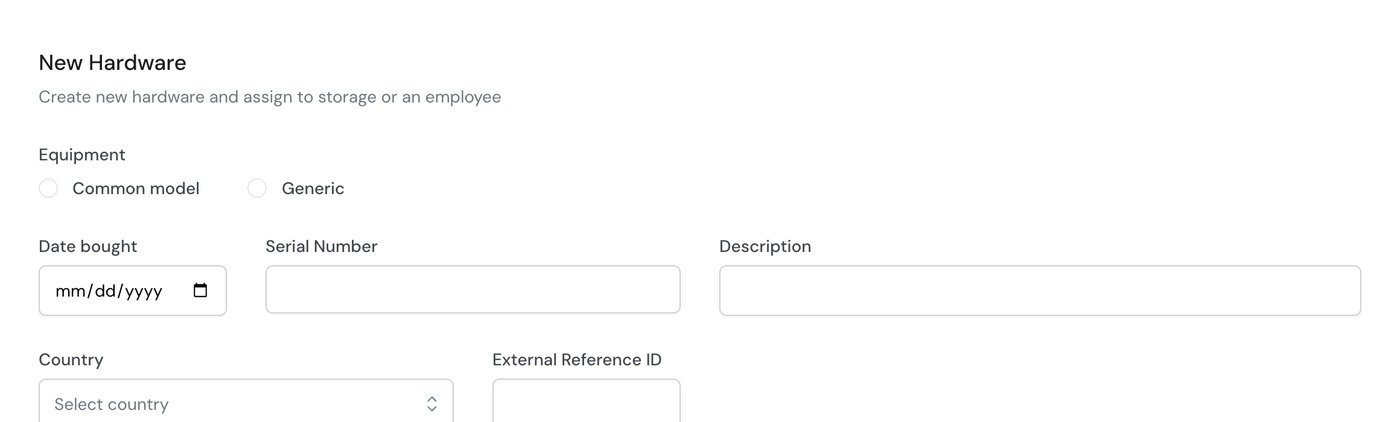
- 1Go to side menu → Hardware → Add.
- 2Choose Common model and pick the model, or Generic if it isn't listed.
- 3Fill in the purchase date, serial number, description, country and, optionally, your external reference ID.
- 4Click Submit.
Shortcut: from an Employee's details → New device → Register an existing device.
Edit a device
Correct or complete a device's details.
Edit the device
- 1Open the device.
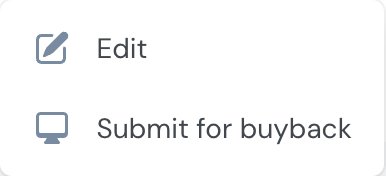
- 2Click Options → Edit.
- 3Change the details you need.
- 4Click Update.
Add a note
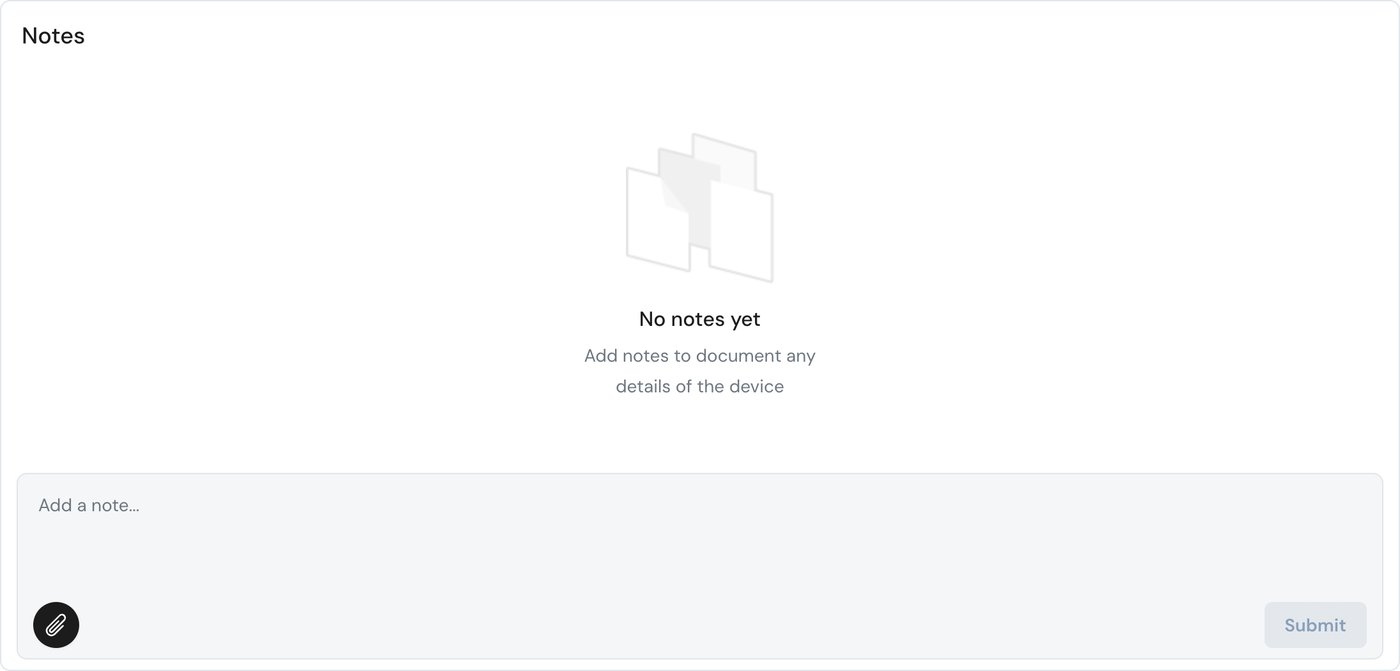
Leave useful information about the device, with images if needed.
Add the note
- 1Open the device.
- 2In Notes, type your note. To add an image, click the paperclip.
- 3Click Submit.
More things you can do from a device
Other processes start from the device details.
Other actions
- Move it to another Employee, Office or storage: Initiate movement. See the Movements chapter. Not possible if the device is already in a movement or has an open ticket.
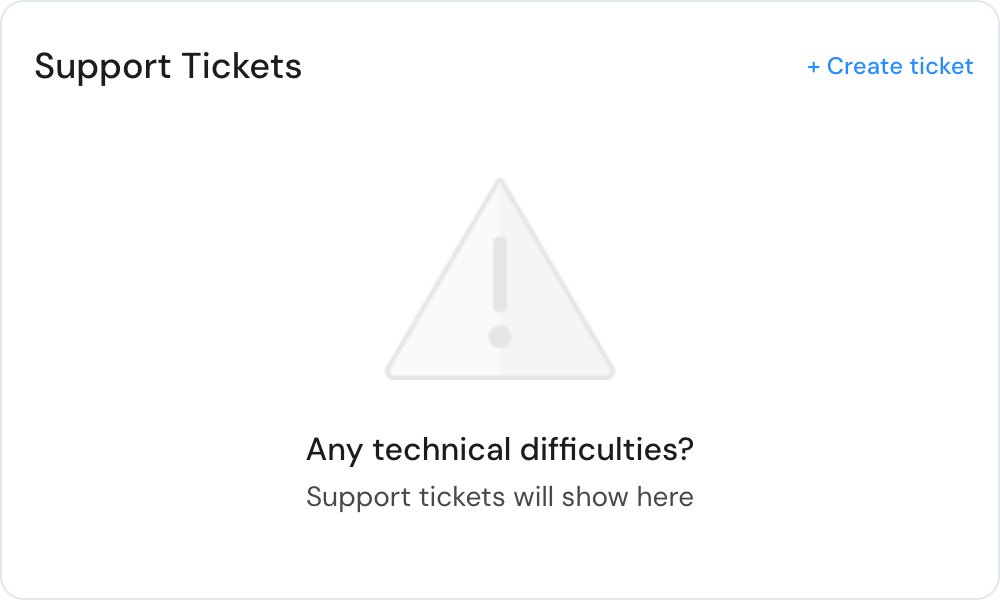
- Request IT support: in Support Tickets, click + Create ticket. See the IT support chapter.
- Sell it to Tecspal: Options → Submit for buyback. See the Buyback chapter.
Employees
The people in your company who receive or return hardware.
- 4.1View your Employees
- 4.2Add Employees
- 4.3Employee details
- 4.4Edit an Employee
- 4.5Give an Employee a device
- 4.6Offboard an Employee
- 4.7Deactivate an Employee
View your Employees
See the people in your company and their hardware.
Find an Employee
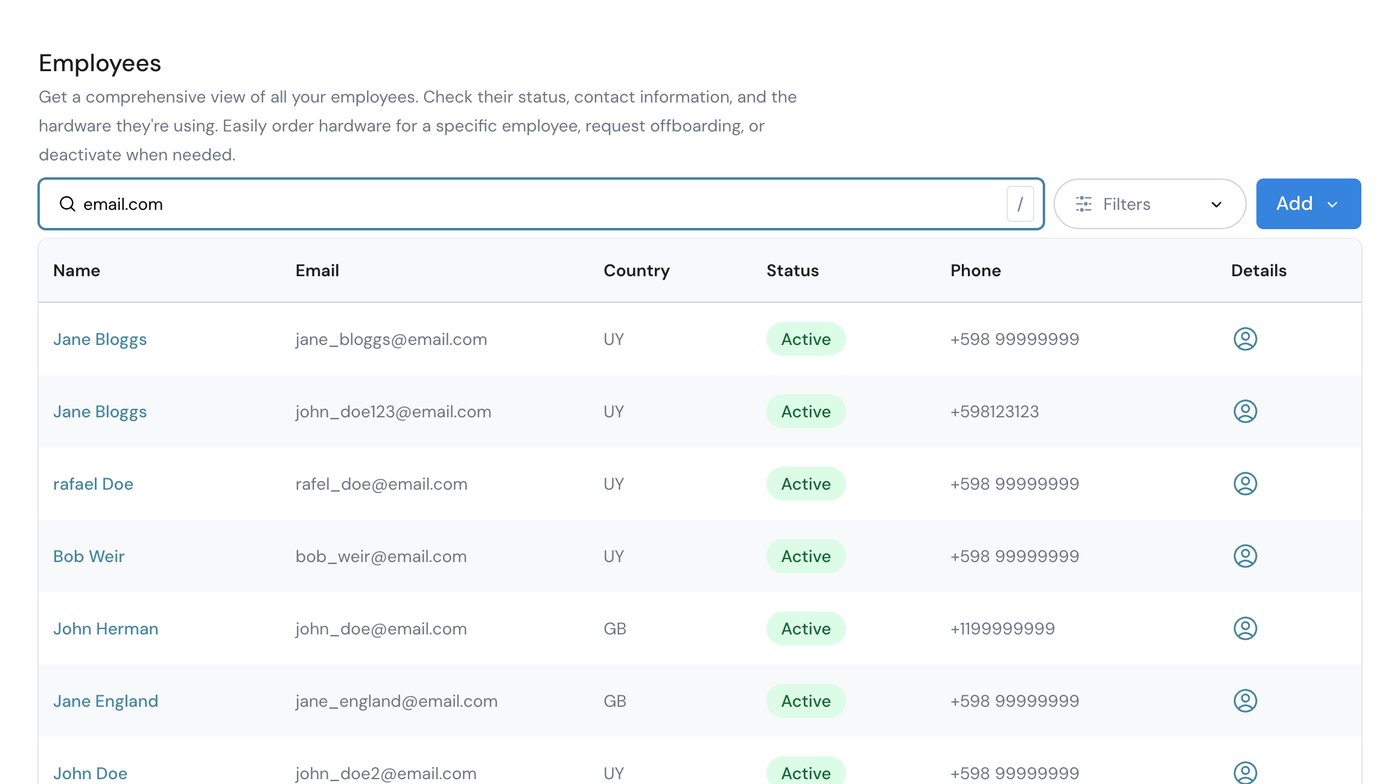
- 1Go to side menu → Employees.
- 2To search, type the Employee's name or email.
- 3Click the Employee to open it.
Add Employees
Add people before you send them hardware: one at a time or several at once with a CSV file.
One at a time
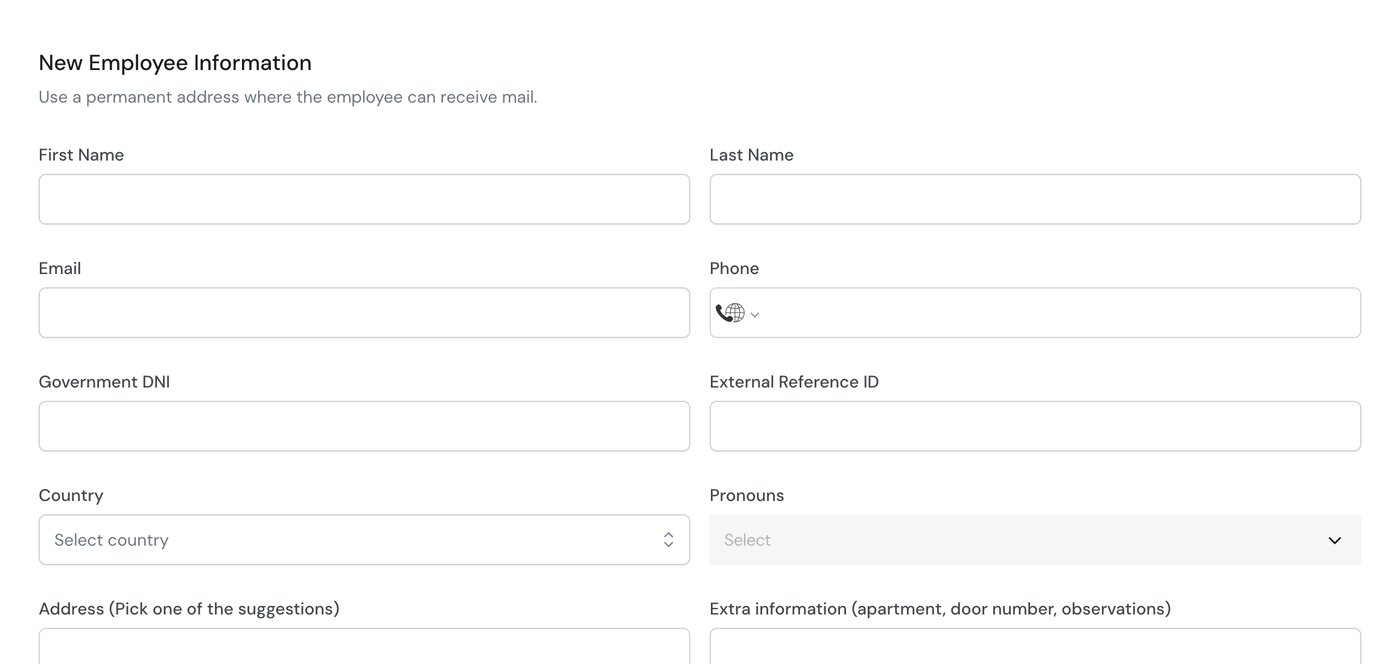
- 1Go to side menu → Employees → Add and choose to add one.
- 2Fill in first name, last name, email and phone (choose the country code).
- 3Enter the ID number (Government DNI). For Brazil, also the CPF.
- 4Choose the country.
- 5Type the address and pick one of the suggestions. If needed, add extra information (apartment, door number).
- 6Fill in the postal code.
- 7Click Submit.
You can also create an Employee on the spot when choosing the destination of an order or a movement.
Several at once with a CSV
- 8Go to side menu → Employees → Add and choose bulk upload.
- 9Prepare the CSV file with one row per Employee.
- 10Before uploading, check that each email appears only once in the file.
- 11Fill in each Employee's ID number (and CPF for Brazil): it is required when creating orders and movements.
- 12Upload the file.
- 13Check that the Employees appear in Employees.
If one row has an error, no Employees from the file are added. Fix the file and upload it again.
Employee details
Their details, their hardware and their history.
What it shows
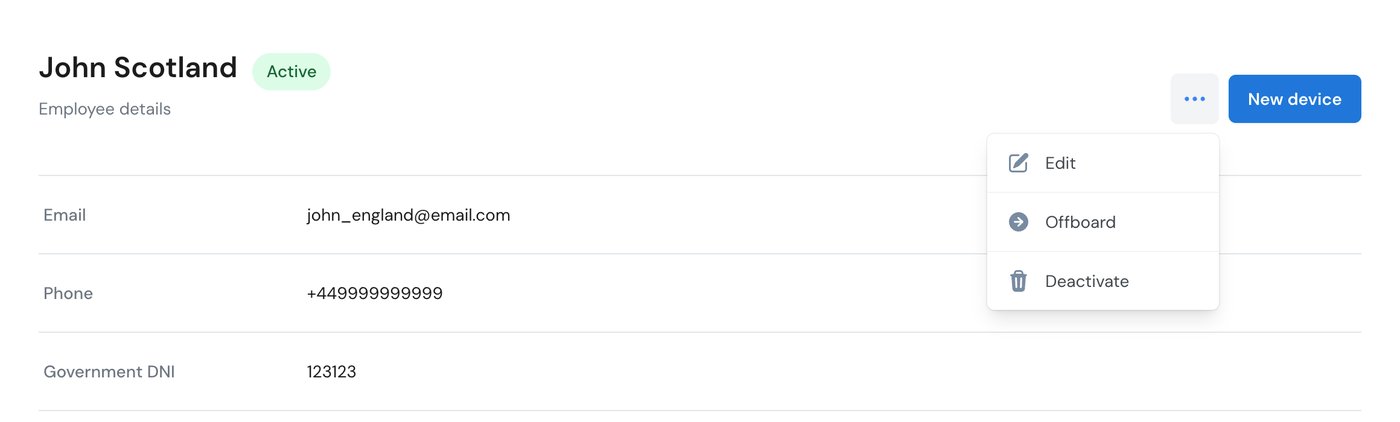
- Details: email, phone, ID number (and CPF in Brazil), address, postal code and external reference. If the ID number is missing, it says Missing.
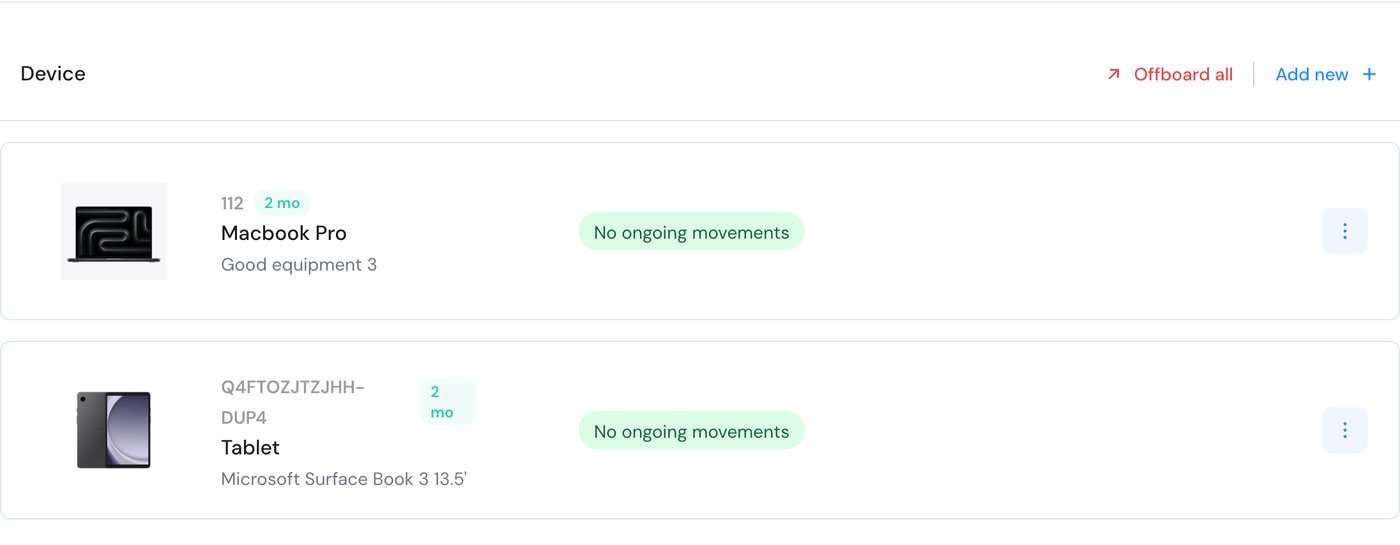
- Their hardware, in the Device section. Click one to open it.
- Their movement history.
- Notes, with images.
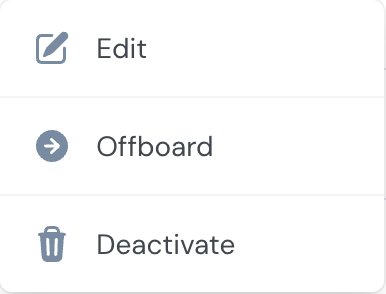
- Actions: at the top right are New device and the ··· menu, with Edit, Offboard and Deactivate.
Edit an Employee
Update a person's details.
Edit the Employee
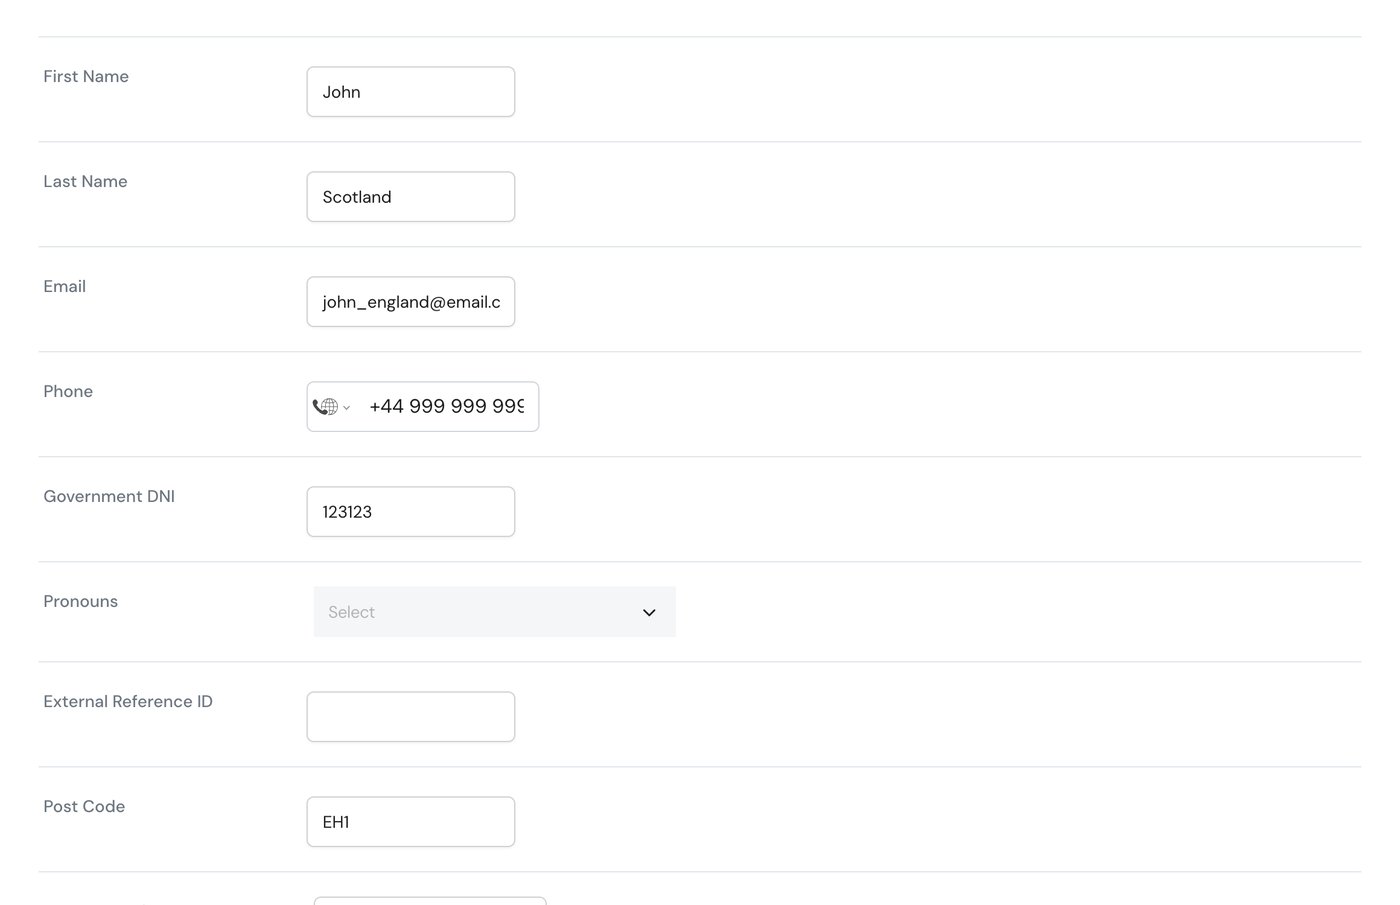
- 1Open the Employee.
- 2In the ··· menu, click Edit.
- 3Change the details you need.
- 4Pick the address from the suggestions again, even if it didn't change.
- 5Save.
If you change the Employee's country, their hardware's country changes too.
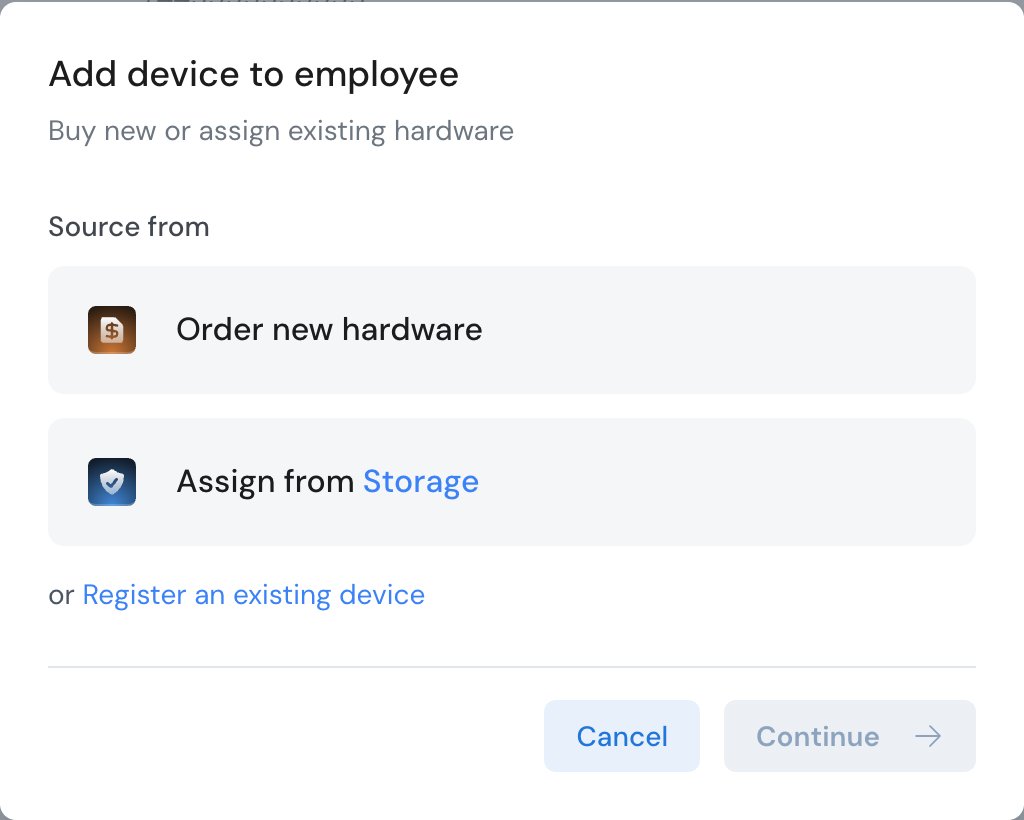
Give an Employee a device
From the Employee, with the person already set as the destination.
Use New device
- 1Open the Employee.
- 2Click New device.
- 3Choose an option:
- Order new hardware: creates an order for the Employee. See Create an order.
- Assign from Storage: sends them a device you keep in Tecspal storage. See the Hardware in storage and offices chapter.
- Register an existing device: adds a device they already have. See Add a device.
- 4Click Continue.
Offboard an Employee
When someone leaves your company, ask Tecspal to collect their hardware.
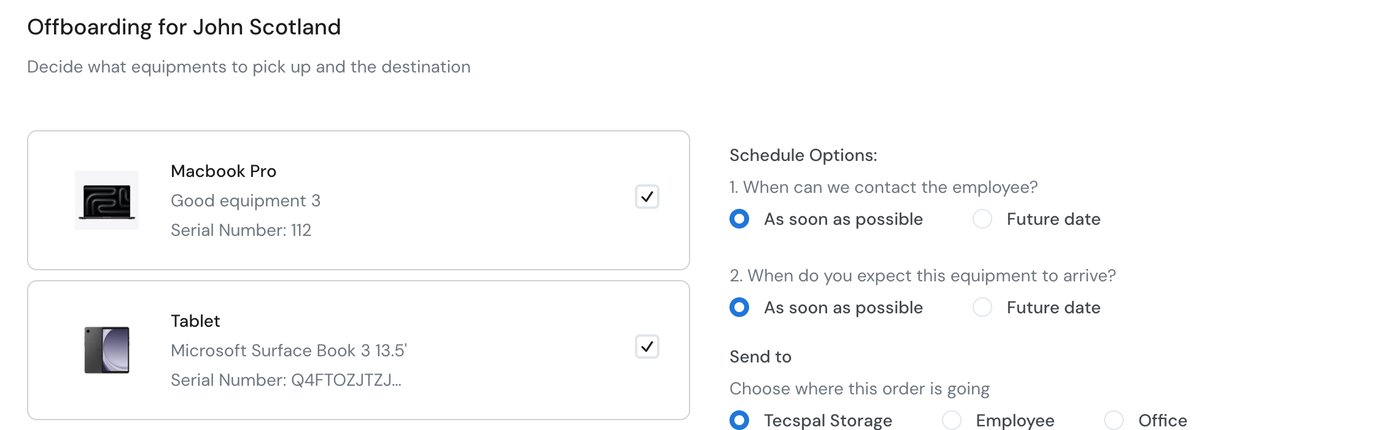
Choose the devices and dates
- 1Open the Employee.
- 2In the ··· menu, click Offboard. You can also use Offboard all in the Device section.
- 3Check the devices: they are all selected. Uncheck the ones that aren't being collected.
- 4In When can we contact the employee?, choose As soon as possible.
- 5In When do you expect this equipment to arrive?, choose As soon as possible or a Future date.
Choose the destination and submit
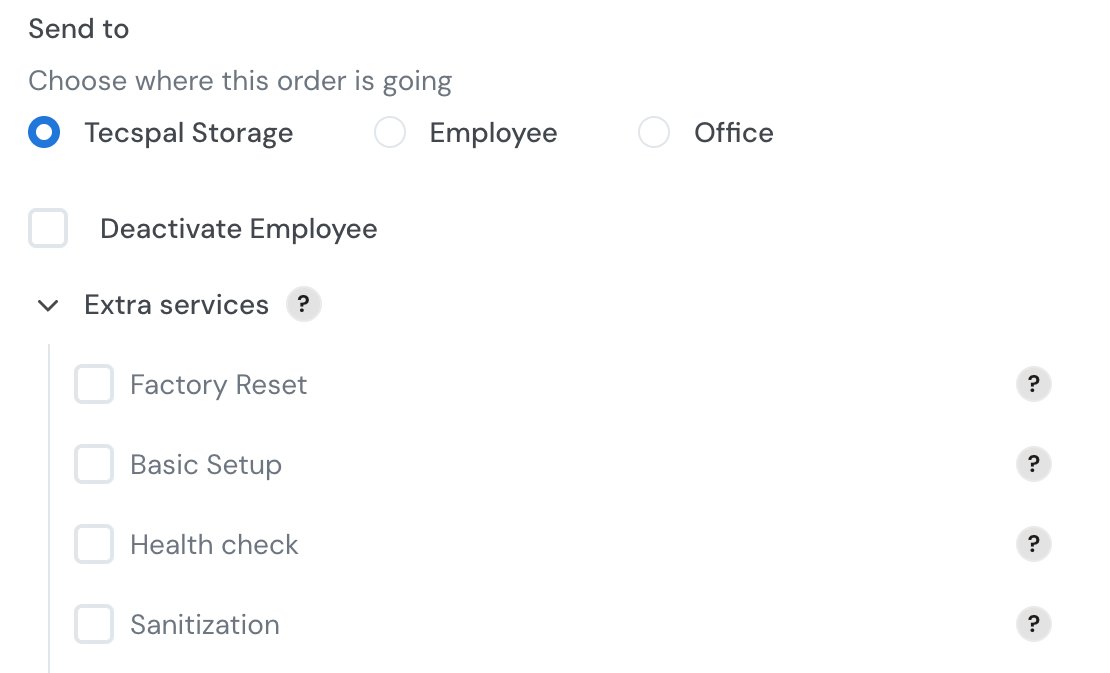
- 6In Send to, choose where the hardware goes:
- Tecspal Storage: Tecspal collects and stores them. For PCs or Macs, in Extra services you can request Factory Reset, Basic Setup, Health check or Sanitization.
- Employee or Office: choose the destination and who ships it, Tecspal or your company.
- 7Click Submit.
All selected devices go to the same destination. To send some elsewhere, do a second offboarding.
Before submitting, the platform checks that the Employee has a phone and ID number (and CPF in Brazil). If something is missing, it lets you add it.
What happens next?
A movement is created and Tecspal coordinates the pickup with the Employee. You can follow it in Movement Requests.
Deactivate an Employee
When someone is no longer at your company and has no pending hardware.
Deactivate the Employee
- 1Open the Employee.
- 2In the ··· menu, click Deactivate.
A deactivated Employee no longer appears when creating orders and movements. Their details and history are kept.
Movements
How to ask Tecspal to move hardware between Employees, Offices and storage, and how to track each shipment.
- 5.1What a movement is
- 5.2Move a device
- 5.3Other places it starts from
- 5.4Track a movement
- 5.5Movement statuses
- 5.6Change or cancel a movement
What a movement is
A movement is a shipment of hardware from one place to another: from storage to an Employee, from an Employee back to storage, between Employees, or to or from an Office.
Types and who ships
The platform sets the type automatically, based on the origin and destination:
- Onboarding: the device leaves Tecspal Storage for an Employee or Office.
- Offboarding: the device goes back to Tecspal Storage.
- Off + On: the device goes from one place to another without going through storage, for example between two Employees.
Who ships: if Tecspal handles it, we coordinate with the Employee, pick up, deliver and keep you posted at every step. If My company handles it, the movement is completed right away and the device changes location immediately: use it to record a shipment your team already made. If the movement starts or ends in storage, Tecspal always handles it.
Move a device
Send a device to another Employee, to an Office or to storage.
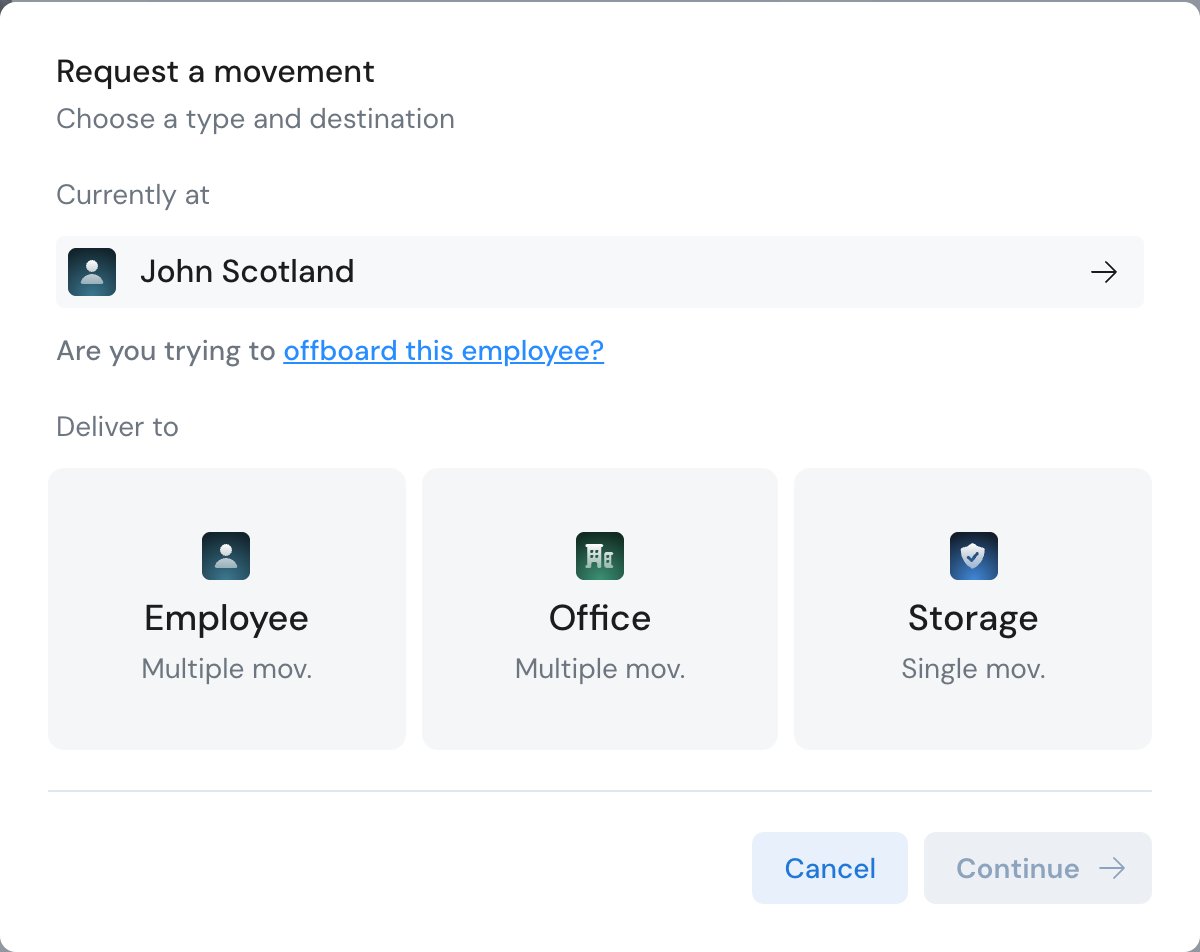
Choose the destination type
- 1Go to side menu → Hardware and open the device.
- 2Click Initiate movement.
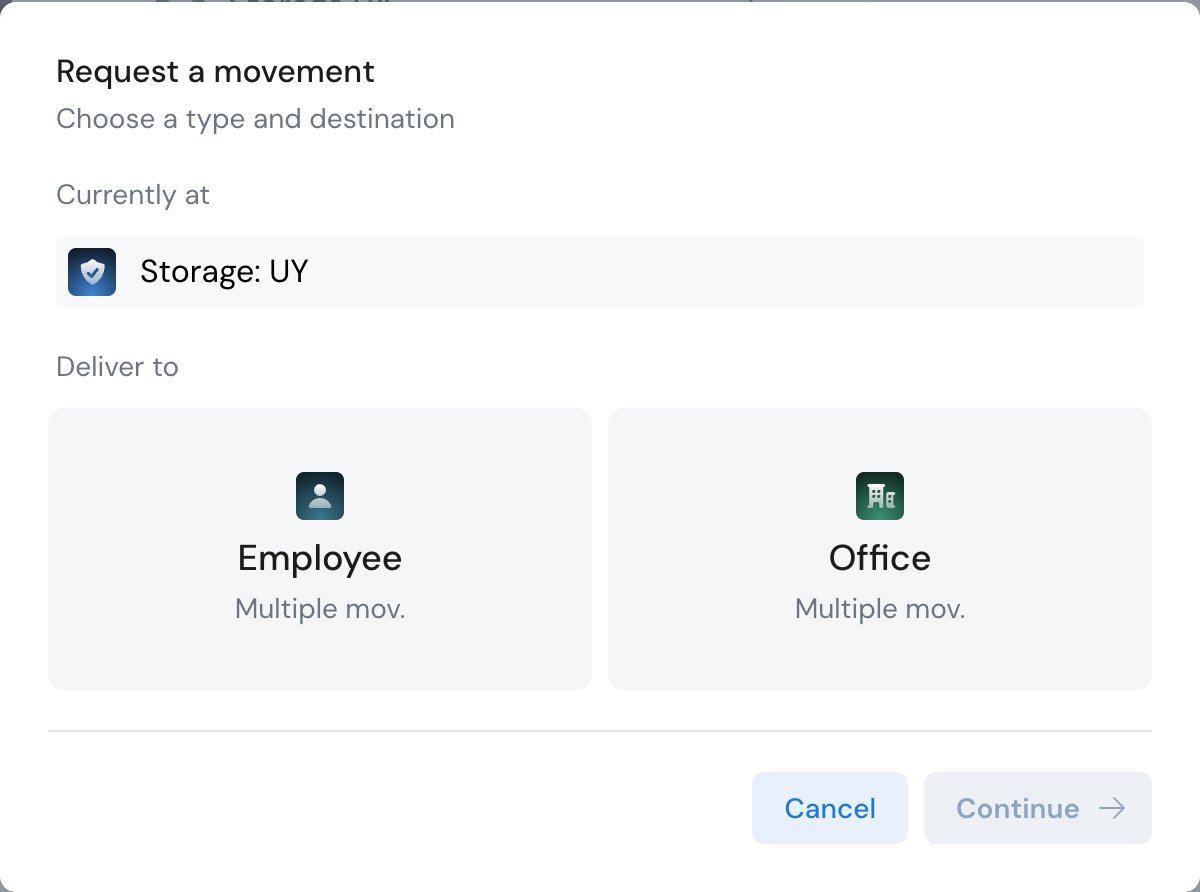
- 3In Deliver to, choose Employee, Office or Storage. If the device is already in storage, the options are Employee or Office.
- 4Click Continue.
If the device belongs to an Employee who is leaving, use the offboard this employee? link. See Offboard an Employee.
You can't move a device that is already in a movement or has an open ticket.
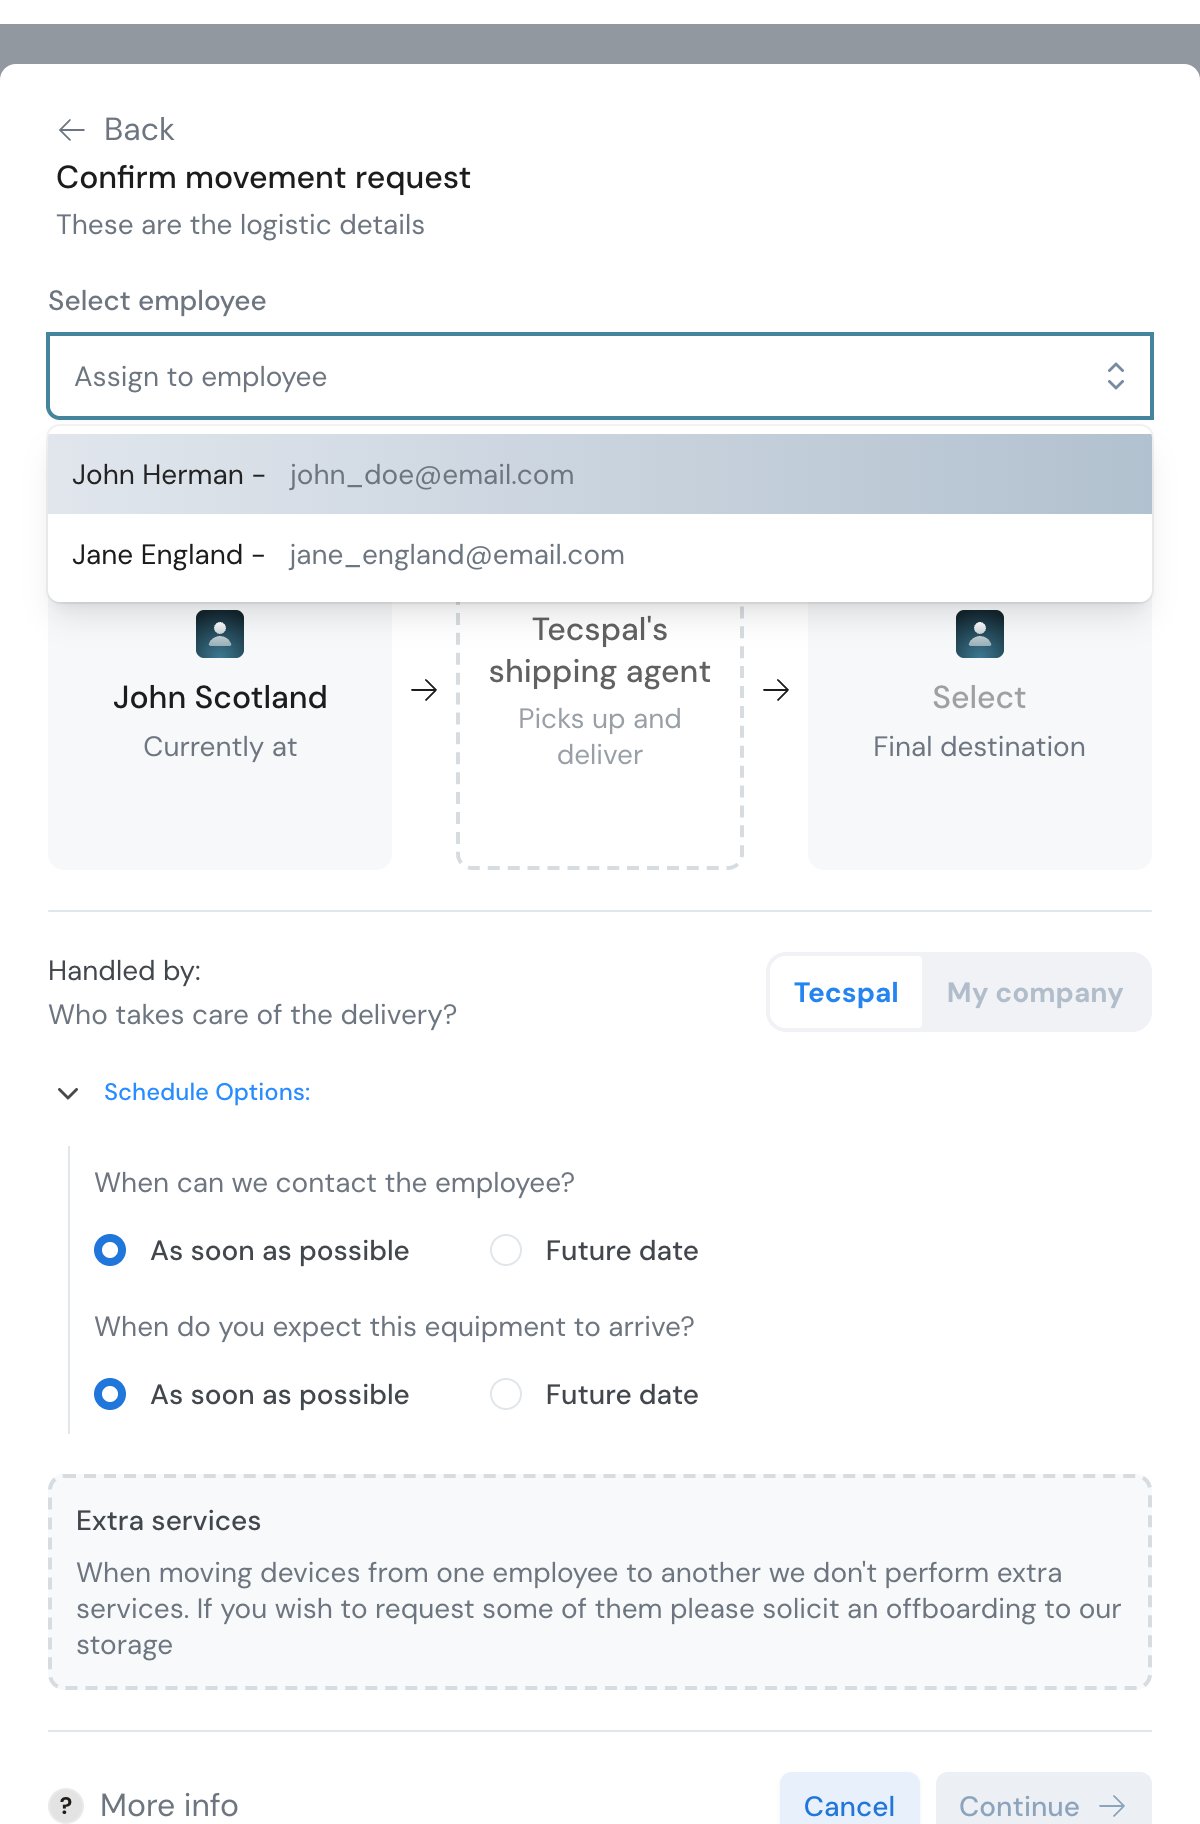
Confirm the details
- 5Choose the destination Employee or Office (for example, in Select employee).
- 6In Handled by, choose Tecspal or My company.
- 7In When can we contact the employee?, choose As soon as possible.
- 8In When do you expect this equipment to arrive?, choose As soon as possible or a Future date.
- 9Click Continue and confirm.
No extra services are done between Employees. If the device needs one (for example, Sanitization), request an offboarding to storage.
What happens next?
If Tecspal handles it, the movement is created in Processing: you get an email and the Employee gets a WhatsApp message to coordinate. You can follow it in Movement Requests.
Other places it starts from
Several processes create a movement for you.
Where else they are created
- Offboarding an Employee: see Offboard an Employee.
- In Storage: to send stored hardware to an Employee or Office. See the Hardware in storage and offices chapter.
- An Office: to send its hardware to an Employee or to storage. See the Hardware in storage and offices chapter.
- A support ticket: Tecspal takes the device to service and brings it back. See the IT support chapter.
- A buyback: Tecspal takes the device to the buyer. See the Buyback chapter.
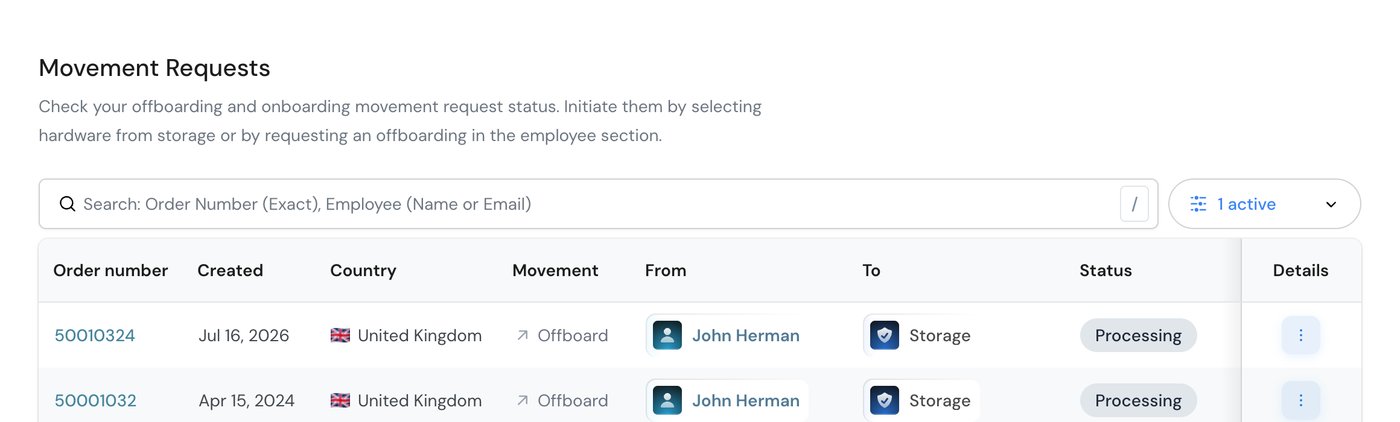
Track a movement
Check where each shipment is.
Find the movement
- 1Go to side menu → Movement Requests.
- 2To search, type the full order number or the Employee's name or email.
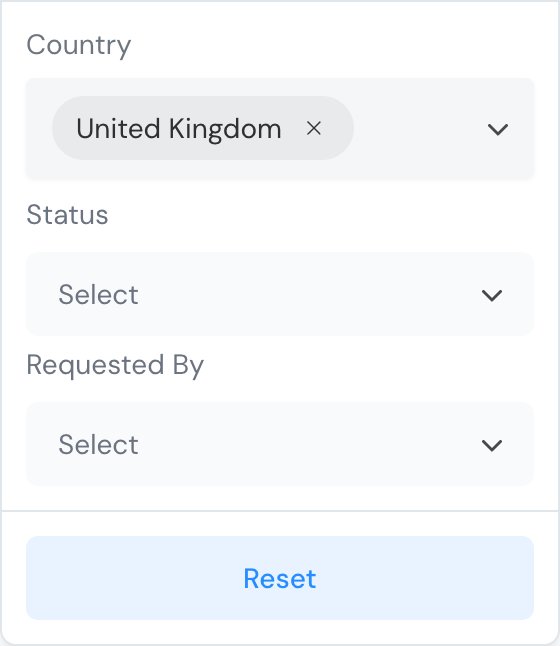
- 3To narrow the list, filter by Country, Status or Requested By.
- 4Click the movement to open it.
Each row shows the number, date, country, type, origin, destination and status.
Check the details
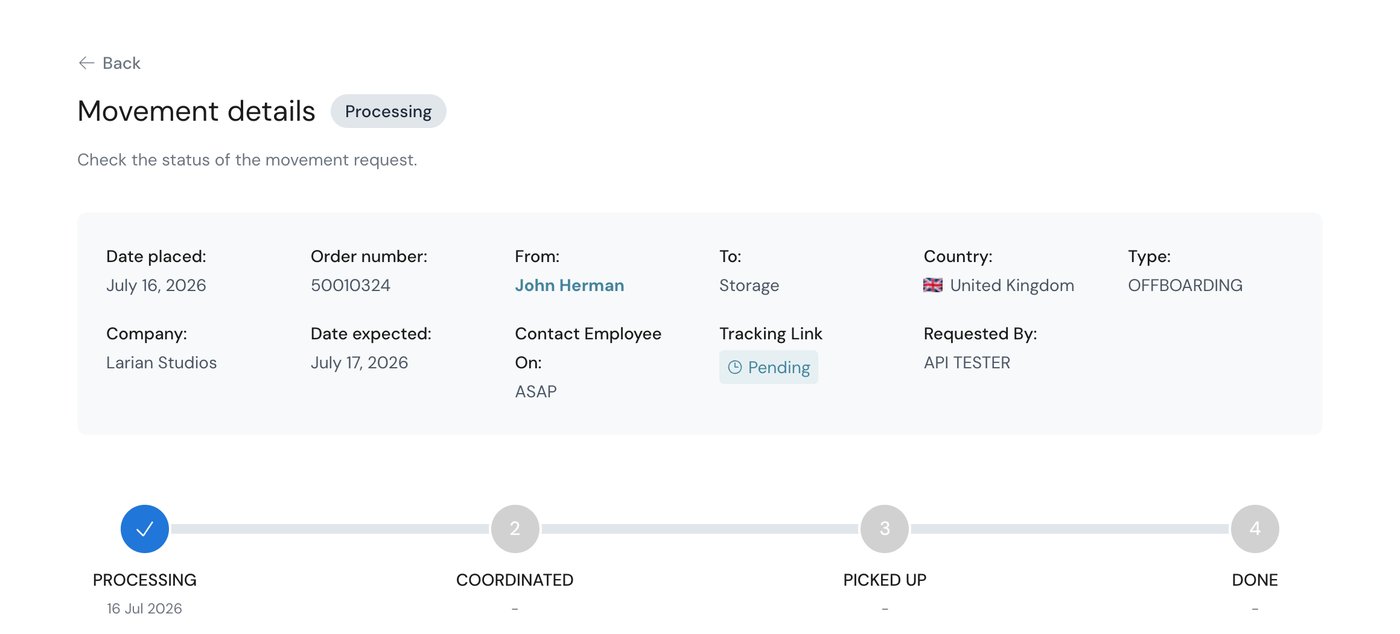
- At the top you see the origin, destination, type, expected date and when the Employee will be contacted.
- When Tecspal adds tracking, a Link appears under Tracking Link.
- The bar shows the current step.
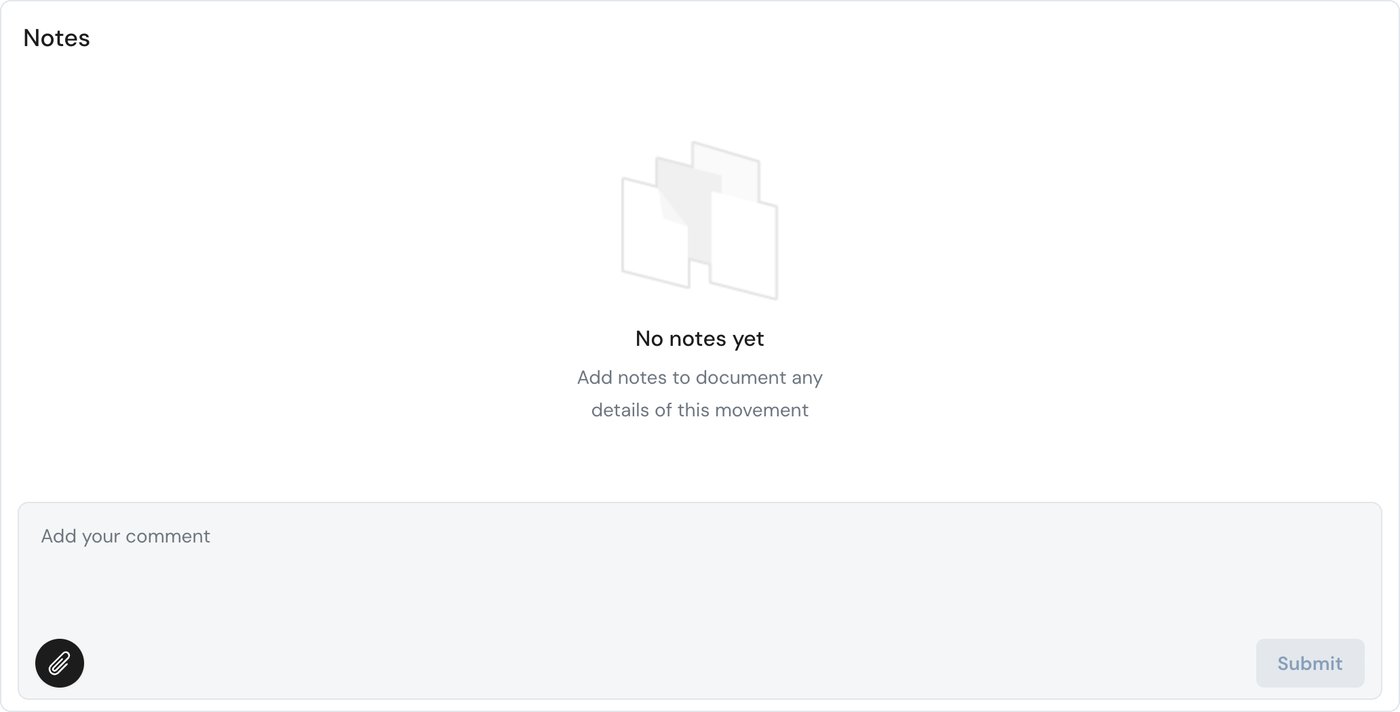
- Below are the devices and Notes, where you can write to Tecspal about that movement.
Movement statuses
What each step means and when we let you know.
The steps
- Processing: Tecspal received the request. Email to your company and WhatsApp to the Employee.
- Coordinated: Tecspal coordinated with the Employee. Email.
- Picked up: Tecspal picked up the device (not for onboardings). Email.
- Done: the device arrived and its location was updated. Email.
- Cancelled: the movement was cancelled.
- Blocked: Tecspal put it on hold. Ask your account manager.
When tracking is added, you get an email and the Employee gets a WhatsApp message.

Change or cancel a movement
Tecspal updates the status of a movement.
Ask for the change
- 1Open the movement.
- 2In Notes, tell Tecspal what you need to change or that you want to cancel it.
- 3Click Submit. If it's urgent, also contact your account manager.
IT support
How to open an IT support ticket, track it and approve the repair.
- 6.1When a ticket is opened
- 6.2Open a ticket
- 6.3Track your tickets
- 6.4Approve the repair
- 6.5When the repair is done
- 6.6Cancel a ticket
- 6.7Comment on a ticket
- 6.8Ticket statuses
When a ticket is opened
A ticket is an IT support request for one or more devices.
Two ways
- You open it from a device when it has a problem. See Open a ticket.
- It opens automatically when you request extra services in an order or an offboarding (for example, Basic Setup or Sanitization): Tecspal opens one ticket per PC or Mac. You don't need to do anything.
Open a ticket
Request support for one of your company's devices.
Create the ticket
- 1Open the device (side menu → Hardware).
- 2In Support Tickets, click + Create ticket.
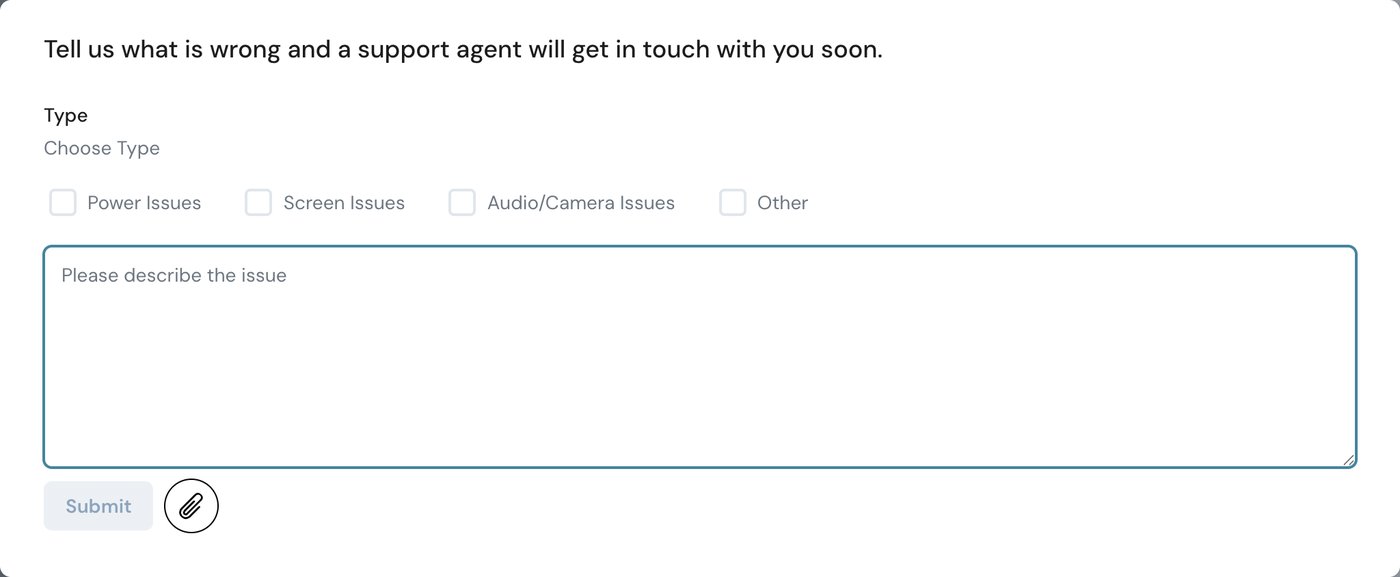
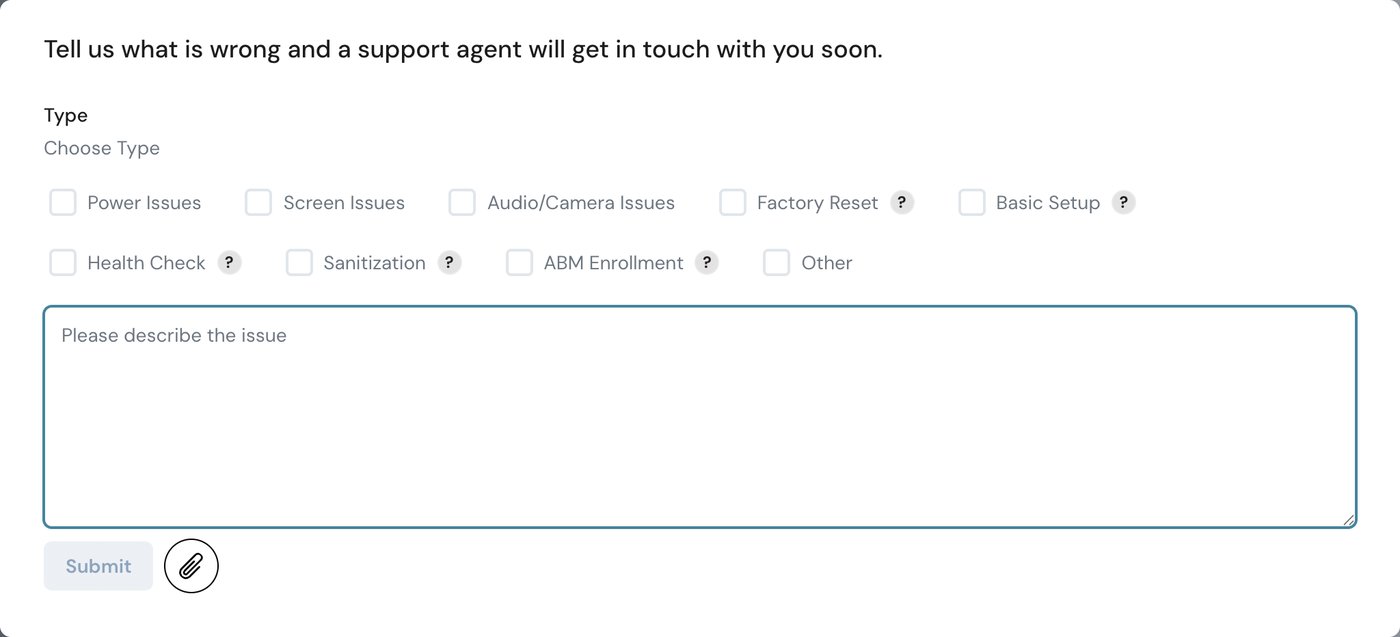
- 3In Type, check one or more issue types. The types depend on where the device is:
- If an Employee has it or it is at an Office: Power Issues, Screen Issues, Audio/Camera Issues or Other.
- If it is in Tecspal storage: also Factory Reset, Basic Setup, Health Check, Sanitization, and Hash extraction (PC) or ABM Enrollment (Mac).
- 4Describe the issue. If needed, attach a file with the paperclip.
- 5Click Submit.
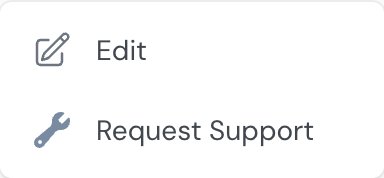
Shortcut: from an Employee's details, in the device card menu → Request Support.
Track your tickets
Check the status of all your company's tickets.
Find the ticket
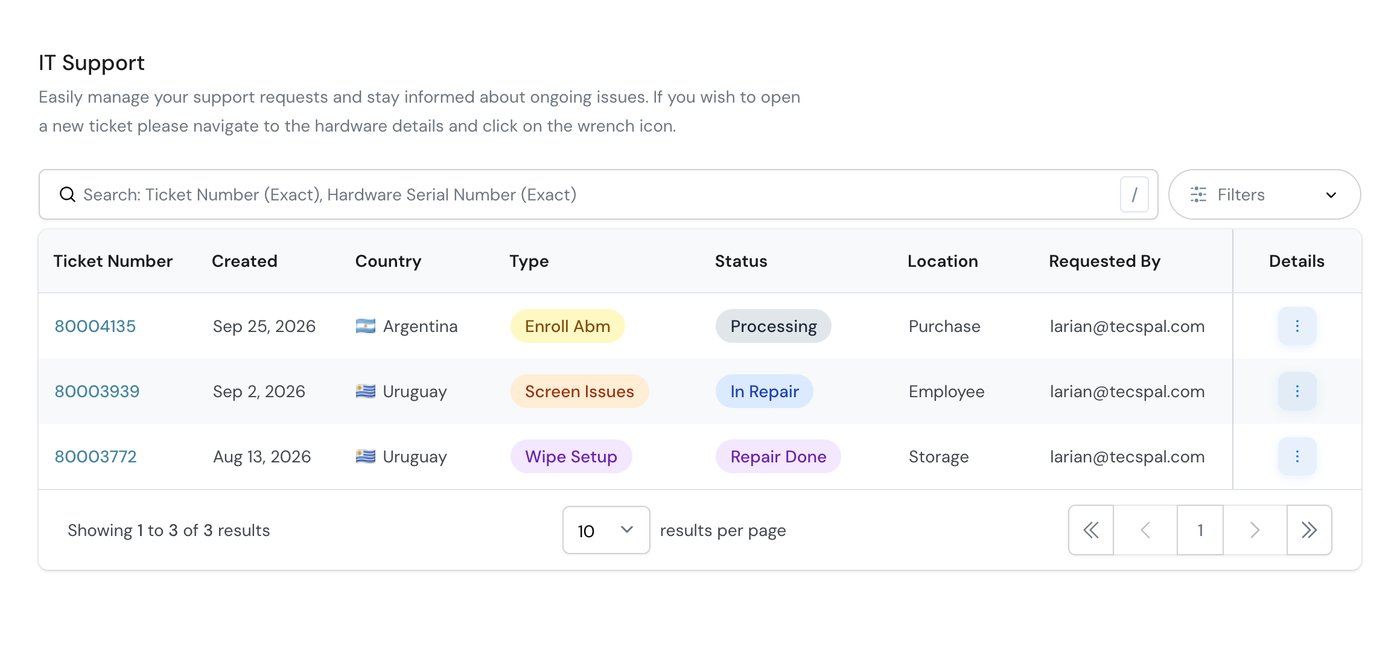
- 1Go to side menu → IT Support.
- 2To search, type the full ticket number or serial number.
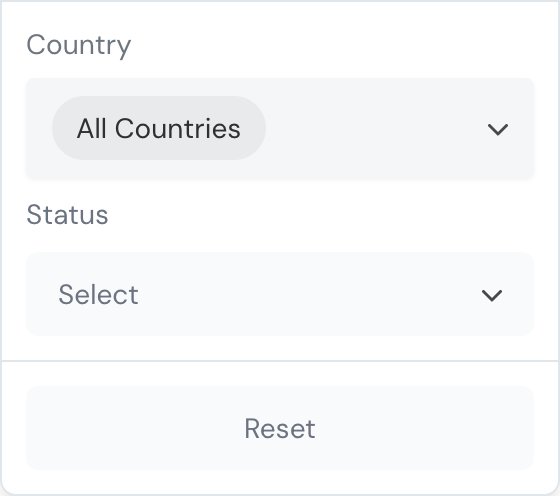
- 3To narrow the list, click Filters and filter by country or status.
- 4Click the ticket to open it.
Approve the repair
When Tecspal finishes the diagnosis, the ticket moves to Diagnostic ready and you get an email.
Approve or cancel
- 1Open the ticket.
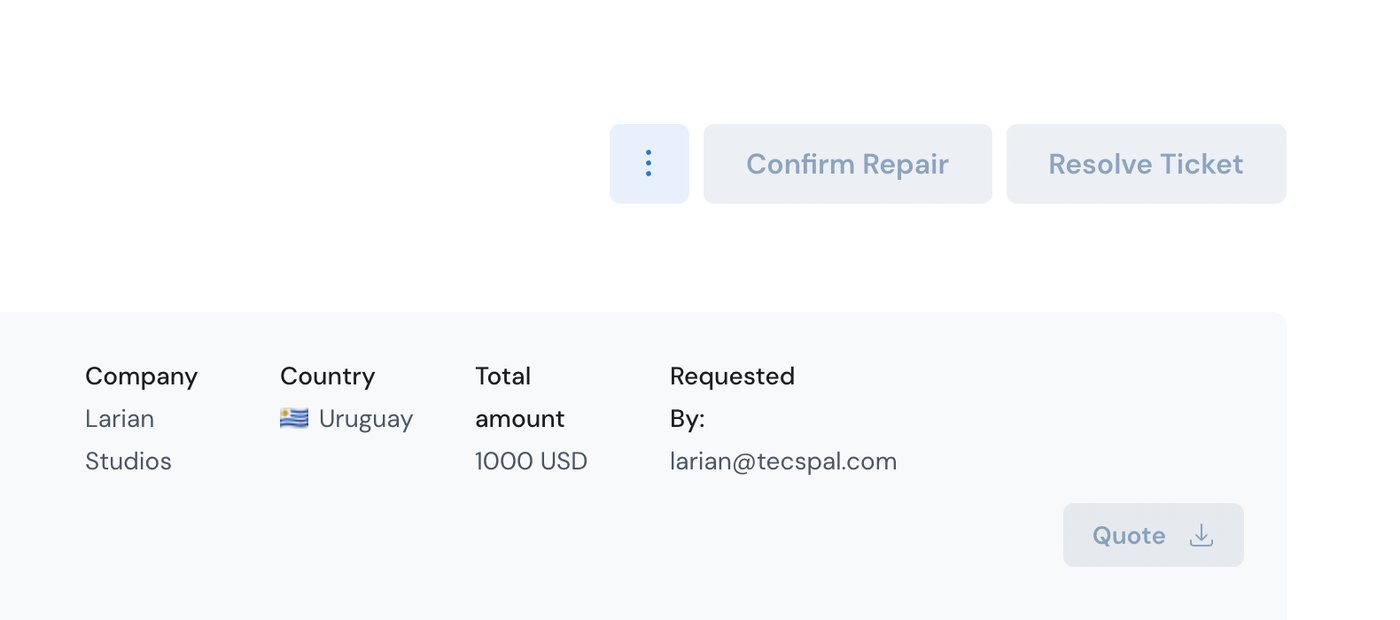
- 2Review the diagnosis and price. To download the quote as a PDF, click Quote.
- 3To approve, click Confirm Repair. The ticket moves to In repair.
- 4If you don't want the repair, cancel the ticket. See Cancel a ticket.
When the repair is done
When the repair is finished, the ticket moves to Repair done and you get an email.
Tecspal closes the ticket
- Tecspal returns the device and closes the ticket. Once closed, it moves to Done.
- If you want the device to go somewhere else (for example, to another Employee or to storage), tell Tecspal in the ticket comments. See Comment on a ticket.

Cancel a ticket
You can cancel while the ticket is in Processing or Diagnostic ready.
Cancel the ticket
- 1Open the ticket.
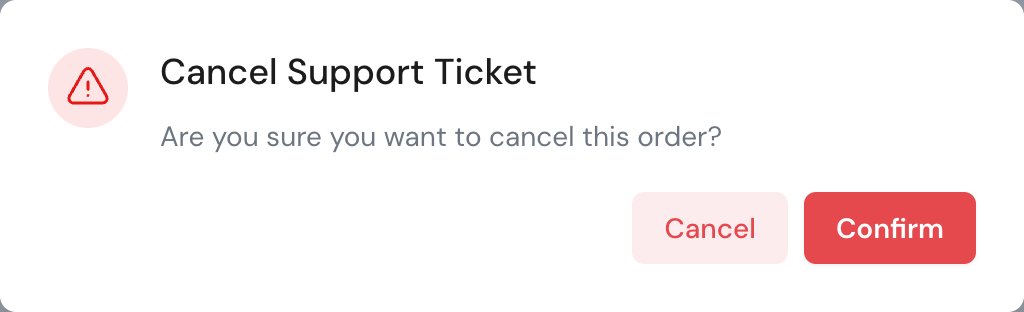
- 2In the ⋮ menu, click cancel.
- 3In Cancel Support Ticket, click Confirm.
Comment on a ticket
Talk to Tecspal about that specific issue.
Leave a comment
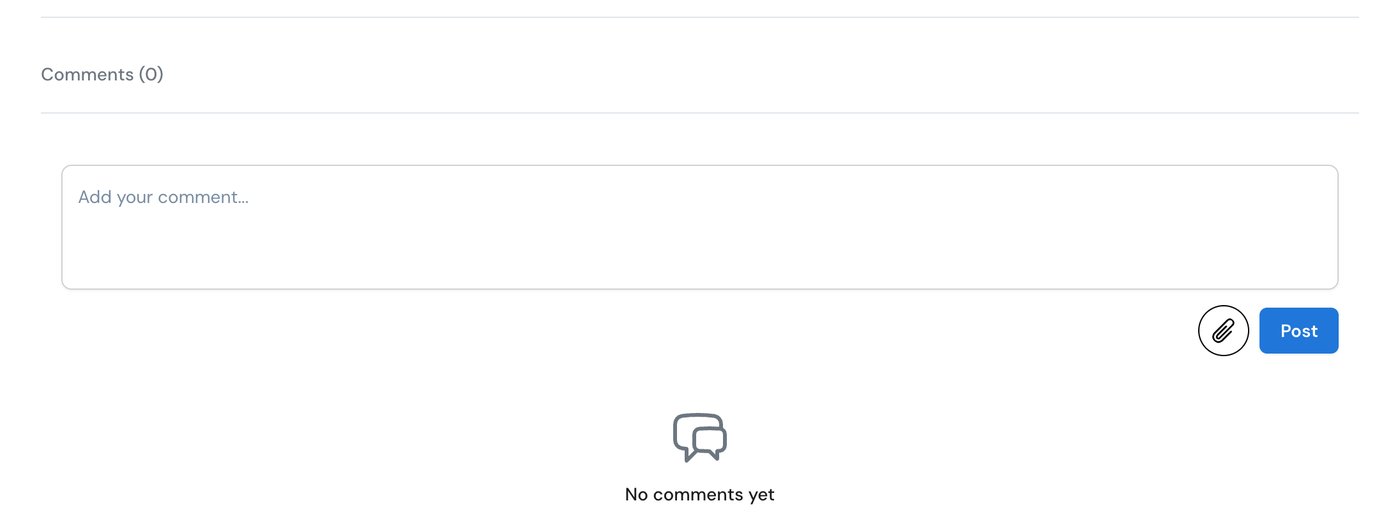
- 1Open the ticket.
- 2Type your message in Add your comment. If needed, attach a file with the paperclip.
- 3Click Post. Tecspal replies on the same ticket.
Ticket statuses
What each step means.
The steps
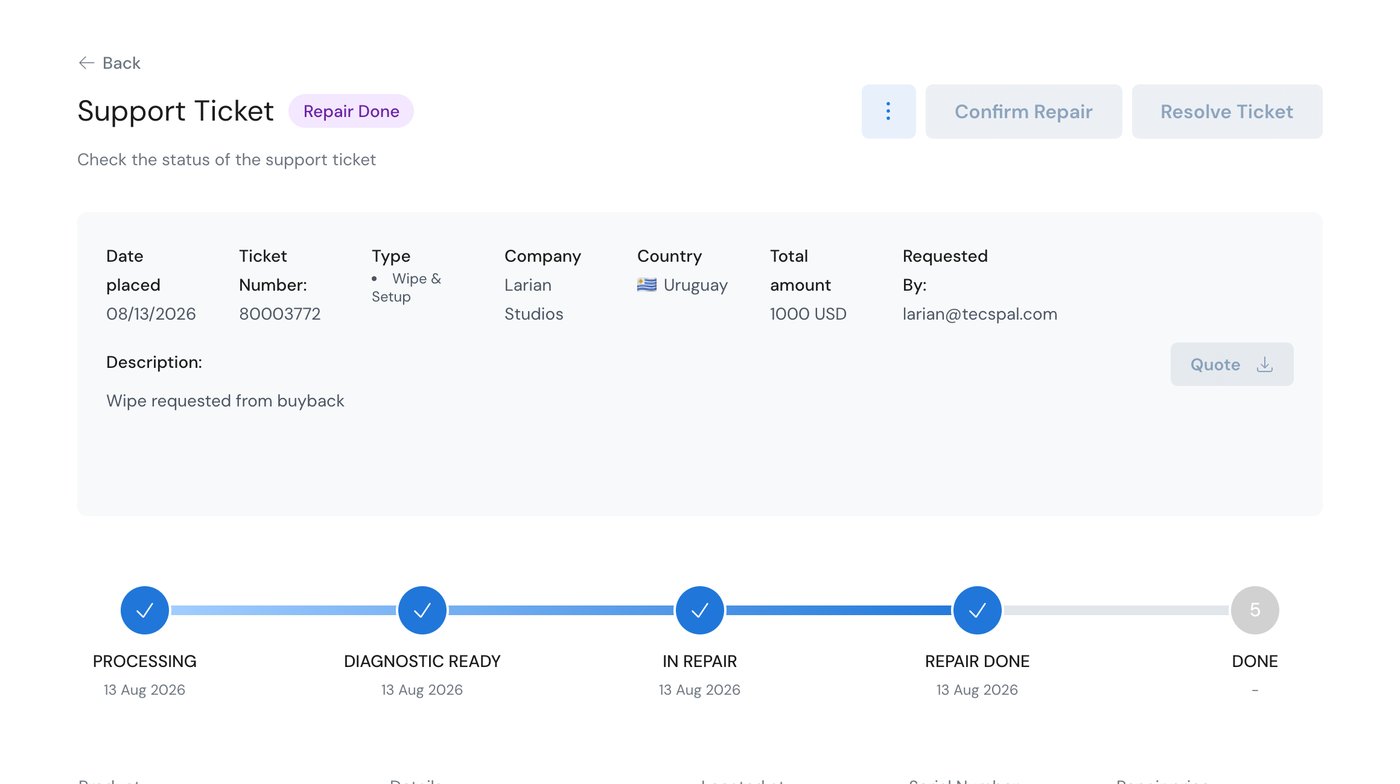
- Processing: Tecspal received the ticket.
- Customer pending: Tecspal is waiting for something from you. Check the comments.
- Diagnostic ready: the diagnosis and price are ready. Approve or cancel.
- In repair: you approved and the device is being repaired.
- Repair done: the repair is finished. Tecspal returns the device and closes the ticket.
- Done: Tecspal closed the ticket.
- Cancelled: cancelled.
Hardware in storage and offices
Hardware kept in Tecspal storage and your company's Offices.
- 7.1View your hardware in storage
- 7.2Send stored hardware
- 7.3Sell stored hardware
- 7.4Offices
- 7.5Create an Office
- 7.6View and edit an Office
View your hardware in storage
See your company's hardware kept in Tecspal storage.
Find the hardware
- 1Go to side menu → In Storage.
- 2At the top, cards show how many devices you have of each type. Click one to see only that type.
- 3Choose the country with the flags.
- 4To narrow the list, filter by condition (new or used), wiped, damaged, or whether the device is in a movement, has a ticket or is in buyback.
Each row shows the model, serial number, description, purchase date, storage location and whether the device is new or used, wiped or damaged.
Send stored hardware
Ask Tecspal to send hardware from storage to an Employee or an Office.
Choose the devices and destination
- 1Go to side menu → In Storage.
- 2Choose the country. You can't select devices until you do.
- 3Select the devices. Devices in a movement or with an open ticket can't be selected.
- 4Click Move.
- 5Choose the Employee or Office. It must be in the same country.
- 6Submit. Tecspal coordinates the delivery.
If any device is marked as damaged, the platform warns you before sending it.
Shortcut: from an Employee's details → New device → Assign from Storage. The Employee is already selected.
What happens next?
An Onboarding movement is created and Tecspal coordinates the delivery. You can follow it in Movement Requests.
Sell stored hardware
Offer Tecspal the hardware you no longer use.
Request buyback
- 1In In Storage, choose the country and select the devices.
- 2Click Submit for buyback.
- 3Follow the steps in the Buyback chapter.
Offices
An Office is one of your company's locations where Tecspal delivers or collects hardware.
The office manager
- Each Office has an office manager: the person who receives or hands over the hardware.
- They are not a platform user: they don't sign in or get emails.
- They get WhatsApp messages about every shipment to or from the Office.
Create an Office
Add an Office so you can send hardware to it.
Fill in the details
- 1Go to side menu → Offices → Add.
- 2Fill in the name and country.
- 3Type the address and pick one of the suggestions. Fill in the postal code and, optionally, any notes.
- 4Enter the Office phone.
- 5Fill in the office manager's details: first name, last name, phone and email. WhatsApp messages go to that phone.
- 6Save.
The country can't be changed later. You can also create an Office on the spot when you start a movement from a device.
View and edit an Office
Its details, its hardware and its notes.
Open the Office
- 1Go to side menu → Offices and click the Office.
- 2Check its details and the table of devices there. You can search and filter by type.
- 3To change the details, click Edit, change what you need and save.
- 4To leave useful information, write a note. You can add images.
An Office's country can't be changed.
Buyback
How to sell your company's used hardware to Tecspal.
- 8.1What buyback is
- 8.2Request a buyback
- 8.3Track your buybacks
- 8.4Approve or decline the quote
- 8.5What happens after you approve
- 8.6Cancel a buyback
- 8.7Buyback statuses
What buyback is
Tecspal buys the used hardware your company no longer needs.
How it works
- 1You choose the devices you want to sell and describe their condition.
- 2Tecspal reviews them and sends you a quote.
- 3If you accept it, Tecspal coordinates the pickup.
- 4When the process is complete, the devices are marked as deactivated on the platform.
Request a buyback
You can request it for one or several devices at once, whether they are in Tecspal storage or an Employee has them.
Choose the devices
- One device: open the device → Options → Submit for buyback.
- Several devices: from Buyback Orders, select the devices in the list of all your hardware.
- Stored devices: from In Storage, choose the country, select the devices and click Submit for buyback.
A device can't be in two buybacks at the same time.
Describe each device
- 1Say whether it has a charger.
- 2Choose its condition, from A (best) to D.
- 3If needed, add a note (for example, a detail about the casing or the battery).
- 4If the device is in Tecspal storage, say whether you want it wiped.
- 5Submit the request.
What happens next?
Tecspal receives the request, reviews the devices and prepares the quote.
Track your buybacks
Check what stage each request is at.
Find the request
- 1Go to side menu → Buyback Orders.
- 2The tabs group requests by stage: waiting for a quote, ready for your approval, approved, and history.
- 3Click a request to see its devices and status.
You can also write to Tecspal from the request.
Approve or decline the quote
When Tecspal finishes the quote, we let you know with a platform notification (the bell in the side menu).
Decide
- 1Open the request.
- 2Review the total Tecspal offers for the devices.
- 3If you agree, approve the quote.
- 4If not, cancel the request. See Cancel a buyback.
What happens after you approve
Tecspal takes care of the rest.
Next steps
- If you asked for a device to be wiped, Tecspal wipes it.
- Tecspal coordinates the pickup of each device. You can follow it in Movement Requests.
- If a device has an open ticket or is in another movement, the pickup waits until that is finished.
- When it's complete, the devices are deactivated: in Hardware they show as Deactivated.
Cancel a buyback
If you don't want to go ahead with the sale, cancel the request.
Cancel the request
- 1Open the request.
- 2Cancel it and confirm.
If a device had already left, Tecspal returns it to storage.
Buyback statuses
What each stage means. The names on screen may vary slightly.
The stages
- Submitted: you sent the request.
- Processing: Tecspal is reviewing the devices.
- Quoted: the quote is ready. Approve or cancel.
- Approved: you approved the quote.
- Coordinated: Tecspal arranged the pickup.
- Done: complete. The devices are deactivated.
- Cancelled: cancelled.
Users
Who can sign in to the platform at your company and what each person can do.
- 9.1Users and Employees
- 9.2View your company's users
- 9.3Add a user
- 9.4Remove a user
- 9.5Roles
- 9.6Change a user's role
Users and Employees
They are two different things, even if they sometimes share an email.
The difference
- User: an account to sign in to the platform, with an email and password. Each user has a role that defines what they can do.
- Employee: a person at your company who receives or returns hardware. They don't sign in to the platform. See the Employees chapter.
View your company's users
Users are managed from Preferences.
Find the list
- 1At the bottom of the side menu, click your company name.
- 2Click Preferences.
- 3Scroll to Company users. There you see each user and their role.
Add a user
Give someone at your company access to the platform.
Create the user
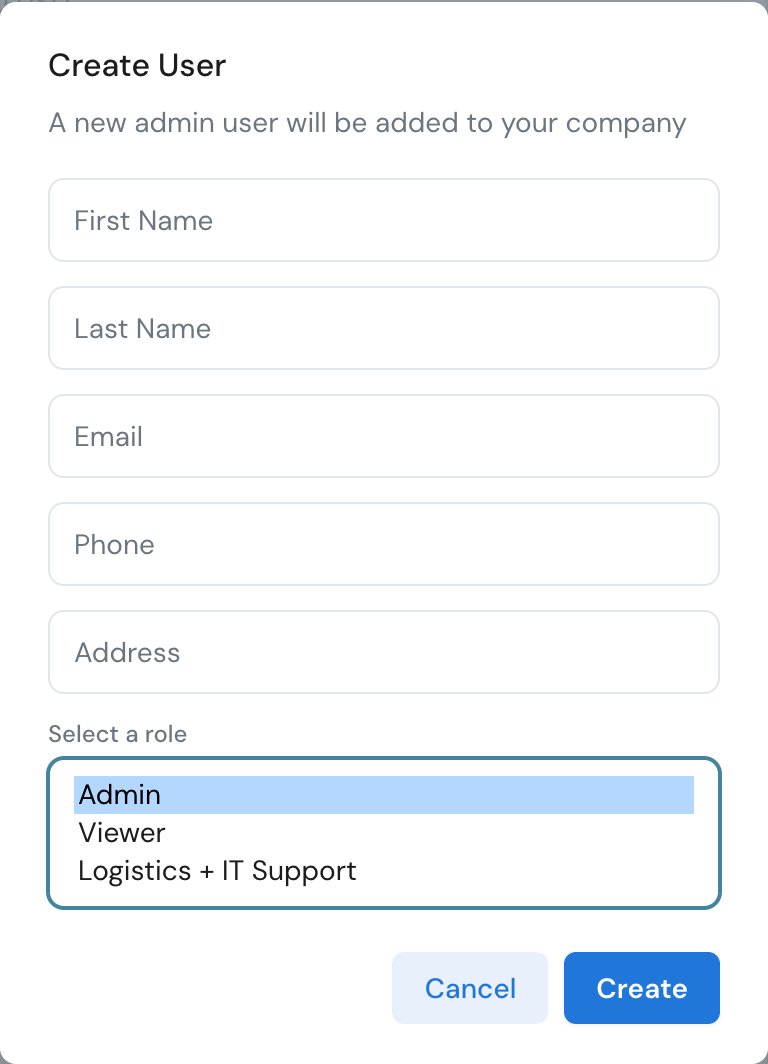
- 1In Company users, click Create new +.
- 2Fill in the first name, last name, email and, optionally, phone and address.
- 3In Select a role, choose Admin, Viewer or Logistics + IT Support. See Roles.
- 4Click Create.
The person gets an email with their password. Suggest they change it the first time they sign in: Preferences → Profile → Change password.
Remove a user
When someone no longer needs to sign in to the platform.
Remove access
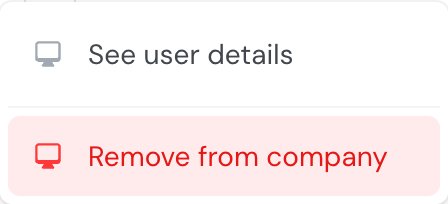
- 1In Company users, open the user's ⋮ menu. You can also click See user details there.
- 2Click Remove from company and confirm.
The person can no longer sign in. Anything they created (orders, movements, tickets) stays as it is. If you removed someone by mistake, ask your account manager to add them back.
Roles
Each user has one role. Choose the one that matches what that person needs to do.
The three roles
- Admin: manages everything for your company on the platform. It's the role for whoever orders hardware, approves quotes and manages users.
- Logistics + IT Support: for whoever handles day-to-day hardware: registers it, moves it and requests IT support. They can view everything else, but don't order new hardware or approve quotes.
- Viewer: view only. They can check orders, hardware, Employees, movements, tickets and buybacks, but can't change anything.
If you're not sure which role to give someone, ask your account manager.
Change a user's role
Tecspal changes a user's role.
Ask for the change
- 1Write to your account manager with the user's email and the new role.
- 2Once Tecspal changes it, the user needs to log out and sign in again to see their new permissions.
Company settings
Your company details used by orders and billing, and your email notifications.
- 10.1Where the settings are
- 10.2Legal entities
- 10.3ABM codes
- 10.4Your company catalog
- 10.5Your profile and password
- 10.6Email notifications
Where the settings are
Everything is set up from Preferences.
Open Preferences
- 1At the bottom of the side menu, click your company name.
- 2Click Preferences.
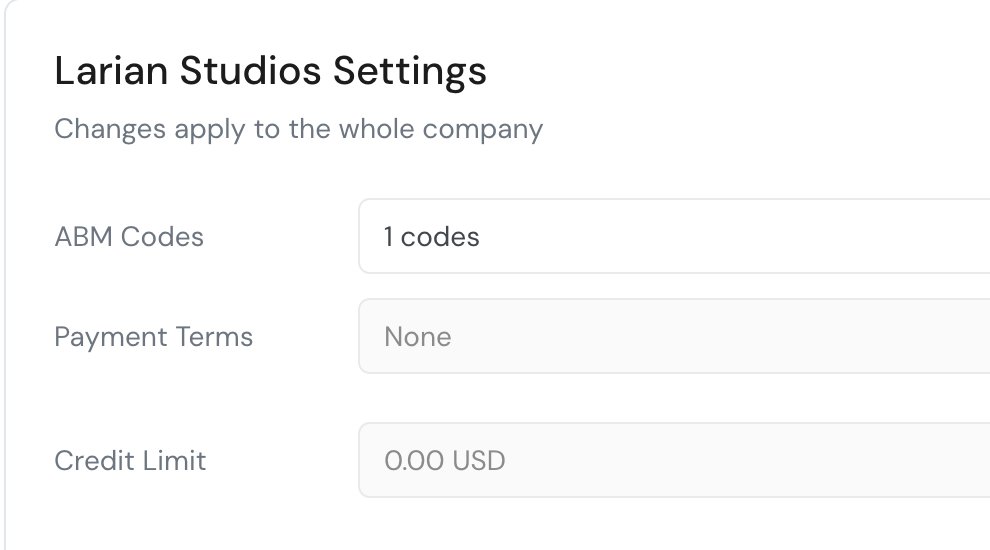
At the top you see your company settings: ABM codes, payment terms and credit limit. Tecspal sets the payment terms and credit limit; if you have questions, ask your account manager.
Legal entities
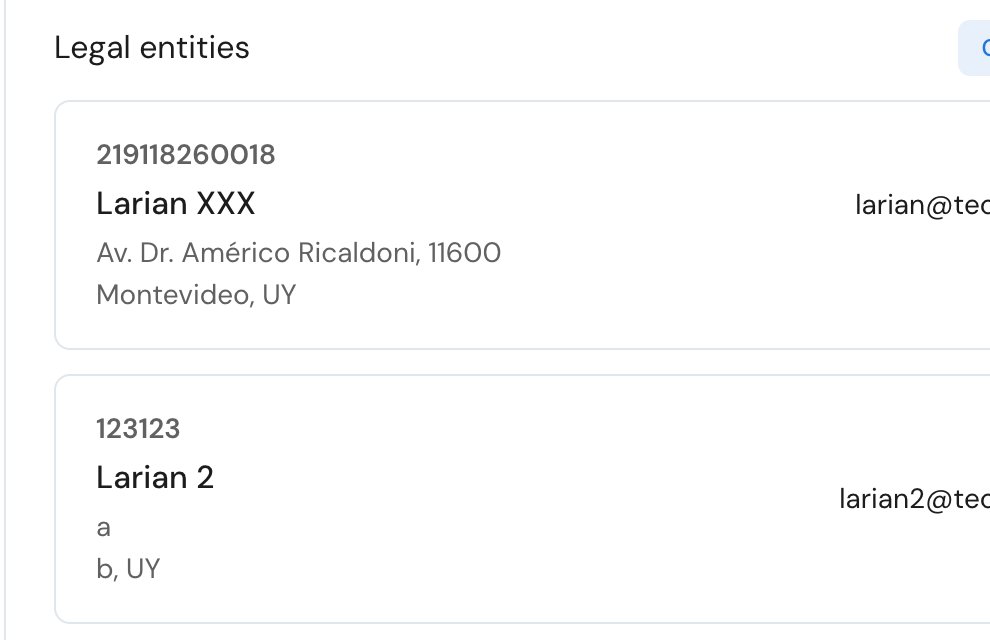
These are the details Tecspal uses to invoice your company: legal name, country, tax ID, billing address and billing email.
Add an entity
- 1In Preferences, go to Legal entities.
- 2Click Create new +.
- 3Fill in the billing details.
- 4Save.
You choose the entity when creating an order or accepting the quote. To correct or delete an entity, or to choose which one is used by default, ask your account manager.
ABM codes
If your company uses Apple Business Manager, add its codes so Macs arrive enrolled.
Manage the codes
- 1In Preferences, next to ABM Codes, click Manage.
- 2Add or review your company's codes.
- 3Save.
When you order a Mac with ABM Enrollment, you choose the code when you accept the quote. See Accept the quote.
Your company catalog
Choose the models your company orders often, so you can find them faster.
Build your catalog
- 1In Preferences, under Catalog, click Manage.
- 2Choose the models.
- 3Save.
When creating an order, Pick a model opens on Our catalog with those models. You can still see every model in All models.
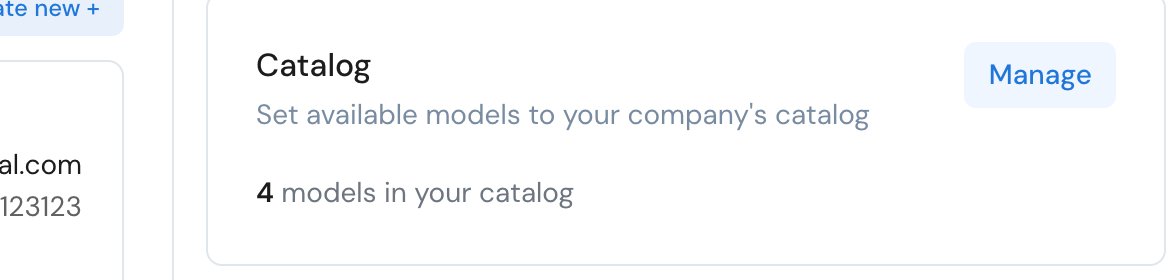
Your profile and password
Your personal details and access.
Update your details
- 1In Preferences, under Profile, click Edit to change your first or last name.
- 2To change your password, click Change password.
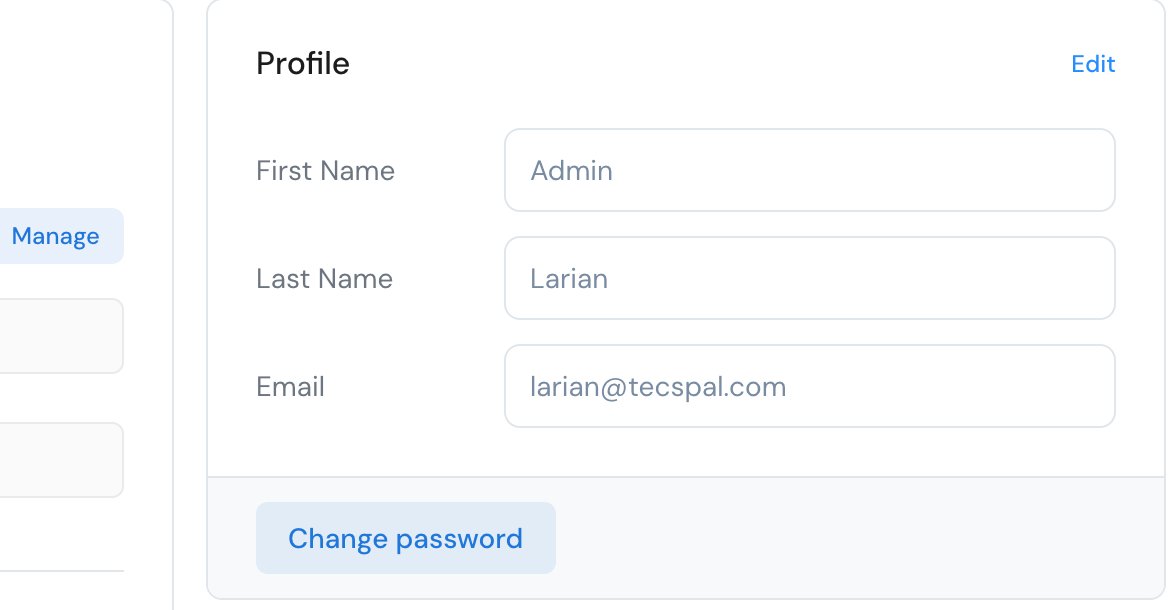
Email notifications
Choose which platform emails you want to receive.
Choose your notifications
- 1In Preferences, go to notifications.
- 2Turn off the emails you don't want: orders (created, status changes, delivered, messages, ETA), movements (created, status changes, completed, messages) and tickets (status changes, completed, messages).
Each user chooses their own notifications. This doesn't change bell notifications or the WhatsApp messages Employees receive.
Status glossary
What each status you see on the platform means.
- 11.1Order statuses
- 11.2Where a device is
- 11.3Employee statuses
- 11.4Movement statuses
- 11.5Support ticket statuses
- 11.6Buyback statuses
Orders
- Pending: you sent the request and Tecspal is preparing the quote.
- Quoted: the quote is ready for you to accept or cancel.
- Accepted: you accepted the quote.
- Coordinating: Tecspal is buying the hardware and arranging the delivery.
- Coordinated: the delivery is arranged and has an estimated date (ETA).
- Delivered: the hardware arrived. It now appears in Hardware.
- Splitted: a quote-only order was split into several, one per destination.
- Cancelled: the order was cancelled.
Where a device is
You see it in Currently at, in the device details.
Hardware
- Employee: a person at your company has it.
- Office: it is at one of your Offices.
- Storage: it is kept in Tecspal storage.
- In service: it is being repaired or serviced.
- Buyback: it is being sold to Tecspal.
- Deactivated: it was deactivated after a buyback.
Each device can also be marked as new or used, wiped, and damaged.
Employees
- Active: the person is at your company and can receive hardware.
- Deactivated: the person has left. They don't appear when creating orders or movements, but their details and history are kept.
Movements
- Processing: Tecspal received the request.
- Coordinated: Tecspal coordinated with the Employee.
- Picked up: Tecspal picked up the device.
- Done: the device arrived and its location was updated.
- Cancelled: the movement was cancelled.
- Blocked: Tecspal put it on hold. Ask your account manager.
Support tickets
- Processing: Tecspal received the ticket.
- Customer pending: Tecspal is waiting for something from you. Check the comments.
- Diagnostic ready: the diagnosis and price are ready. Approve or cancel.
- In repair: the device is being repaired.
- Repair done: the repair is finished. Tecspal returns the device.
- Done: Tecspal closed the ticket.
- Cancelled: the ticket was cancelled.
Buyback statuses
See also Track your buybacks. The names on screen may vary slightly.
Buyback
- Submitted: you sent the request.
- Processing: Tecspal is reviewing the devices.
- Quoted: the quote is ready.
- Approved: you approved the quote.
- Coordinated: Tecspal arranged the pickup.
- Done: complete. The devices are deactivated.
- Cancelled: cancelled.
Manual for the client Admin · tecspal.com